

![[Gallery] Mecum Kissimmee Auction 2026](https://www.racingjunk.com/news/wp-content/uploads/2026/03/DSC_0717-e1774629242515-376x206.jpg)
![[Gallery] Cruisin’ One Daytona](https://www.racingjunk.com/news/wp-content/uploads/2026/03/DSC_0538-e1774027057404-376x206.jpg)

How to Mount Fuel Components: Working With Difficult-To-Mount Components
When many aftermarket manufacturers build a “fits-all” universal” part, they really have no idea what your application may be. It’s up to you to figure out how to mount the component. Common examples of these fits-all pieces might be fuel filters, fuel pumps, accumulators and so on. Essentially, you’re forced to work out the mounting process. And that’s exactly what this article is all about. I’ll show you a super cool mounting arrangement I worked out. You can copy it to mount a fuel filter or in-line fuel pump or (in larger scale) an oil accumulator or any other tough to install cylindrical component. Here’s how it works:
Figuring Out The Location…
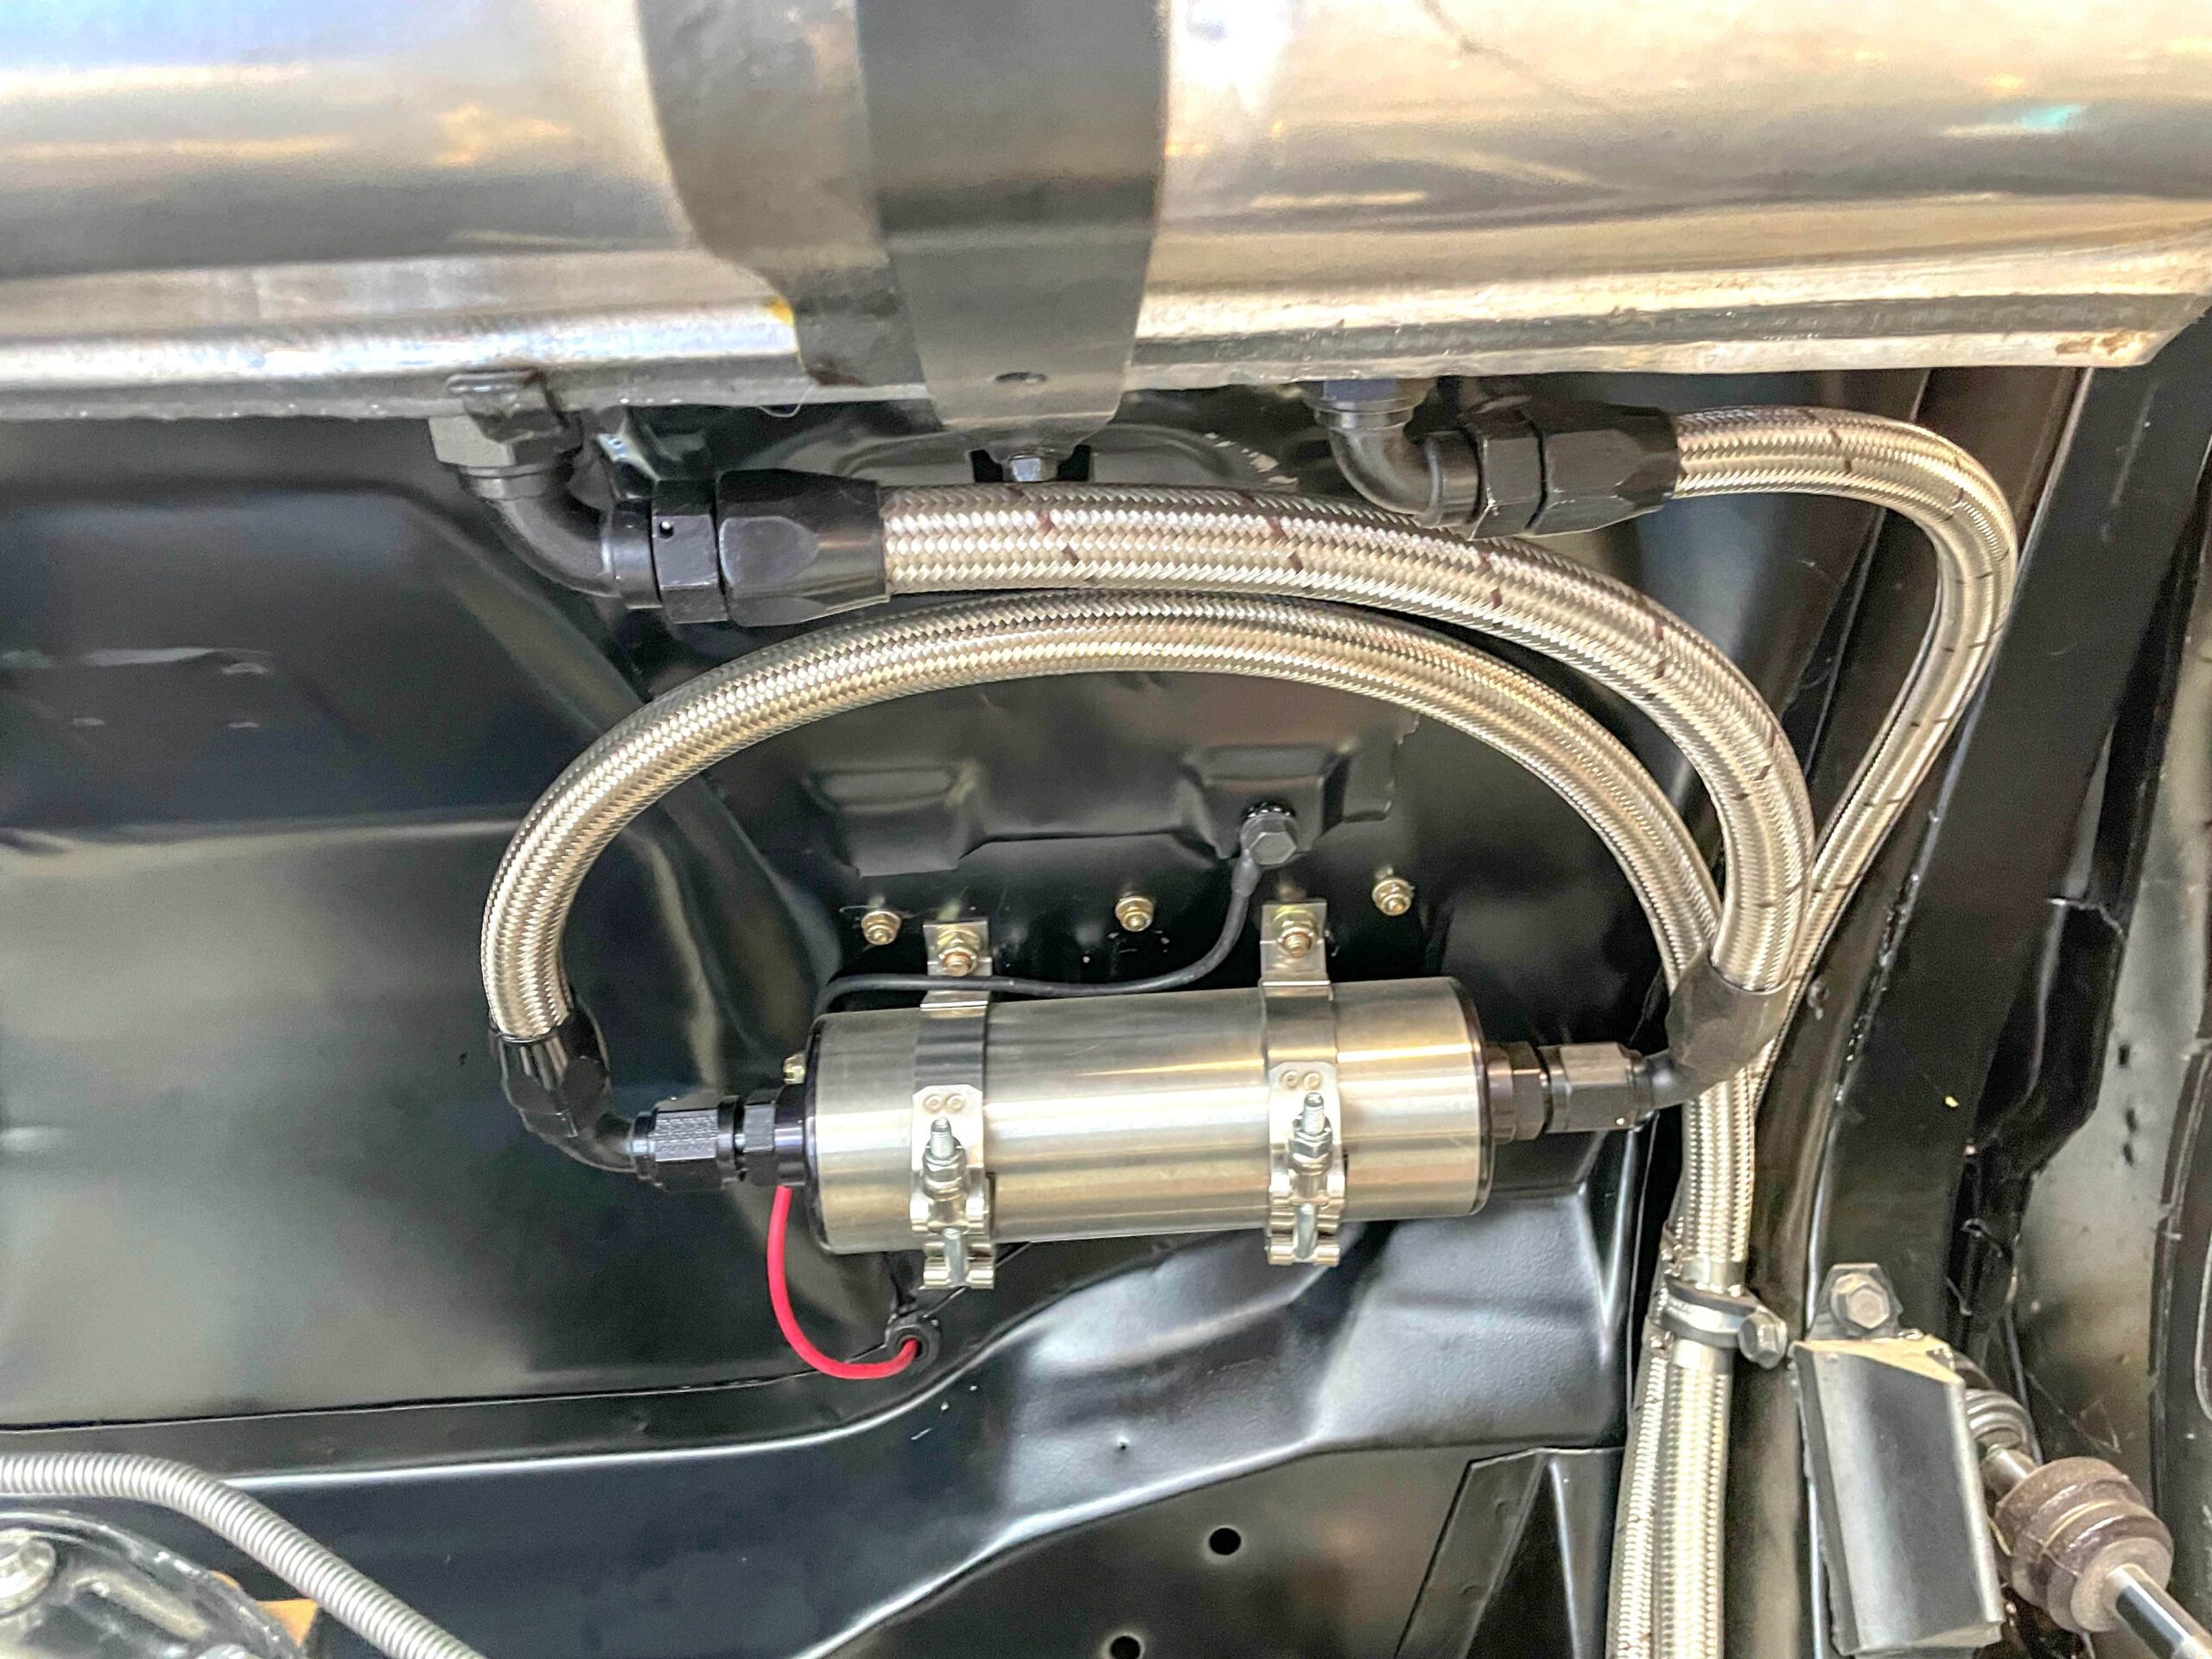
Items such as fuel pumps and filters are critical, that’s a given. They can’t be near a heat source, they require robust mounts and they obviously must be installed in such a way that they are efficient (for example, many fuel pumps cannot self-prime). Additionally, you can’t mount a fuel pump or filter below the scrub line. The last thing you need is a fuel system component becoming vulnerable when it comes to the road and regular road debris.
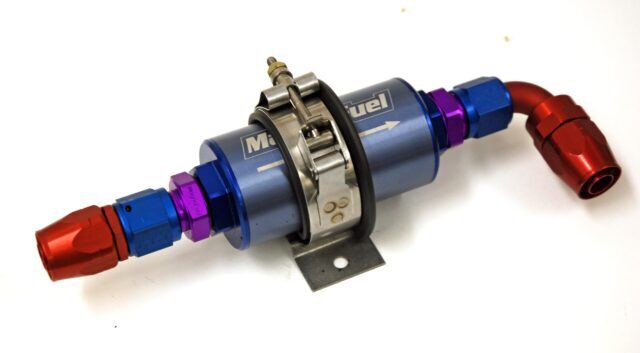
Once I have a location for the hardware more or less determined, I always dummy up some of the hoses required for the application. While hoses and plumbing are beyond the scope of this article, you’ll need something that requires a lot of flow and little restriction. Here, I use bent tube or straight fittings everywhere (no hard 90-degree “forged” bends). Bent tube fittings in 90’s and 45’s aren’t the smallest items in the world (you can see the setup in the first photo). Neither is the bend radius mandated by a straight hose end/hose combination in -8 and -10 sizes. FYI, “bend radius” is the amount of bend a specific hose will accept before it collapses or the hose reinforcement (braid) is damaged.
None-the-less, either use a partial hose/hose end combination or a basic hose end fitting mounted on each of the pump’s inlet, outlet and bypass ports when you dummy it up. In my case, I figure out how much room the pump with hose attached requires, and then I mark the car for eventual placement. Simultaneously, I figure out where the filter(s) mounts. I use the same strategy of adding the appropriate hose and hose ends to the mix before I nail down a mounting point.
Once all of the tentative mounting locations are determined, I spend a bit of time under the car, working out the scenarios for scrub line clearance. If you’re not familiar with the term, “scrub line” is the point where something on the car can drag if one or more tires go flat. It’s important. You really don’t want something like a fuel line dragging on the ground if a tire goes down. Another big issue is heat. The exhaust has to go somewhere but the best bet is to have it routed and directed where the fuel system isn’t located.
Figuring Out The Mounts…
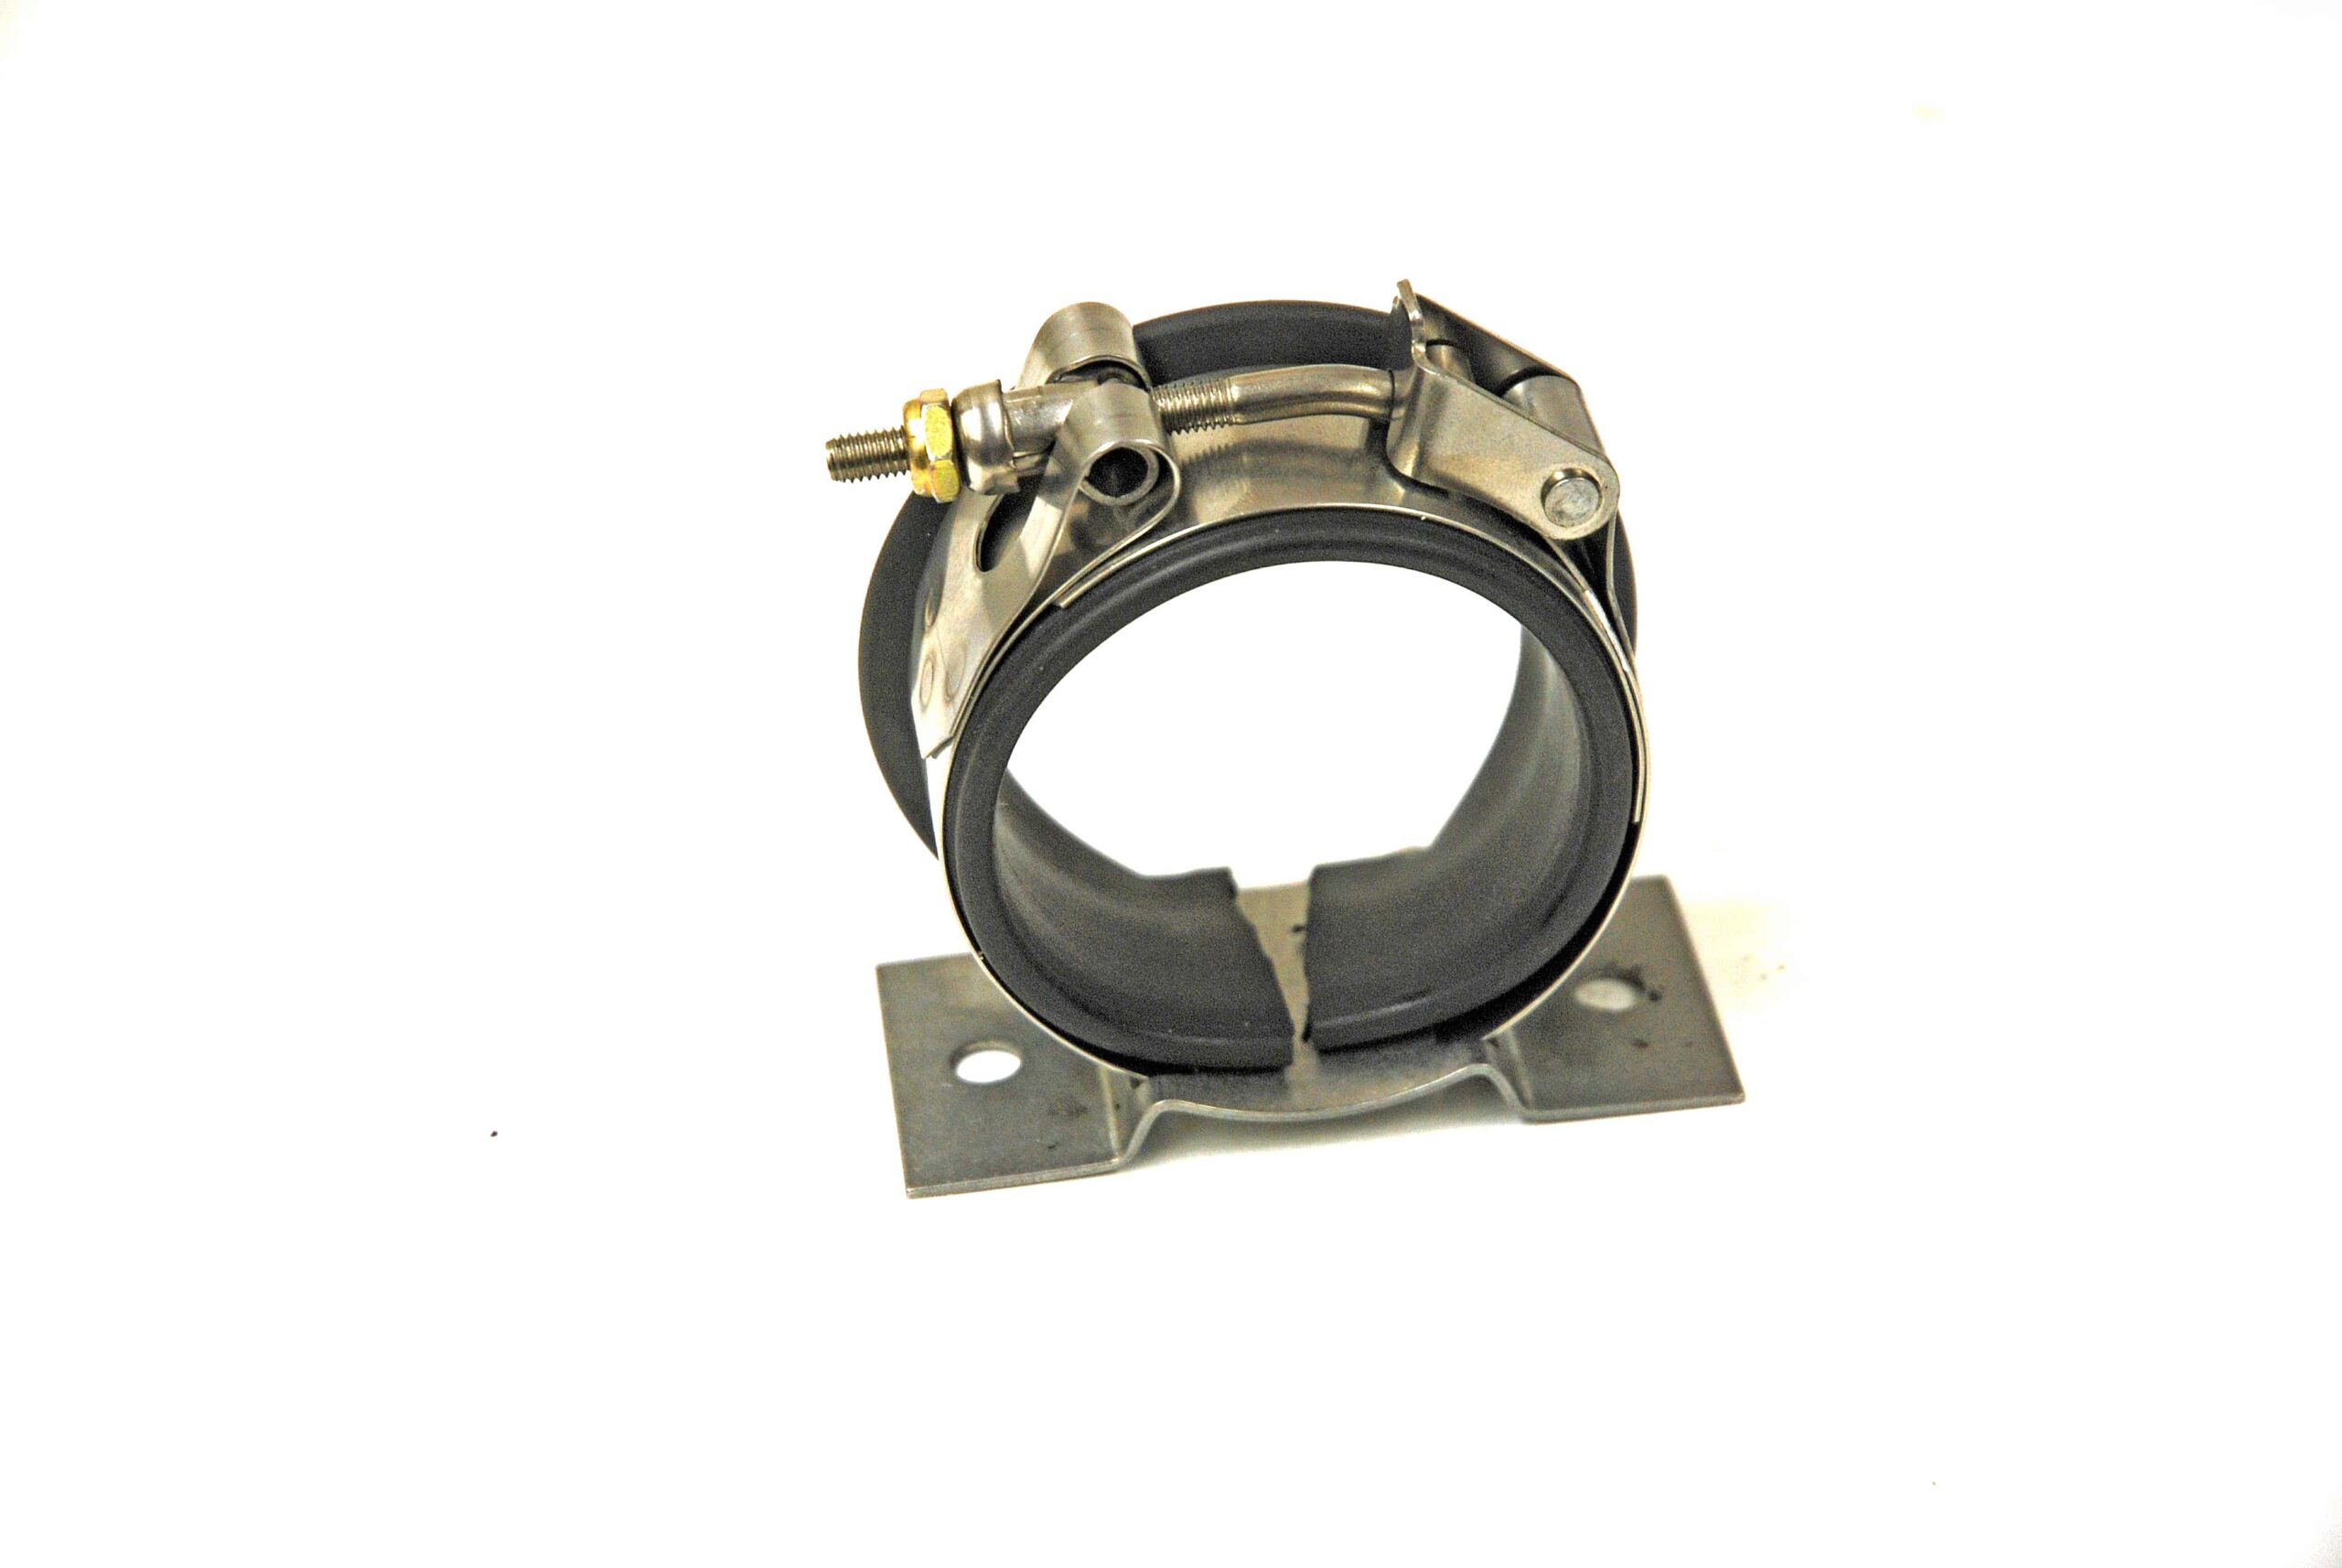
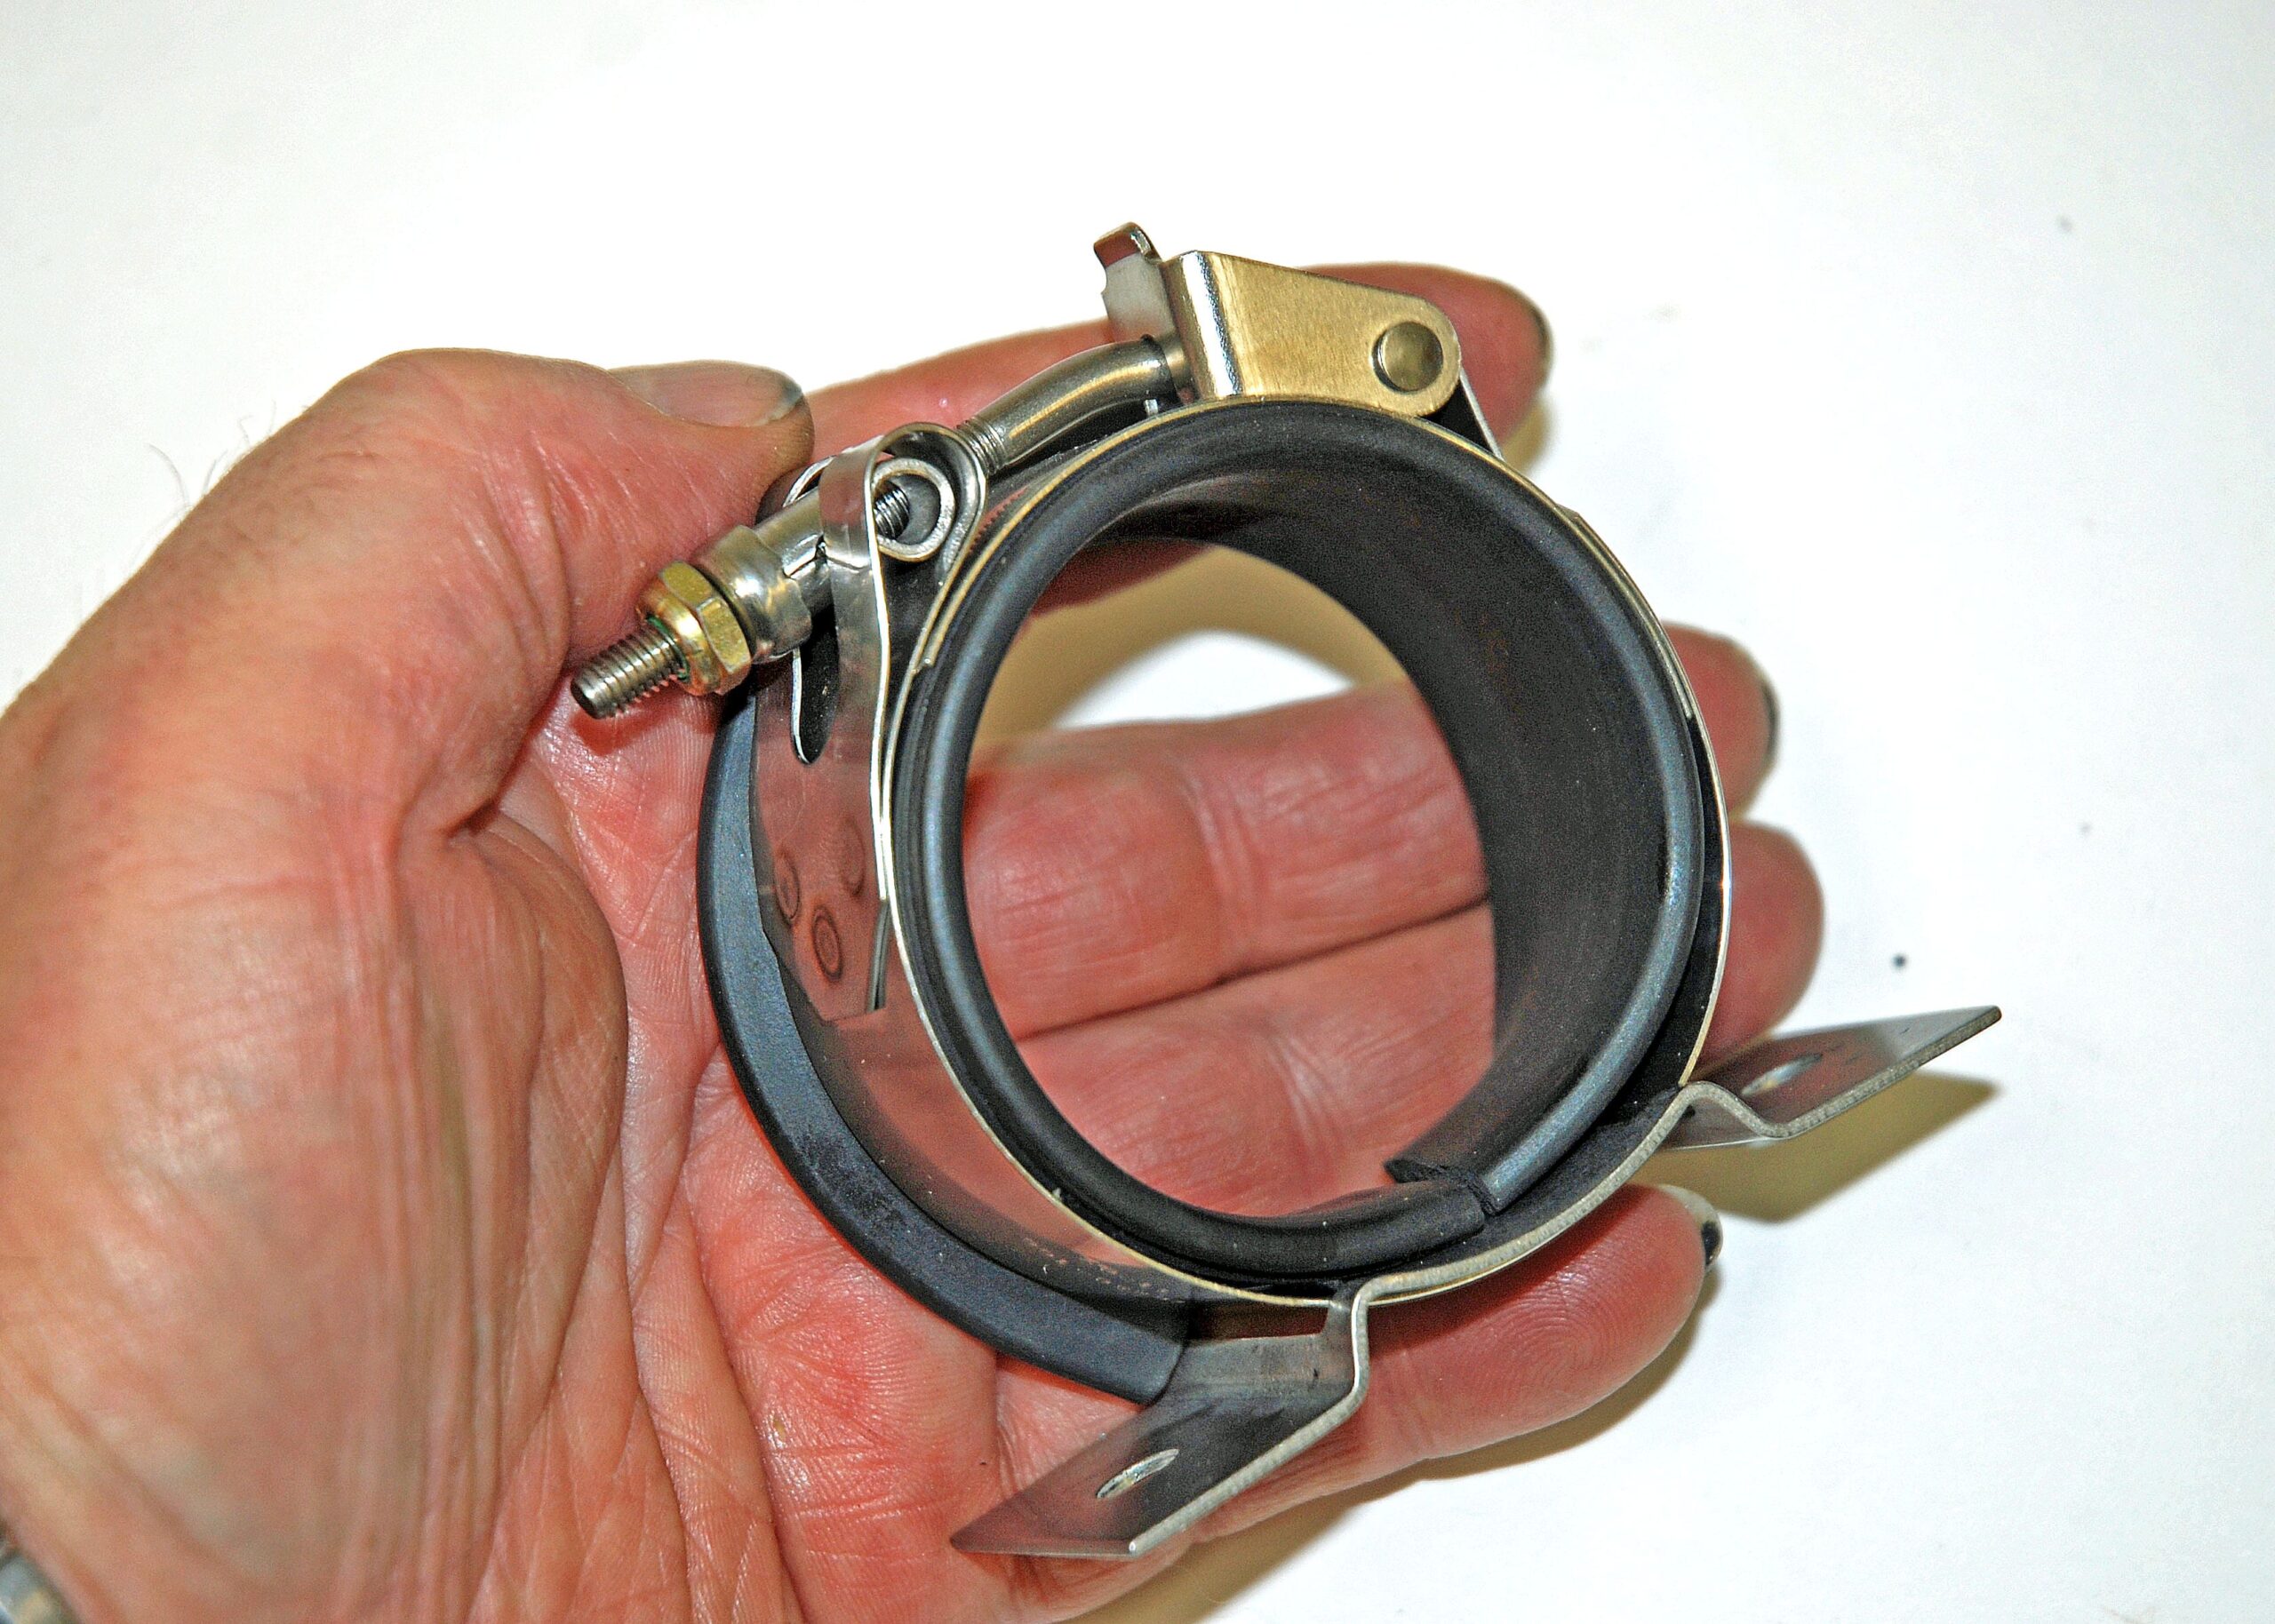
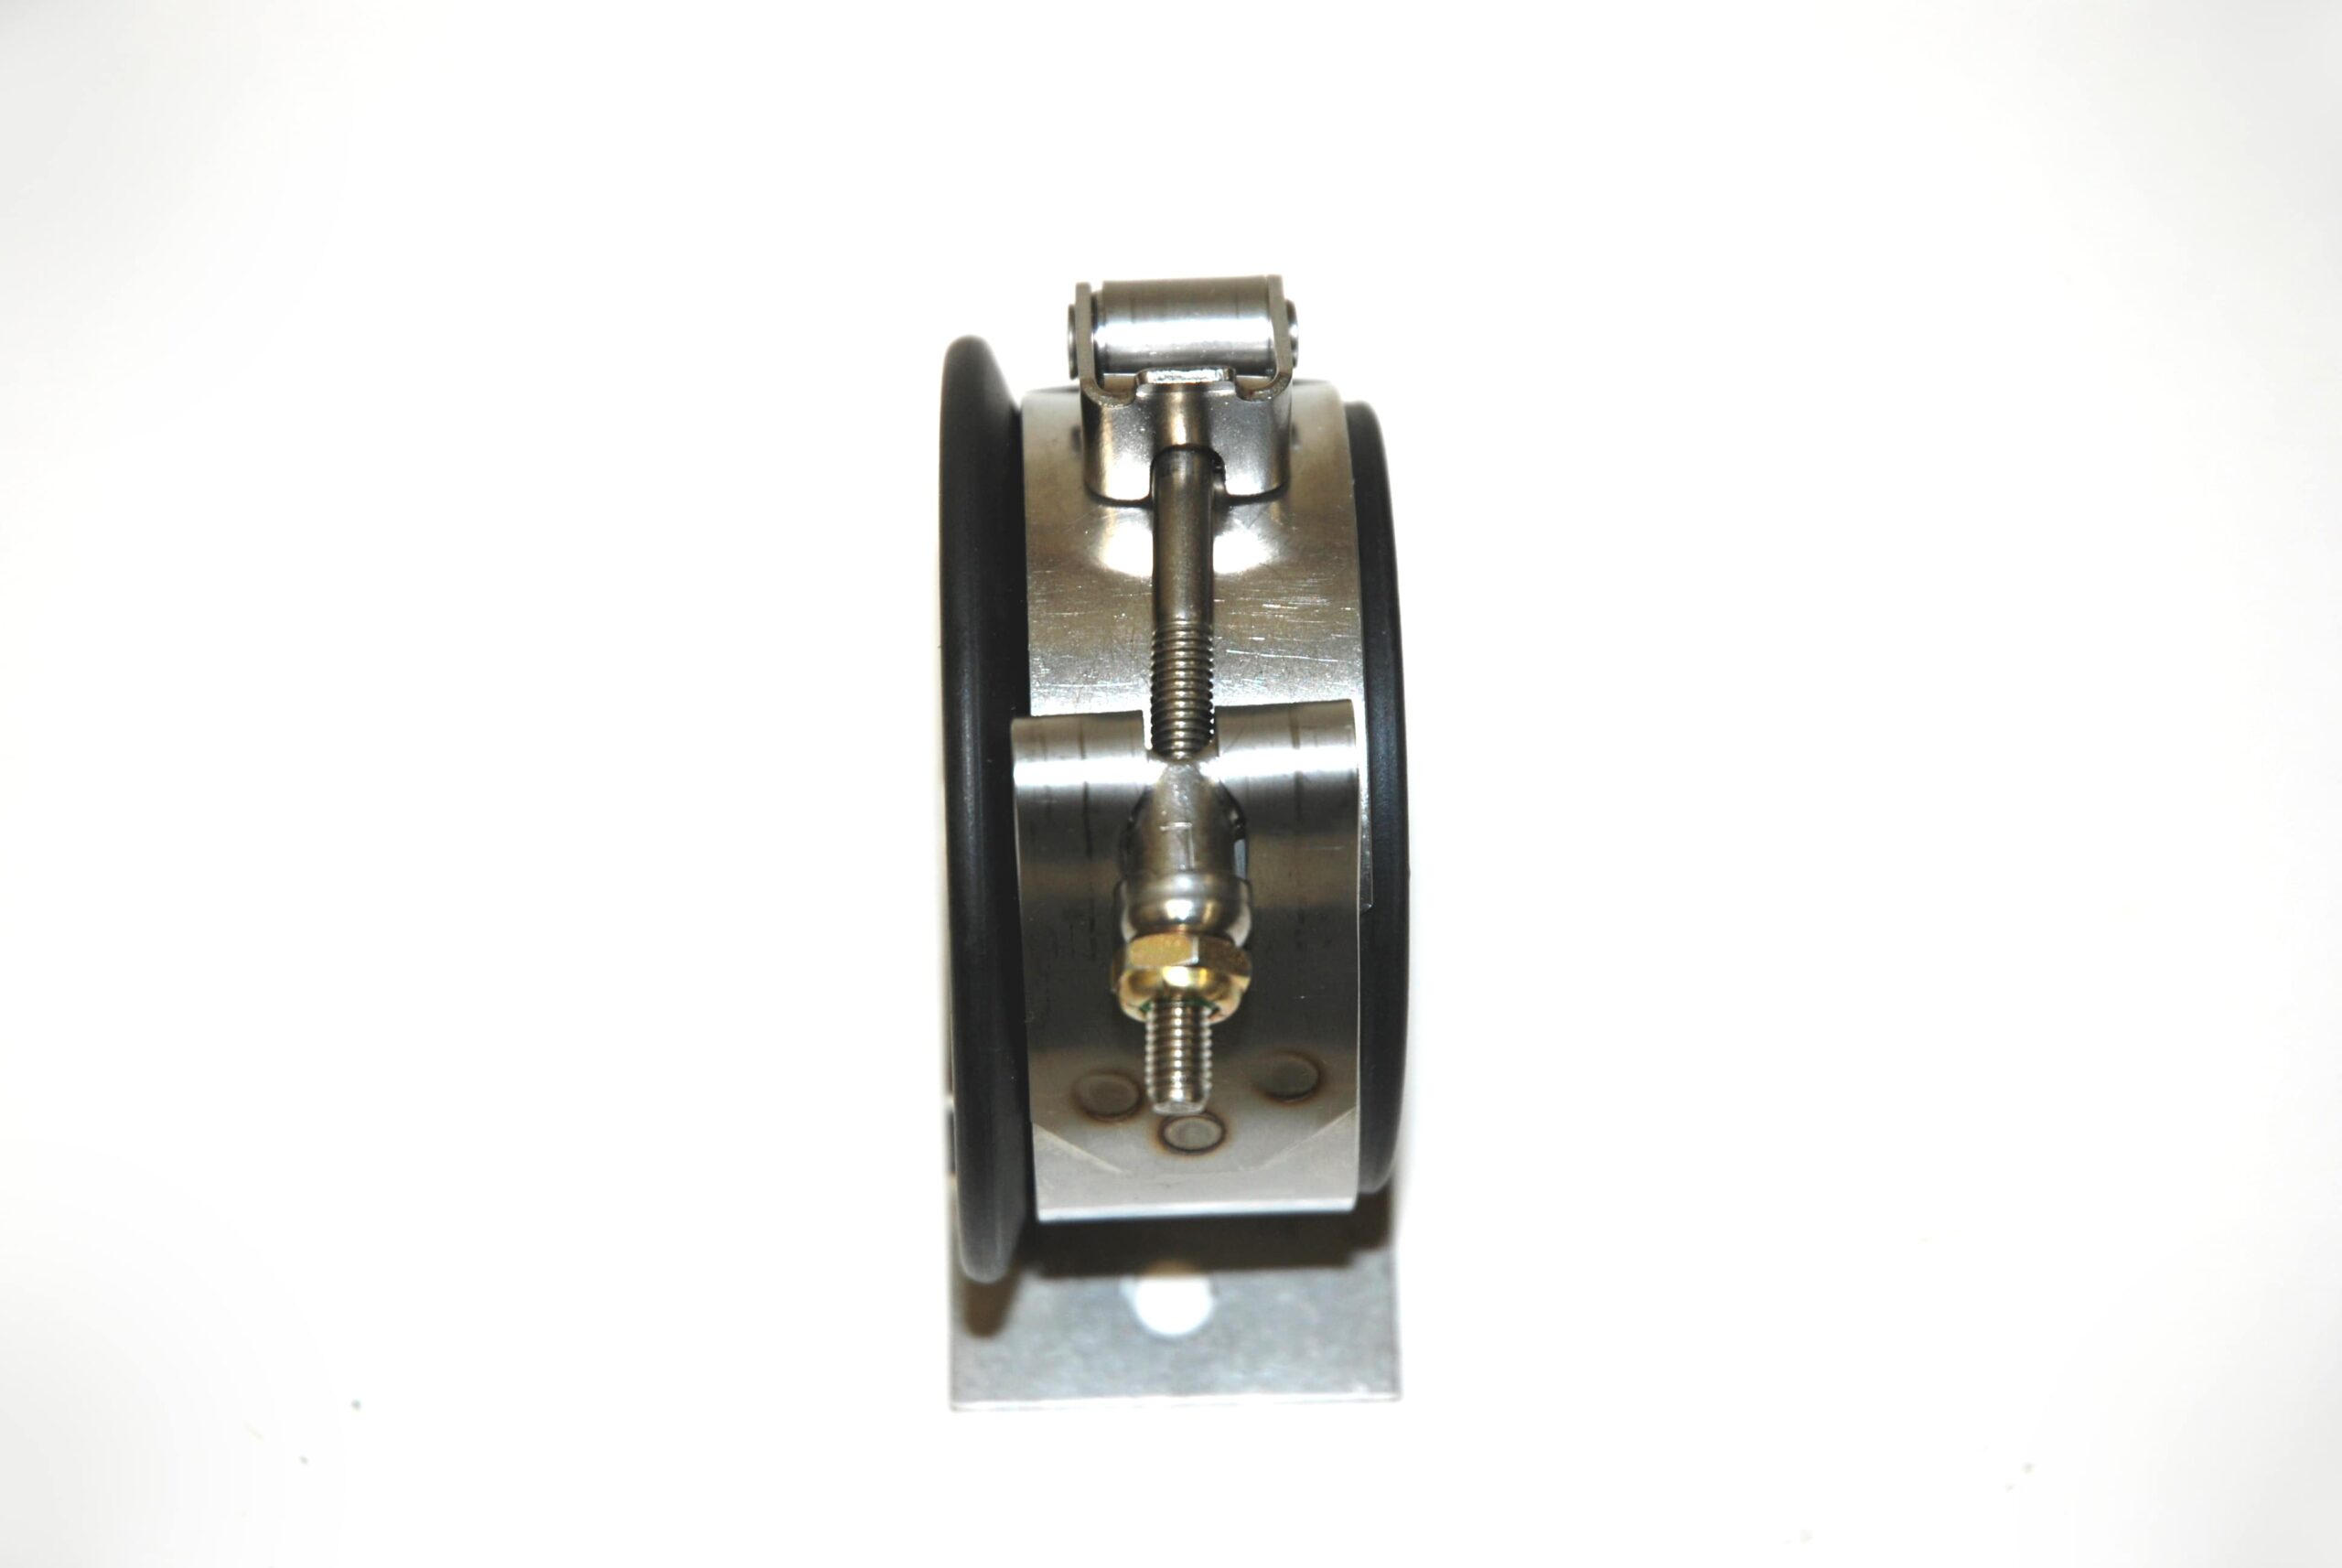
Often, the universal mount supplied with a specific part either doesn’t fit the application or there is no mount included with the part (or, the mount is just butt-ugly). Case-in-point is a fuel filter. I like clean mounts (as in simple and effective). I also like to see something that provides easy access; something that proves easy to bolt into place and simultaneously offers a simple means to remove the filter when it required servicing. My solution is to modify a clamp from an aircraft fuel pump for the application.
Aircraft Spruce sells a mounting bracket for Weldon aircraft fuel pumps (Aircraft Spruce part number 05-00021). It’s a T-bolt configuration complete with a mounting bracket. It’s manufactured from stainless steel and is engineered to withstand considerable vibration. The quick release T-bolt is setup to rotate within the mount bracket so that you can access the quick release in any number of mount locations. Bottom line? It’s perfect as an automotive fuel filter mount (or for a mount for any other similarly sized cylindrical component – obviously it can be used for some fuel pumps too).
The clamp is setup to accept 2-1/2-inch diameter fuel pump bodies. The high quality MagnaFuel filters I use measure just over 2-1/8-inch in diameter. While the aircraft band clamp is adjustable and can take up some of the difference, it can’t shrink a full 3/8-of an inch. Solution? It’s simple: Install a band of rubber inside the clamp. Not only does it work (very well), it also soaks up any vibration transmitted by way of the fuel fuel pump.
For a closer look, check out the accompany photos. And by the way, there are a number of clamps and mount arrangements found in the huge Aircraft Spruce catalog that can find uses in custom race and street applications.
Figuring Out The Location…
Items such as fuel pumps and filters are critical, that’s a given. They can’t be near a heat source, they require robust mounts and they obviously must be installed in such a way that they are efficient (for example, many fuel pumps cannot self-prime). Additionally, you can’t mount a fuel pump or filter below the scrub line. The last thing you need is a fuel system component becoming vulnerable when it comes to the road and regular road debris.
Once I have a location for the hardware more or less determined, I always dummy up some of the hoses required for the application. While hoses and plumbing are beyond the scope of this article, you’ll need something that requires a lot of flow and little restriction. Here, I use bent tube or straight fittings everywhere (no hard 90-degree “forged” bends). Bent tube fittings in 90’s and 45’s aren’t the smallest items in the world (you can see the setup in the first photo). Neither is the bend radius mandated by a straight hose end/hose combination in -8 and -10 sizes. FYI, “bend radius” is the amount of bend a specific hose will accept before it collapses or the hose reinforcement (braid) is damaged.
None-the-less, either use a partial hose/hose end combination or a basic hose end fitting mounted on each of the pump’s inlet, outlet and bypass ports when you dummy it up. In my case, I figure out how much room the pump with hose attached requires, and then I mark the car for eventual placement. Simultaneously, I figure out where the filter(s) mounts. I use the same strategy of adding the appropriate hose and hose ends to the mix before I nail down a mounting point.
Once all of the tentative mounting locations are determined, I spend a bit of time under the car, working out the scenarios for scrub line clearance. If you’re not familiar with the term, “scrub line” is the point where something on the car can drag if one or more tires go flat. It’s important. You really don’t want something like a fuel line dragging on the ground if a tire goes down. Another big issue is heat. The exhaust has to go somewhere but the best bet is to have it routed and directed where the fuel system isn’t located.
Figuring Out The Mounts…
Often, the universal mount supplied with a specific part either doesn’t fit the application or there is no mount included with the part (or, the mount is just butt-ugly). Case-in-point is a fuel filter. I like clean mounts (as in simple and effective). I also like to see something that provides easy access; something that proves easy to bolt into place and simultaneously offers a simple means to remove the filter when it required servicing. My solution is to modify a clamp from an aircraft fuel pump for the application.
Aircraft Spruce sells a mounting bracket for Weldon aircraft fuel pumps (Aircraft Spruce part number 05-00021). It’s a T-bolt configuration complete with a mounting bracket. It’s manufactured from stainless steel and is engineered to withstand considerable vibration. The quick release T-bolt is setup to rotate within the mount bracket so that you can access the quick release in any number of mount locations. Bottom line? It’s perfect as an automotive fuel filter mount (or for a mount for any other similarly sized cylindrical component – obviously it can be used for some fuel pumps too).
The clamp is setup to accept 2-1/2-inch diameter fuel pump bodies. The high quality MagnaFuel filters I use measure just over 2-1/8-inch in diameter. While the aircraft band clamp is adjustable and can take up some of the difference, it can’t shrink a full 3/8-of an inch. Solution? It’s simple: Install a band of rubber inside the clamp. Not only does it work (very well), it also soaks up any vibration transmitted by way of the fuel fuel pump.
For a closer look, check out the accompany photos. And by the way, there are a number of clamps and mount arrangements found in the huge Aircraft Spruce catalog that can find uses in custom race and street applications.
Leave a Reply