


![[Gallery] Street Rodders for Life Memorial Day Car Show](https://www.racingjunk.com/news/wp-content/uploads/2026/06/Memorial-day-show_0198-376x206.jpg)
![[Gallery] Townsman Car Show](https://www.racingjunk.com/news/wp-content/uploads/2026/05/916_2843-e1780072552171-376x206.jpg)

How to Prep For Your Project Car Part 1
Click Here to Begin Slideshow
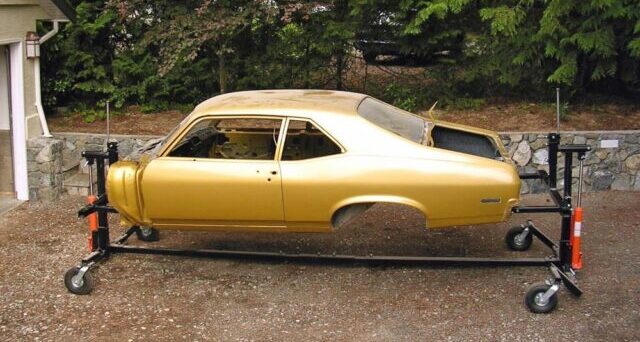
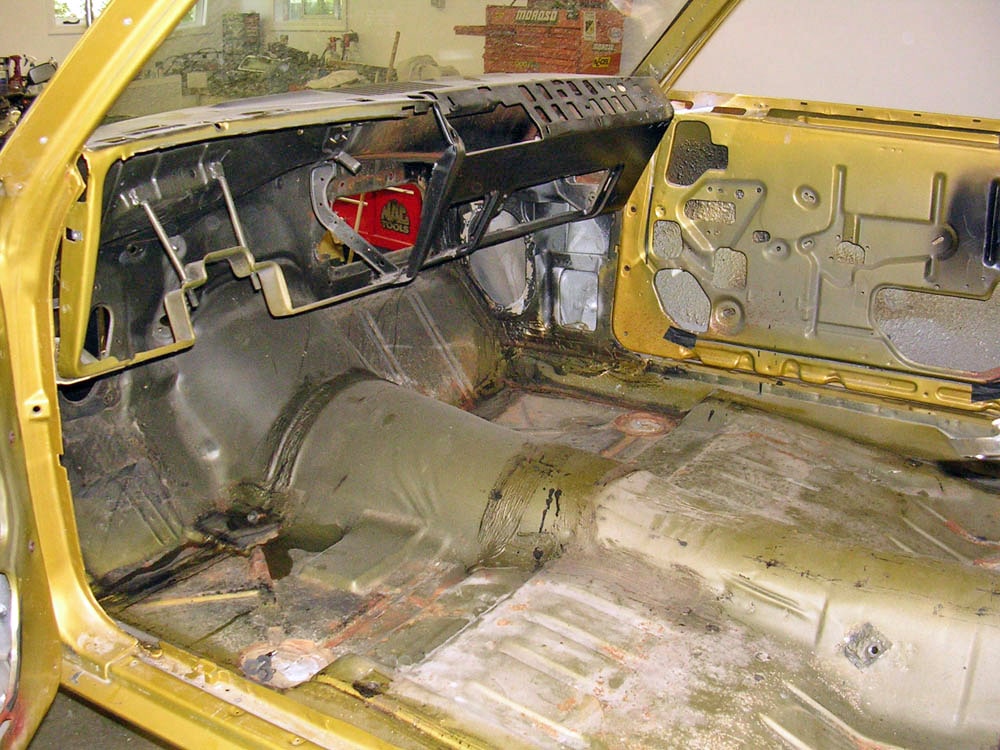
Don’t you wish you could go down to the used car lot and pick up the exact car you want, with the right color along with the right trim? It needs no paintwork, it has few miles on the clock and underneath, and the thing is spotless. Working on it is, well, perfect. After all, it’s a perfect world. Right? For most of us that’s just Fantasyland. In the real world, your project car most certainly won’t be exactly what the doctor ordered. You can bet you bottom dollar, when you’re starting from scratch, it will have to go to either a chassis shop or a body shop. And before it goes there, it’s going to need work (in some cases, extensive work).
When the time comes to restore a car, or to construct something like a quality drag race car, the likelihood of stripping and cleaning the shell is pretty high. If the car in question isn’t stripped and cleaned, you can rest assure the chassis shop or the body shop punch card (with your name on it) will be busy. You see, most professional car builders (chassis or body) demand a clean shell. If it's not clean, they'll perform the dirty work and pass the expenses on to you-know-who. In some cases, there might be 100-200 hours required to strip and clean a car. Factor in a shop rate of $80 to $100+ per hour and you can see costs can prove to be epic.
There are a number of options when it comes to prepping your project car. It’s not a big stretch to call a tow truck and drag your project shell to the local paint stripper and have them peel off the exterior finish, but in many of those cases, a total disassembly of the vehicle isn't really required. You might not want to remove the glass, doors and other hardware. Each method of removing the finish from an automobile has its drawbacks (stripping media cleanup, chemicals lurking in body crevices and so on). Finally, some cars really don't need the exterior sheetmetal "laundered" at all -- just the undercarriage needs attention.
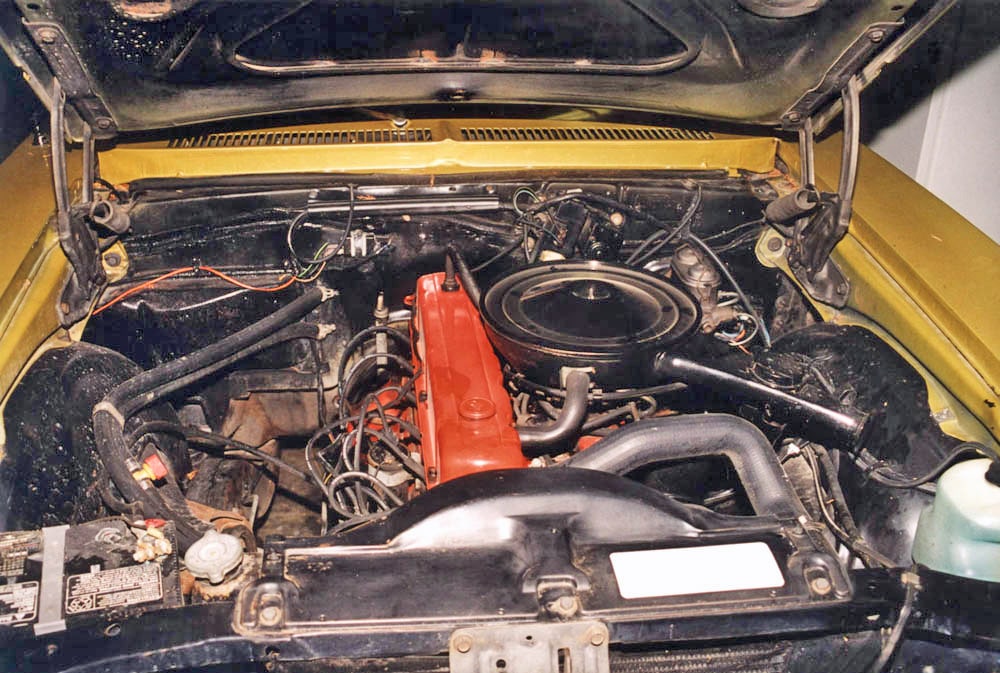
No matter what direction you take, how do you get a real grip on the cleanup? It’s pretty simple actually. You just have to get down and dirty. Before you begin sanitizing, remove anything flammable. Most chassis shops mandate the complete fuel system be removed, along with the exhaust system, brake lines and the interior (good body shops appreciate that too). Remove the vehicle electrical system, including the battery. In addition, some items like gas charged shock absorbers should be taken out (they can explode if heated excessively), and if you're working with a late model vehicle, disarm or remove the air bags. A word of caution here: Use extreme care in removing the air bag system. Buy a factory service manual and follow it to the letter. Sudden air bag discharges tend to be both violent and hot. You don’t want to be in the neighborhood if one goes off accidentally.
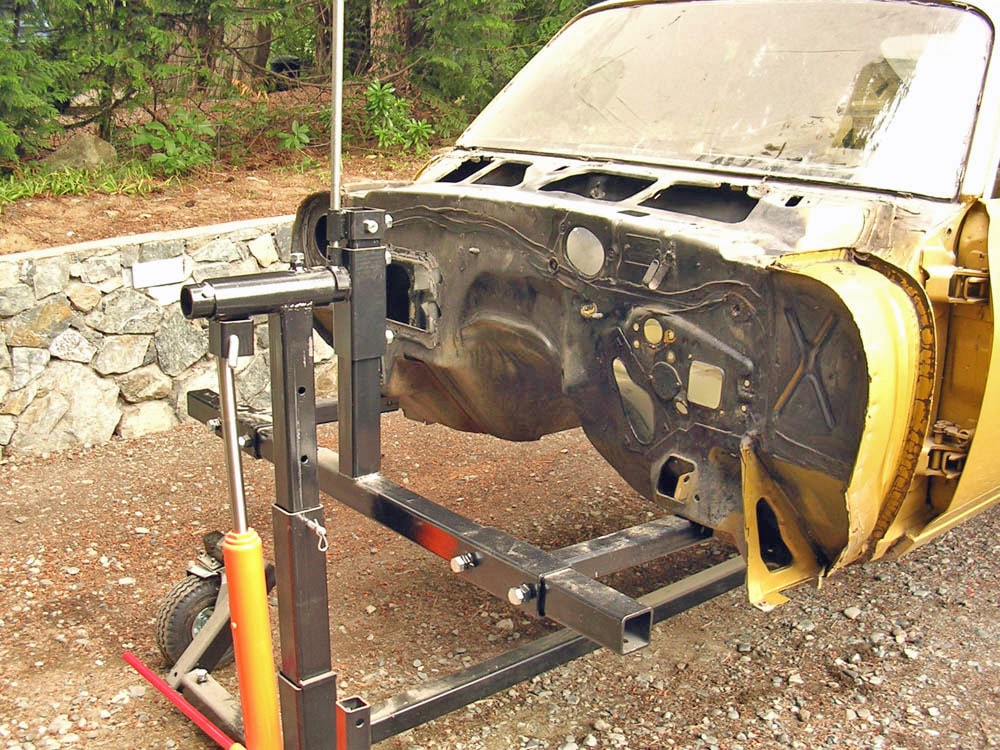
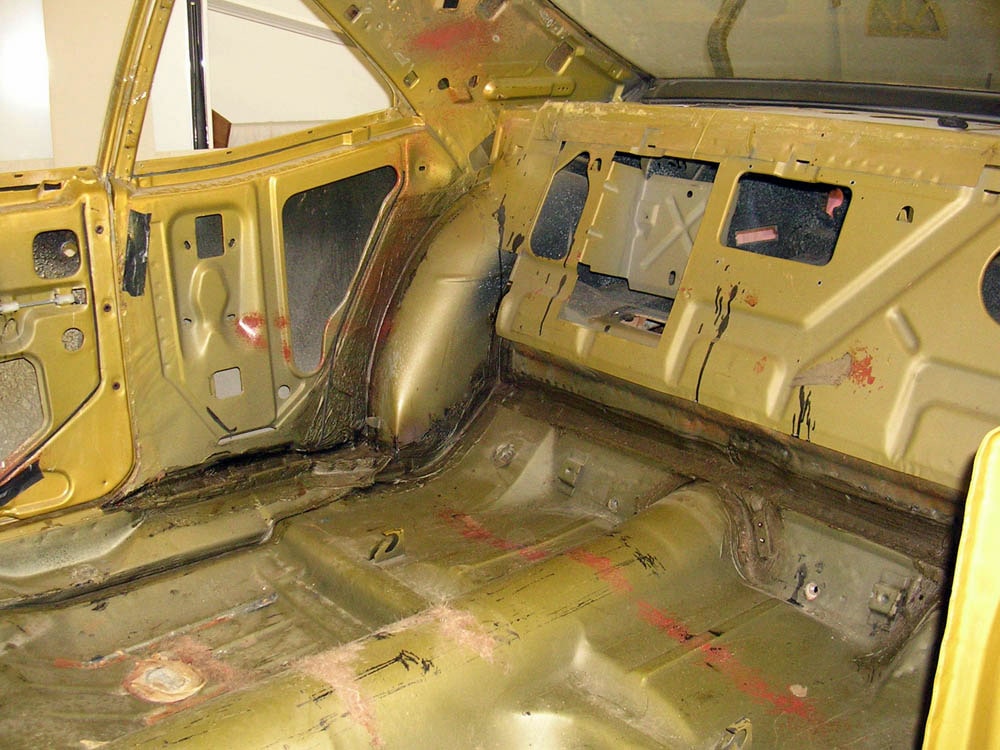
There’s more too: Some cleaners give off ugly fumes and worse yet, the residue from cleaning can turn the floor of your shop into a disgusting cesspool of a mess. Because of this, the best place to clean a chassis is outdoors. At this point, it's also a good idea to slide a 4X8' sheet of plywood under the car. Some of the cleaners used can raise havoc with concrete or asphalt driveways. If you're working on gravel or good old-fashioned Mother Earth, then the plywood sheet makes life a whole bunch easier while you're on your back. Support the car solidly. We usually include wheel ramps on the rear and two axle stands under the nose along with an extra set of "just in case" axle stands at the front. We also keep a floor jack and a healthy fire extinguisher within arm's reach. On the other hand, if you’re fortunate enough to have a rotisserie, then the drudgery is significantly simplified.
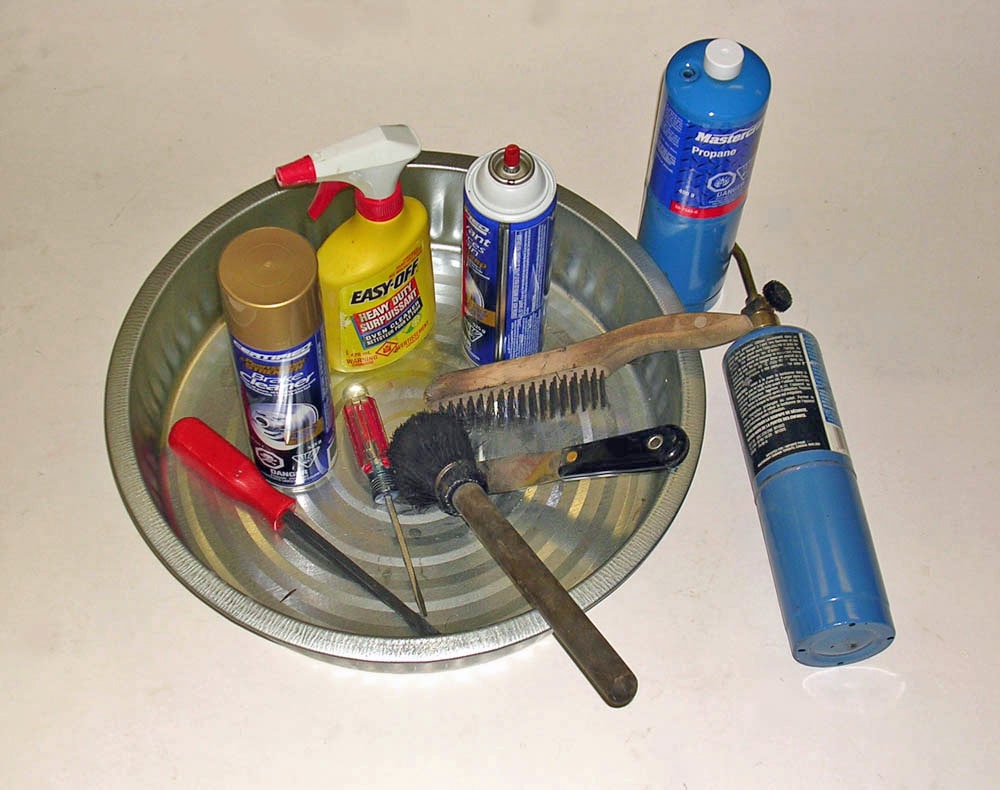
You have the car supported. It’s stripped clean of parts, and you’re ready to prep and clean the chassis. Now what? The tools of the cleanup trade are basic and for the most part, a bit crude: For a clean car, you'll need a propane torch along with a couple of bottles of propane (and no, a heat gun won't get the undercoating hot enough to peel away – we’ve tried it). Two spray cans of Easy-Off oven cleaner and three or four spray cans of heavy-duty brake cleaner will usually get the job done. Collect a half dozen heavy duty Scotchbrite® scouring pads as well as a stack of heavy shop rags. You'll need a sharp putty scraper (likely your most important tool), a medium size flat blade screwdriver and finally, a small gasket scraper Spend the money on a good set of heavy rubber gloves. Don't use disposable gloves; they usually disintegrate while working under the car. If your car doubled as a toxic dump in the past, then double or triple the amount of cleaners required.
In our next issue, we’ll dig deeper into the cleanup. As a rule of thumb, start with the easier jobs and progress to the bigger messes. If you keep plunking away at it, you’ll end up with a pretty slick car. Watch for part two of the series.
Click Here to Begin Slideshow
Don’t you wish you could go down to the used car lot and pick up the exact car you want, with the right color along with the right trim? It needs no paintwork, it has few miles on the clock and underneath, and the thing is spotless. Working on it is, well, perfect. After all, it’s a perfect world. Right? For most of us that’s just Fantasyland. In the real world, your project car most certainly won’t be exactly what the doctor ordered. You can bet you bottom dollar, when you’re starting from scratch, it will have to go to either a chassis shop or a body shop. And before it goes there, it’s going to need work (in some cases, extensive work).
When the time comes to restore a car, or to construct something like a quality drag race car, the likelihood of stripping and cleaning the shell is pretty high. If the car in question isn’t stripped and cleaned, you can rest assure the chassis shop or the body shop punch card (with your name on it) will be busy. You see, most professional car builders (chassis or body) demand a clean shell. If it's not clean, they'll perform the dirty work and pass the expenses on to you-know-who. In some cases, there might be 100-200 hours required to strip and clean a car. Factor in a shop rate of $80 to $100+ per hour and you can see costs can prove to be epic.
There are a number of options when it comes to prepping your project car. It’s not a big stretch to call a tow truck and drag your project shell to the local paint stripper and have them peel off the exterior finish, but in many of those cases, a total disassembly of the vehicle isn't really required. You might not want to remove the glass, doors and other hardware. Each method of removing the finish from an automobile has its drawbacks (stripping media cleanup, chemicals lurking in body crevices and so on). Finally, some cars really don't need the exterior sheetmetal "laundered" at all -- just the undercarriage needs attention.
No matter what direction you take, how do you get a real grip on the cleanup? It’s pretty simple actually. You just have to get down and dirty. Before you begin sanitizing, remove anything flammable. Most chassis shops mandate the complete fuel system be removed, along with the exhaust system, brake lines and the interior (good body shops appreciate that too). Remove the vehicle electrical system, including the battery. In addition, some items like gas charged shock absorbers should be taken out (they can explode if heated excessively), and if you're working with a late model vehicle, disarm or remove the air bags. A word of caution here: Use extreme care in removing the air bag system. Buy a factory service manual and follow it to the letter. Sudden air bag discharges tend to be both violent and hot. You don’t want to be in the neighborhood if one goes off accidentally.
There’s more too: Some cleaners give off ugly fumes and worse yet, the residue from cleaning can turn the floor of your shop into a disgusting cesspool of a mess. Because of this, the best place to clean a chassis is outdoors. At this point, it's also a good idea to slide a 4X8' sheet of plywood under the car. Some of the cleaners used can raise havoc with concrete or asphalt driveways. If you're working on gravel or good old-fashioned Mother Earth, then the plywood sheet makes life a whole bunch easier while you're on your back. Support the car solidly. We usually include wheel ramps on the rear and two axle stands under the nose along with an extra set of "just in case" axle stands at the front. We also keep a floor jack and a healthy fire extinguisher within arm's reach. On the other hand, if you’re fortunate enough to have a rotisserie, then the drudgery is significantly simplified.
You have the car supported. It’s stripped clean of parts, and you’re ready to prep and clean the chassis. Now what? The tools of the cleanup trade are basic and for the most part, a bit crude: For a clean car, you'll need a propane torch along with a couple of bottles of propane (and no, a heat gun won't get the undercoating hot enough to peel away – we’ve tried it). Two spray cans of Easy-Off oven cleaner and three or four spray cans of heavy-duty brake cleaner will usually get the job done. Collect a half dozen heavy duty Scotchbrite® scouring pads as well as a stack of heavy shop rags. You'll need a sharp putty scraper (likely your most important tool), a medium size flat blade screwdriver and finally, a small gasket scraper Spend the money on a good set of heavy rubber gloves. Don't use disposable gloves; they usually disintegrate while working under the car. If your car doubled as a toxic dump in the past, then double or triple the amount of cleaners required.
In our next issue, we’ll dig deeper into the cleanup. As a rule of thumb, start with the easier jobs and progress to the bigger messes. If you keep plunking away at it, you’ll end up with a pretty slick car. Watch for part two of the series.
Click Here to Begin Slideshow
Leave a Reply