Holley Sniper EFI for Jeep CJs with the BBD Carburetor

Click Here to Begin Slideshow Image from screenshot. You probably thought that in order to get the benefits of electronic fuel injection - such as cold start reliability, accurate fuel feed even at precipitate angles on the trail that would kill carbureted engines and an end to vapor lock on your ’73-’86 Jeep CJ with the BBD carburetor - you’d have to pull the intake and spend big bucks. Not true.

Holley Sniper EFI for Jeep CJs with the BBD Carburetor

Click Here to Begin Slideshow

Image from screenshot.

You probably thought that in order to get the benefits of electronic fuel injection - such as cold start reliability, accurate fuel feed even at precipitate angles on the trail that would kill carbureted engines and an end to vapor lock on your ’73-’86 Jeep CJ with the BBD carburetor - you’d have to pull the intake and spend big bucks. Not true.

An Easy Alternative

Image courtesy Holley Blog.

Sniper now has an EFI system that’s a direct bolt-on replacement for the BBD carb on Jeep CJs with the straight-six 258. The hardest part of the install is making the four wiring connections (If your fuel system can operate at 60 PSI. If not, a fuel system upgrade will be required.). All you need is a few hours and your CJ can have EFI.

Label Everything

Disconnect the battery. Although not every vacuum hose or electrical line will be re-used, label everything attached to the BBD. Disconnect the fuel line and vacuum hoses. Disconnect the throttle linkage.

Remove the Old BBD

Remove the four half-inch bolts securing the BBD to the intake. Remove the carburetor.

Prep for Install

Shove a rag or towel into the intake openings and clean the mating surface completely. I prefer to use a small gasket cleaner on my cordless drill.

Mount the Sniper BBD-Replacement EFI Unit

Slide the new gasket onto the intake. Place the Sniper EFI for Jeep CJs unit onto the intake. Install the washers and thread the nuts on. Tighten the nuts to 60-80 in-lbs in a crossing pattern.

Reattach the Throttle Linkage

Reconnect the throttle linkage. Make sure the pedal can move freely and adjust as necessary to free up the pedal/linkage.

Install the Temperature Sensor

Locate and remove a 3/8 inch NPT plug in either the head or intake. Route the temperature sensor to this location and apply three to four wraps with Teflon tape. Install the sensor and tighten.

Reconnect Vacuum

The old BBD had a number of vacuum hoses that the new Sniper EFI won’t need. Manifold vacuum and the brake booster are the two main vacuum connections required on the Sniper EFI. Distributor vacuum advance is another. Trace any unused vacuum hoses to their source, then remove and cap them.

Give It Fuel

Hook up the fuel supply and return lines. The supply has to go the supply side on the EFI unit and the return must go to the regulator. Looking at the idle air control (IAC) valve, the fuel inlet is on the left.

Reinstall the Air Cleaner Housing

On top of the Sniper EFI unit is an air cleaner bale that allows you to use the factory air cleaner. Place the air cleaner outlet over the Sniper inlet and attach with the factory wingnut.

Install the Oxygen Sensor

The Jeep CJ BBD Sniper EFI needs an oxygen sensor to maintain the proper air-fuel ratio (AFR). Drill a 7/8 inch hole in the exhaust pipe as close to the engine as possible. Drill this hole after the collector if you have a header. Also, make sure the sensor can sit at least ten degrees above horizontal if the pipe chosen runs horizontally.

Tighten it Up

Fit the gasket and sensor mounting plate over the hole and slide the two supplied clamps over the ends of the plate. Tighten the clamps as much as possible to ensure there are no leaks. Install the oxygen sensor using heat-resistant anti-seize compound. Connect the O2 sensor to the corresponding lead on the EFI unit. You could also weld the O2 bung onto the exhaust pipe. Just make sure your weld is good.

Tach Input

If you’ve got a stock ignition system, attach the yellow wire from the three-wire connector to the coil negative and the brown from the two-wire connector to the tach output. If you’ve got a CD box, the three-wire connector is connected to the purple wire from the box and the brown goes to the tach output.

NOTE: Use a QUALITY crimp tool, not the cheapest you can buy.

Switched Ignition Power

Use a test light or volt meter to find power when the key is in the ‘Run’ AND ‘Start’ positions. I recommend using this lead to switch a relay straight off the battery. If you tap into the coil, it may not get enough energy to properly fire the plugs.

NOTE: I will repeat - find a power source that is hot both during cranking and engine run and use this to switch a relay powered directly from the battery. Don’t wire the pink wire from the Sniper EFI unit to the switched power source.

Connect the Display Controller

You could just plug the display controller into its plug from the EFI unit and set the 3.5 inch display on the cowl to do the initial programming and calibration. Route the controller cable through a grommet in the bulkhead first so it can be used while driving.

Power and Ground

Without fail, the power and ground cables must go directly to the battery. This may require that you change either the battery cables or the terminals. Reconnect the battery.

NOTE: Again, if you have to, install new battery terminals so you can connect the EI directly to the battery.

Initial Setup

Now it’s time to tell the Sniper EFI controller about your engine. Turn the key to the “On” position to power the unit up. The “Home Screen” will appear on the controller. Press “Next” after each step:
• Select the ‘Wizard’ icon on the touchscreen.
• Scroll down to select the correct installation type (BBD Sniper).
• Select the number of cylinders (Six).
• Slide the input bar to input the engine displacement (258).
• Slide the input bar to select the desired RPM while at normal operating temp.
• Select your cam type.
• Select your ignition type-coil or CD.
• The Holley BBD Sniper EFI controller will come up with a base calibration.
• Press the ‘Start’ button to send this calibration to the controller. Once uploaded the controller will give an alert.
• Recycle the key. Listen for the fuel pump cycling for five seconds.

NOTE: Check for fuel leaks as the pump cycles.

Verify Sensor Readings Prior to Initial Startup

You need to verify that the sensors are all reading and reporting correctly. After cycling the key, the ‘Home’ screen will come up. Select ‘Monitor’ twice. From here select ‘Initial Startup.’ You’ll see monitor readings for five sensors. If any of these are not reading correctly, correct the problem before continuing.
1. Engine RPM-This should read ‘Stall; with the engine off.
2. TPS-Throttle Positon Sensor. Reads “0” with the engine not running.
3. MAP-Manifold Air Pressure. Should read between 95-102 in most locations. Lower at higher altitudes.
4. CTS-Coolant temp senor. Reads engine temperature.
5. IAC Position-Addressed later.
6. Battery-Battery voltage. A minimum of 12 volts is required.

Prior to Initial Start

Go over everything you’ve done up to now without turning off the ignition. Make sure all vacuum lines and wiring are clear of heat sources, pinch and chafe points and moving parts.

Start and Tune

Crank the engine while observing the monitor. The RPM reading should change to “Syncing.” Within a few seconds this should change to whatever the engine RPM is. If the engine doesn’t start and come to an idle, go to Holley’s troubleshooting guide and fix the problem. Check for leaks as the engine warms up and top off the coolant if needed.

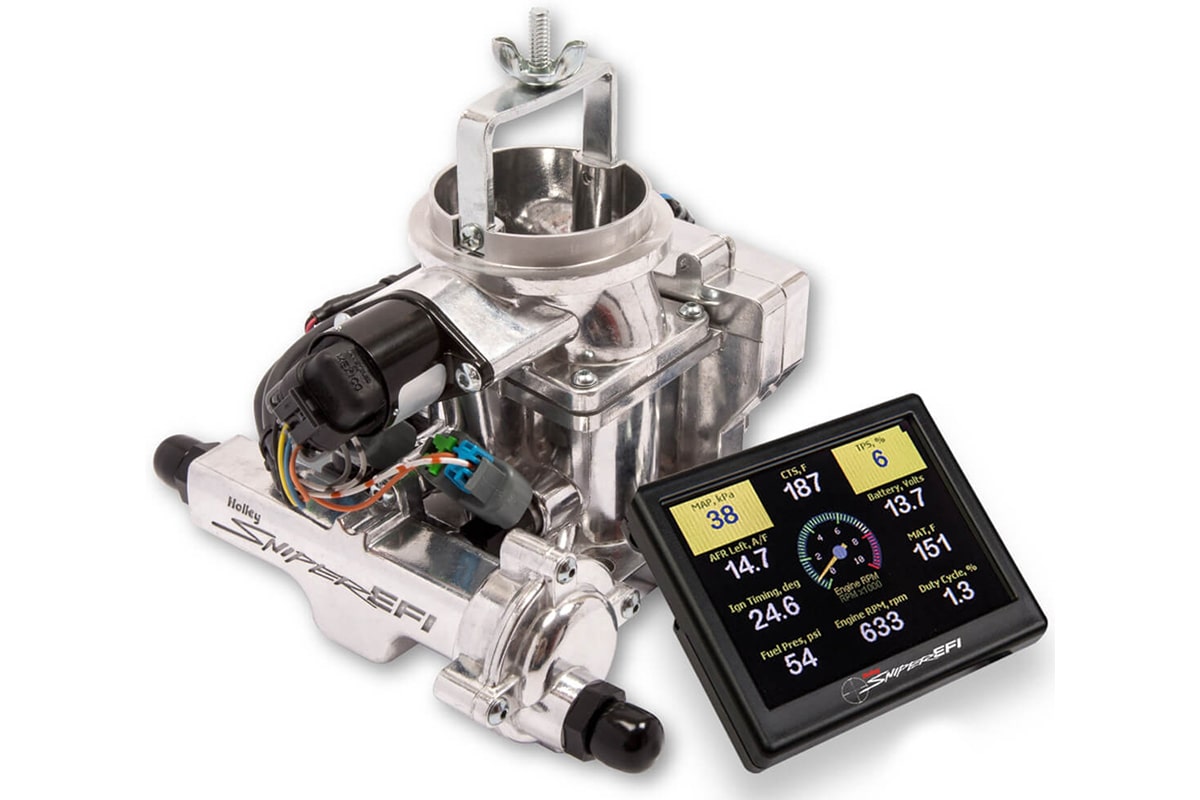
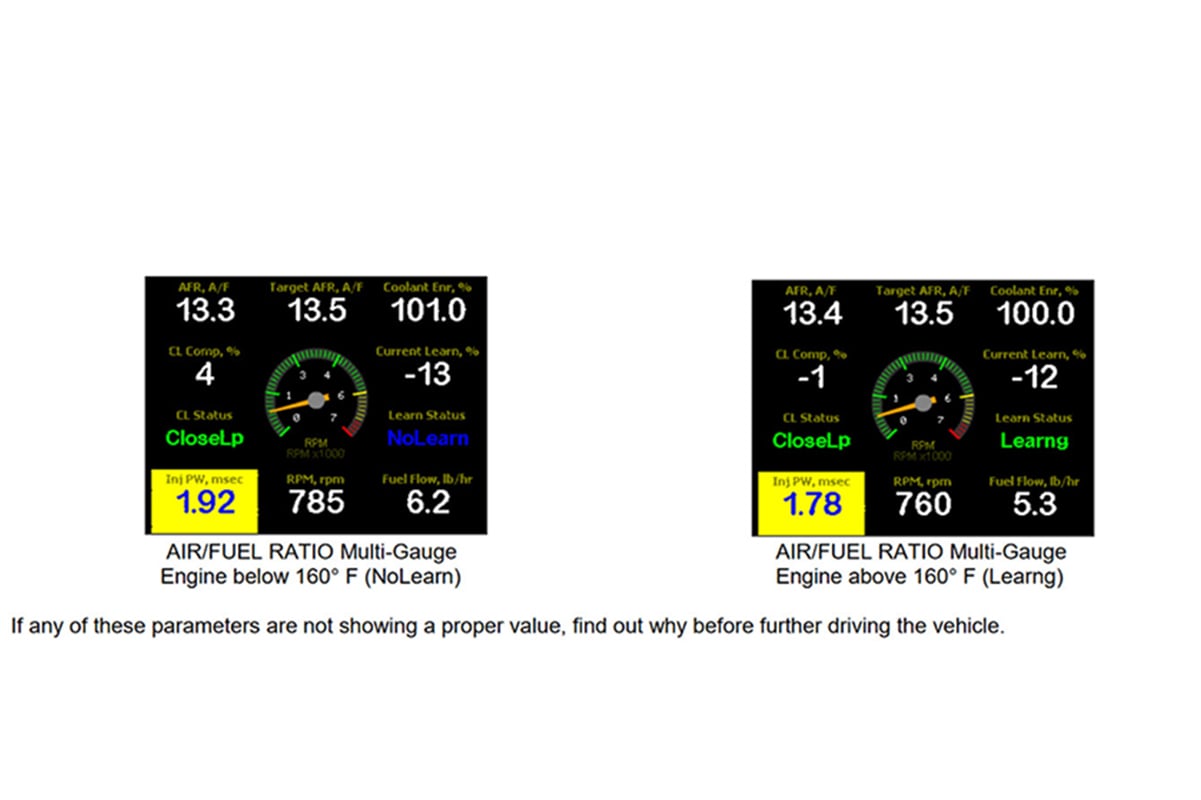
On the handheld, surf through the Monitor, Multi Gauge and then the Air/Fuel Ratio screens.
• AFR, A/F-This should read the air/fuel ratio the O2 sensor is reading. The reading may fluctuate a bit as the engine runs and warms up.
• Target Air/Fuel Ratio-This is what the ECU is trying to maintain as the a/f ratio and will change depending on engine load and speed and coolant temp.
• Coolant Enr, %-This tells you how much of the enrichment the system is adding is based upon coolant temp as a percentage. Once the engine reaches 160 degrees this should read 100 indicating zero enrichment.
• CL Status-Indicates Closed or Open loop operation. Closed means the Sniper ECU is in full control and is controlling the a/f ratio. The Sniper ECU should always be in Closed Loop once the engine reaches 160 degrees.
• CL Comp, %-This tells you the percentage of fuel delivery control the ECU is exerting. A negative number indicates leaning out while positive shows enrichment. In Open Loop during warmup this will read zero.
• Learn Status-Indicates whether the Sniper ECU has entered its self-tuning status. This should always read “Learn” once the engine has reached 160 degrees and the ECU has entered Closed Loop if Self Tuning has been enabled (this is the default). If this has been disabled or the ECU is in Open Loop this will read “NoLearn.”
• Current Learn, %-This should read between -20% and 20% and indicates how much fuel is being added or subtracted based upon the base fuel map in the ECU memory. This can read higher or lower depending on several parameters.
• Inj PW, msec-This is the injector pulsewidth in milliseconds. Innjector pulsewidth is the length of time the injector is open and injecting fuel and will vary depending on engine speed, load, and environmental conditions.
• RPM, rpm-Engine speed.
• Fuel Flow, lb/hr-This is how much fuel is going into your engine as an instantaneous reading. A gallon of gasoline weighs about six pounds.

Set the Idle

Go back to the Initial Startup screen. Set the parking brake and put the transmission in Neutral. Adjust the idle screw until the IAC Position reads between two and 10 percent. Now adjust the idle speed screw (also called the throttle plate screw) while watching the TPS value. If the value increases, cycle the ignition to reset it to zero. Continue this until the target idle speed has been reached.

Go for a Drive

Head back to the Air/Fuel Ratio screen on the handheld. With the engine at operating temp and the brake set, put the transmission into gear (automatics) and turn on the A/C. Once the CL Comp value returns to zero, you can turn off the aircon if you want and head off for a drive.

Don’t jackrabbit from stops. If you have a manual transmission, take longer than normal to disengage the clutch for a bit. Hit and hold city street speeds for a few minutes, then vary your speed a bit for a few minutes until the Comp value returns to zero.

Now head somewhere that you can safely do some harder acceleration, including a few wide open throttle (WOT) blasts. You’ve just put the engine through several speed and load variations to teach the ECU. Your Sniper EFI’s ECU will have lowered the Learn Comp Limits enough to transfer the new fuel map to the base map. This will continue to happen as overall driving conditions change and stabilize - for instance, a change in air temp of more than 10 degrees, or if you spend a week in the mountains.

Enjoy. Let us know what you think about the Sniper EFI for the Jeep CJ with BBD carburetor in the comments below.

Back to Post
About Mike Aguilar 388 Articles
Mike's love of cars began in the early 1970's when his father started taking him to his Chevron service station. He's done pretty much everything in the automotive aftermarket from gas station island attendant, parts counter, mechanic, and new and used sales. Mike also has experience in the amateur ranks of many of racing's sanctioning bodies.

1 Comment on Holley Sniper EFI for Jeep CJs with the BBD Carburetor

Leave a Reply

Your email address will not be published.


*


I agree to receive emails from RacingJunk.com. I understand that I can unsubscribe at any time. Privacy Policy