

![[Gallery] Mecum Kissimmee Auction 2026](https://www.racingjunk.com/news/wp-content/uploads/2026/03/DSC_0717-e1774629242515-376x206.jpg)

![[Gallery] Cruisin’ One Daytona](https://www.racingjunk.com/news/wp-content/uploads/2026/03/DSC_0538-e1774027057404-376x206.jpg)

Simply Shocking Part 2
Click Here to Begin Slideshow
In our last issue, we started our look at AFCO’s double adjustable “Eliminator” line of drag shocks. If you point your browser back to that article, you’ll find the shocks allow for completely independent setting of the internal compression and rebound valving. As we pointed out in that article, it’s easy to change the shock settings by a single click and actually feel the difference in the shock. AFCO spent a lot of time working out the valving, ensuring the adjustment window is very large. It’s easily accomplished, too:
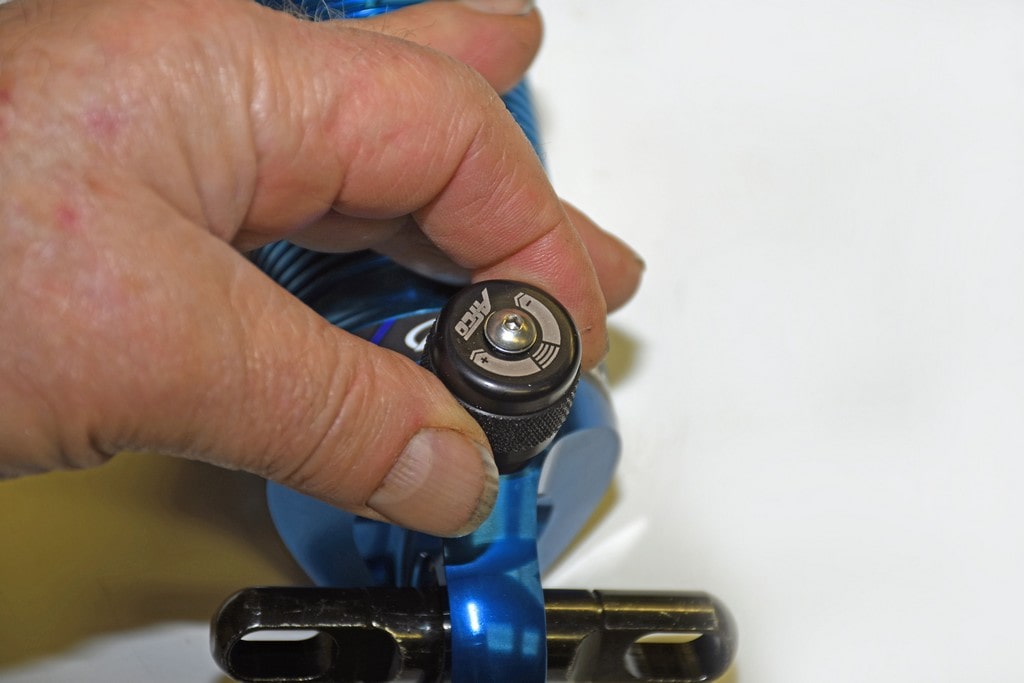
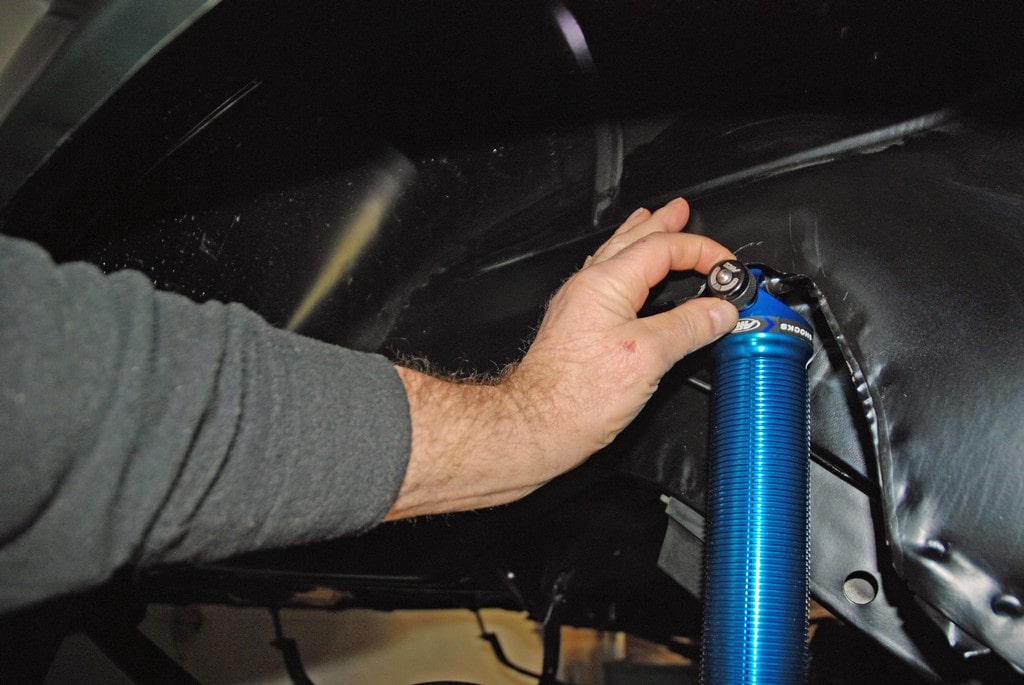
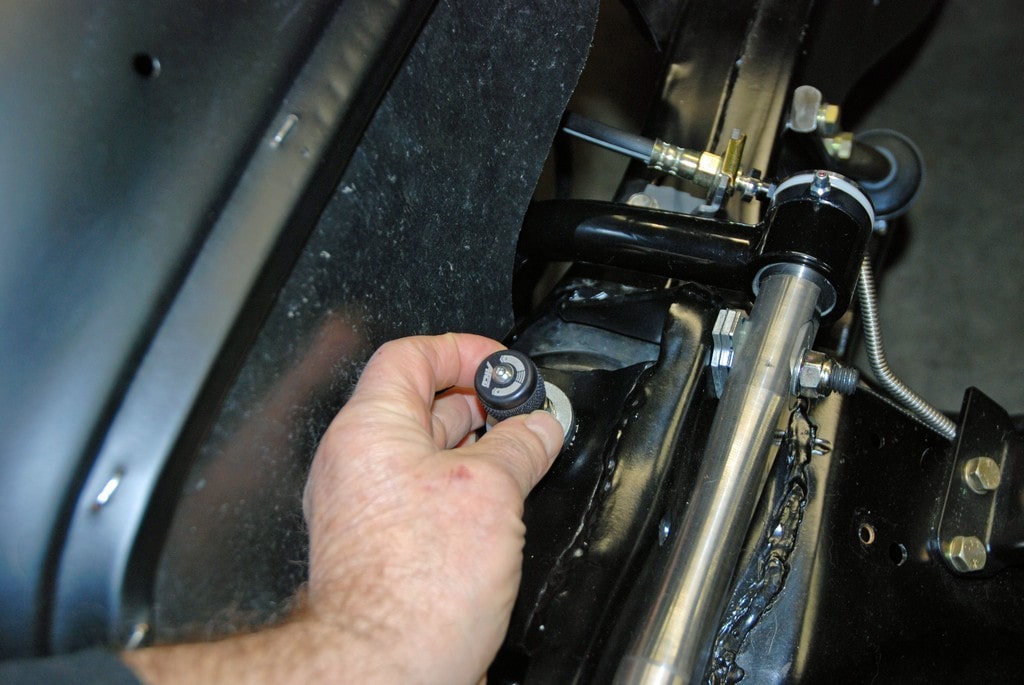
What all of this means is that double adjustable shocks such as the AFCO permit you to fine tune the valving requirements externally. The compression adjustment is controlled by the knob on the shock body. The rebound adjustment is located at the eyelet. These adjustments are easily accessible without removing the shock from the car. The following is a look, up close, at how the shocks work and how they're adjusted:
Compression & Rebound…
Different shock companies use different lingo. Quite often, the words "bump", "rebound", "compression" and "extension" are used interchangeably. A shock absorber travels in two directions: It gets shorter (compresses) and gets longer (extends). Some shock absorber manufacturers call this "bump" and "rebound," but that can get confusing. To get a grasp of what this is all about, pretend that you drive your car over a good old-fashioned speed bump. The speed bump "bumps" the shock, which in turn compresses it. After you drive over the speed bump, the shock rebounds and extends. In the case of AFCO Racing, they prefer to call these actions "compression" and "rebound."
Compression Adjustment…
On the AFCO double adjustable shocks, turning the compression knob clockwise tightens up the valving. This means the shock becomes stiffer to compress. AFCO recommends that for heavy door cars, you start tuning by adjusting to full stiff (clockwise on the knob) and work your way back 18 turns. Faster “heavy” door slammers should begin adjustment from 14 clicks full stiff. Tube frame cars (for example, a Top Sportsman or Super Gas car) should begin with 12-15 clicks from full stiff, while four link dragsters should start with 12 clicks from full stiff.
Rebound Adjustment…
The rebound adjuster on the AFCO drag shock is typically located in the eyelet at the base of the main shaft (AFCO uses a black ring on the rod end of the shaft or, in the case of front shocks, a black knob on the stud). And like the compression adjuster, it only acts as a tuning device for one side of the shock valving – in this case, rebound. Turning the rebound clockwise stiffens the rebound. Obviously, turning it counter-clockwise softens the shock. This is the adjustment that controls the “hit” of the tire. AFCO suggests that for heavy door cars slower than 9.90 seconds in the ET department, you should begin with 20 clicks of the adjuster from full stiff. For tuning purposes, move up in the adjustment range two clicks at a time until the 60-foot times fall off. Faster (heavy) cars should start with 14 clicks from full stiff and then follow the same two-click-at-a-time process until the car slows. Top Sportsman, Super Gas and other lightweight tube frame door slammers can begin at 16-18 clicks from full stiff, while suspension dragsters can begin at 8-10 clicks from full stiff.
That’s a wrap for this issue. As you can see, setting the Eliminator shocks is a real piece of cake. And having a good baseline with which to start is a serious bonus too. Next time around, we’ll zoom in on something called “Big Nose Compression” and we’ll also take a look at what fits where. The week after that will feature our last issue in this series. You might be surprised at what you see!
In our last issue, we started our look at AFCO’s double adjustable “Eliminator” line of drag shocks. If you point your browser back to that article, you’ll find the shocks allow for completely independent setting of the internal compression and rebound valving. As we pointed out in that article, it’s easy to change the shock settings by a single click and actually feel the difference in the shock. AFCO spent a lot of time working out the valving, ensuring the adjustment window is very large. It’s easily accomplished, too:
What all of this means is that double adjustable shocks such as the AFCO permit you to fine tune the valving requirements externally. The compression adjustment is controlled by the knob on the shock body. The rebound adjustment is located at the eyelet. These adjustments are easily accessible without removing the shock from the car. The following is a look, up close, at how the shocks work and how they're adjusted:
Compression & Rebound…
Different shock companies use different lingo. Quite often, the words "bump", "rebound", "compression" and "extension" are used interchangeably. A shock absorber travels in two directions: It gets shorter (compresses) and gets longer (extends). Some shock absorber manufacturers call this "bump" and "rebound," but that can get confusing. To get a grasp of what this is all about, pretend that you drive your car over a good old-fashioned speed bump. The speed bump "bumps" the shock, which in turn compresses it. After you drive over the speed bump, the shock rebounds and extends. In the case of AFCO Racing, they prefer to call these actions "compression" and "rebound."
Compression Adjustment…
On the AFCO double adjustable shocks, turning the compression knob clockwise tightens up the valving. This means the shock becomes stiffer to compress. AFCO recommends that for heavy door cars, you start tuning by adjusting to full stiff (clockwise on the knob) and work your way back 18 turns. Faster “heavy” door slammers should begin adjustment from 14 clicks full stiff. Tube frame cars (for example, a Top Sportsman or Super Gas car) should begin with 12-15 clicks from full stiff, while four link dragsters should start with 12 clicks from full stiff.
Rebound Adjustment…
The rebound adjuster on the AFCO drag shock is typically located in the eyelet at the base of the main shaft (AFCO uses a black ring on the rod end of the shaft or, in the case of front shocks, a black knob on the stud). And like the compression adjuster, it only acts as a tuning device for one side of the shock valving – in this case, rebound. Turning the rebound clockwise stiffens the rebound. Obviously, turning it counter-clockwise softens the shock. This is the adjustment that controls the “hit” of the tire. AFCO suggests that for heavy door cars slower than 9.90 seconds in the ET department, you should begin with 20 clicks of the adjuster from full stiff. For tuning purposes, move up in the adjustment range two clicks at a time until the 60-foot times fall off. Faster (heavy) cars should start with 14 clicks from full stiff and then follow the same two-click-at-a-time process until the car slows. Top Sportsman, Super Gas and other lightweight tube frame door slammers can begin at 16-18 clicks from full stiff, while suspension dragsters can begin at 8-10 clicks from full stiff.
That’s a wrap for this issue. As you can see, setting the Eliminator shocks is a real piece of cake. And having a good baseline with which to start is a serious bonus too. Next time around, we’ll zoom in on something called “Big Nose Compression” and we’ll also take a look at what fits where. The week after that will feature our last issue in this series. You might be surprised at what you see!
Leave a Reply