


When we last left you, we had installed the basic steering parts (steering box, pitman arm, idler arm) onto the Camaro subframe along with the upper a-arm studs. We also discussed various frame motor mount combinations along with various transmission crossmember choices (there are plenty of options here). This time around we’ll dig into the a-arms (upper and lower) along with finishing the steering system.
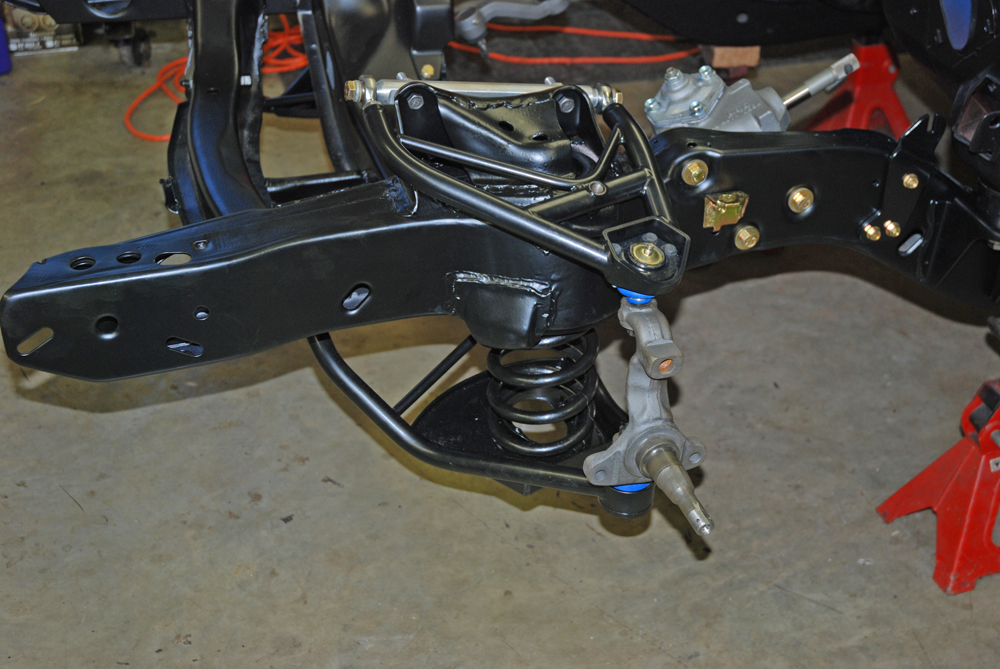
In a different series, we covered TRZ Motorsports’ drag race a-arm setup for first generation Camaros and 1968-72 Novas. To recap, the TRZ tubular chrome moly a-arms are lighter than the factory a-arms and simultaneously, provide for much more caster (they have 5-7 degrees built in). Additionally, the TRZ components include Delrin lower bushings (a-arm to subframe) and spherical bearings (rod ends) upstairs on the top a-arm. The upper a-arm cross shaft is milled from billet aluminum. High quality ball joints are included (top and bottom) and the top end makes use of an adjustable a-arm limiter. You can get these a-arms setup for coil over shocks or setup for conventional springs and conventional drag shocks. The setup we’re using is a standard spring and shock arrangement.
One thing that should be addressed is the limiter (and in particular, the orientation of the bolt in the limiter). We’ve personally used this setup on several different cars. And we’ve personally used them and we’ve also seen them installed two different ways – bolt head up (which is easy to reach) or bolt head down (not as easy to reach and adjust). Some folks prefer the latter because the threads on the adjuster never get mangled. Others prefer the bolt head up top where it’s easy to adjust. It’s just a matter of choice.
In terms of installation, the TRZ pieces install just like factory parts – they bolt right in. You’ll need a spring compressor for the coil springs. An air compressor with an impact gun goes a long way toward compressing the spring easily, but a couple of words of caution here: Be careful! Always watch where the spring is pointed when we’re compressing it. Always start the spring compressor by hand with a ½-inch drive ratchet before moving over to the impact gun. Always heavily lube the threads on the spring compressor too, and we lube them during the tightening process. Finally, we always watch the spring compressor to make sure it’s centered in the spring. They can dance around and move off-center while using an impact. In most cases, the rod of the spring compressor will have to protrude through the upper shock stud hole in the subframe during installation. If it’s off-center in the spring, it won’t fit and you’ll have to start all over again (it can also slip when compressing the spring). Why all of the concern with the springs? If you’ve ever had the experience of a shaky spring compressor losing its threads and launching a coil through your garage door and across the street, you’ll know what we’re talking about!
In our build, we used a stock spindle. Our examples were in great condition, but we urge you to inspect the spindle carefully. Over time, they can develop fractures, and of course, they can wear, particularly on the wheel bearing surfaces. By the way, we painted our examples with good old-fashioned cast iron grey paint by way of a rattle can. We’ve had them powder coated in the past, but if and when you have to strip the front end and you use a pickle fork (ball joint separator), you can be assured the powder coating will chip. Rattle can flat grey is obviously easy to fix!
There are a lot of different springs available for these cars. Each application will be different. For us, a stock small block spring is perfect for the big block install. If you need assistance in selecting a spring, the folks from TRZ can help you out. In our case we had the small block springs bead blasted and powder coated before the install.
For tie rod ends, we sourced new inners and outers from the folks at Classic Industries. We’ve used their quality tie rods in the past and in simple terms, they work perfectly. There was no need to make any other changes. To join them, we used a set of Hotchkiss tie rod sleeves from Classic Industries parts bins. The setup from Classic includes machined hex bodies (so you can easily turn them to adjust toe with a basic open-end wrench) and matching jam nuts. They’re powder coated gloss black too. Install is just the same as stock too. See the photos for more info.
The final piece in our steering puzzle was a new rag joint. For these first generation Camaros, you’ll find that the rag joint for a manual steering box differs from the joint for power steering applications. They’re not exactly easy to find at your local auto parts store (as in you find one on the “twelfth of never”!). Fortunately, Classic Industries stocks the correct rag joints, so it’s simply a matter of ordering the appropriate joint and waiting for it to show up on your doorstep.
Next time, we’ll wrap up the build with a look at the brake package we’re using from Baer Brakes. Like the rest of our parts in the “Subframes” series, they’re an easy bolt on.
Find earlier parts of this series here:


Leave a Reply