Click Here to Begin Slideshow
Not long ago, I introduced you to Holley’s Sniper EFI 4150 Super Sniper EFI, a TBI-style fuel injection system that can support up to a whopping 1250 HP. I also took you through the basic installation and calibration of the system, enough to get it running properly before taking it to the next level. I’m going to guide you to that next level here.
All images courtesy Holley unless otherwise noted.
Holley’s Super Sniper EFI Unit Can Control Multiple Secondary Functions for You
The Super Sniper EFI unit can take care of numerous extra functions that the “extra goodies” racers like to install require. It has a built-in nitrous controller, for instance. It can also be used with boost, has several additional programmable inputs and outputs for things like fans and can be connected to a CAN BUS for laptop-based tuning. We’re going to take a look at a few of the advanced capabilities of the Super Sniper EFI without buying additional components. Nitrous and boost control both require a laptop and the Holley Super Sniper EFI tuning software.
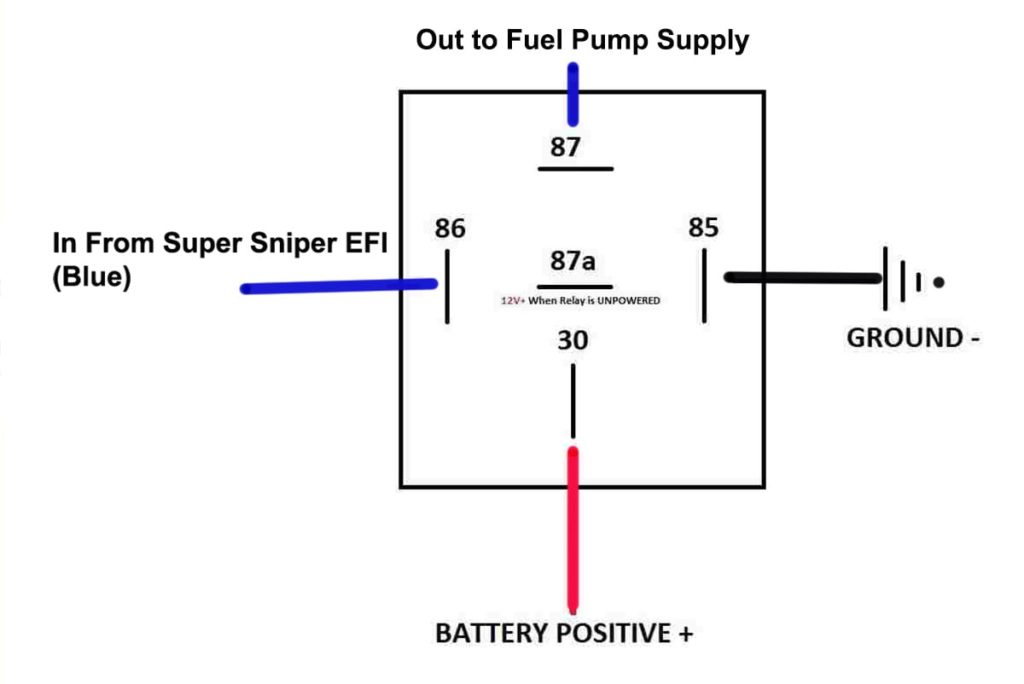
Fuel Pump Supply and Fan Control-Wiring
Image by Mike Aguilar
For owners of older carbureted cars, Super Sniper can energize a fuel pump relay using the blue wire on the 7 pin connector. It’s labeled C. It runs to the low-power switching side (pin 86 on most relays) of a relay. The high-power output from that relay supplies power to the fuel pump. Never power the fuel pump directly off the Super Sniper EFI.
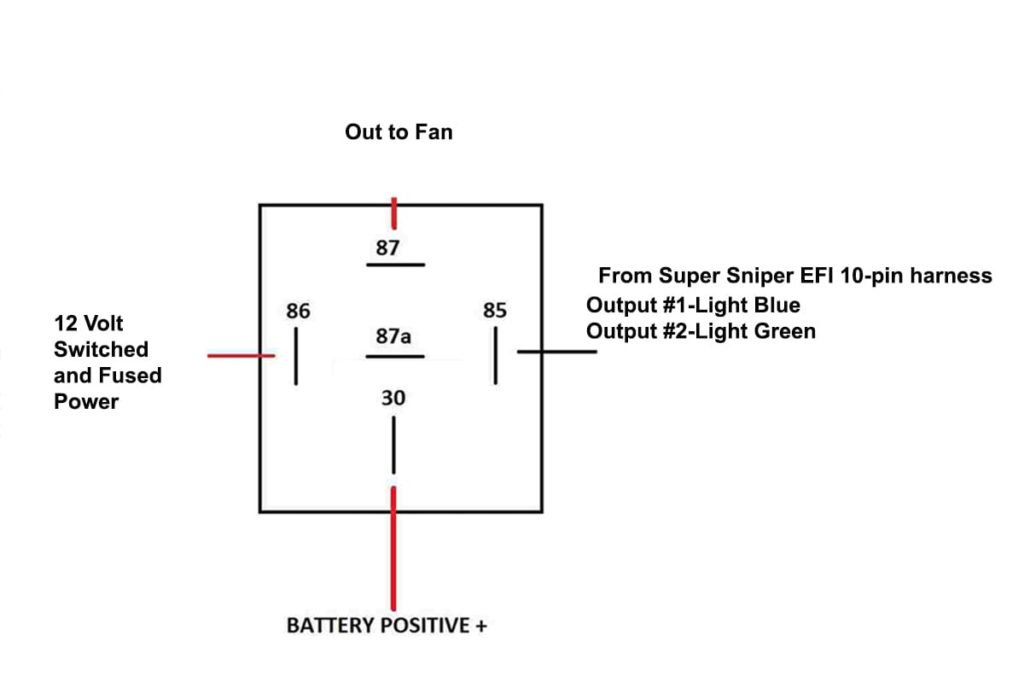
Multiple Fans
Image by Mike Aguilar
Super Sniper can also control two cooling fans and turn them on and off at different temperatures. The outputs for these are on the 10-pin connector (Note: Only 8 of these pins are populated). The wires are light blue and light green and are connected to the NEGATIVE side of the relay switching circuit (pin 85 on most relays).
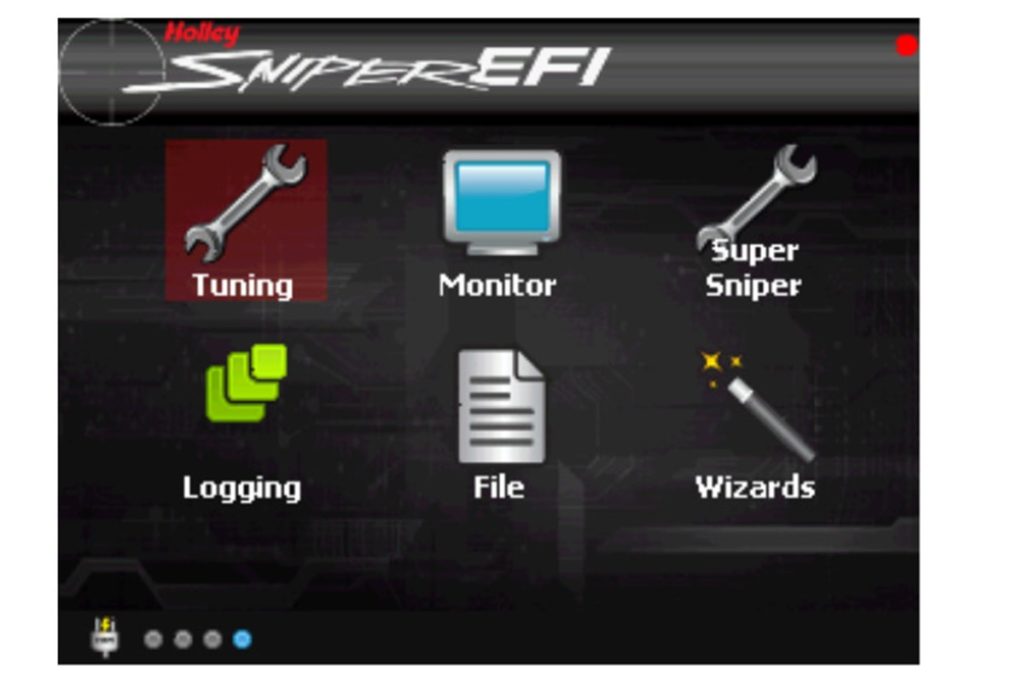
Fan Control-Tuning Section
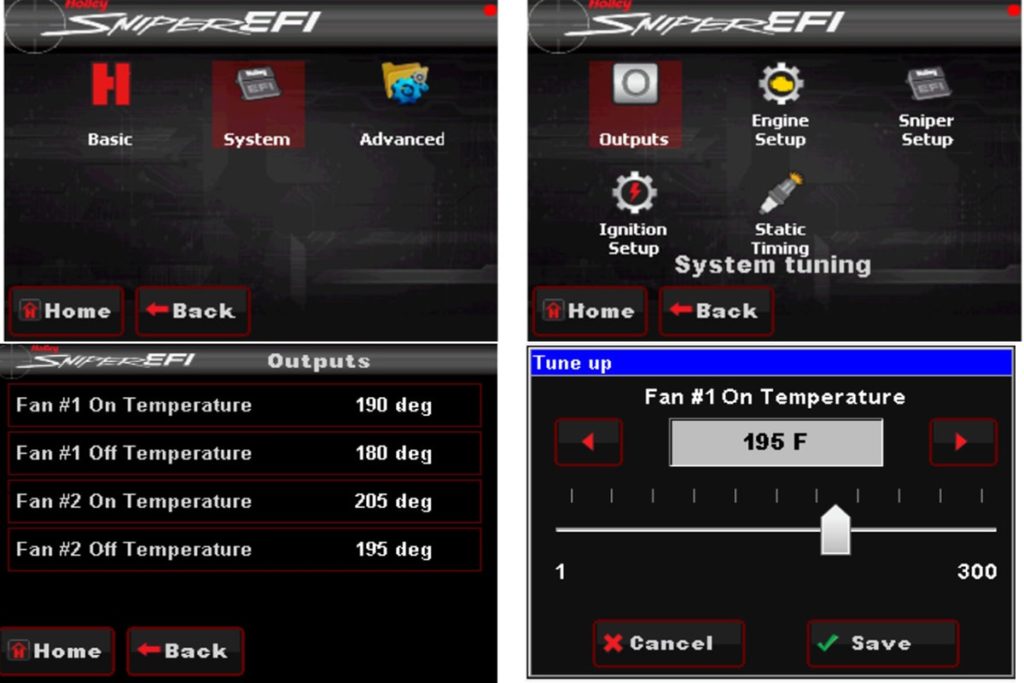
The Home Screen is where everything starts.
Once you have the fans wires as above, you need to tell the EFI controller when to turn the fan(s) on and off using the handheld (or a laptop). Select “Tuning” from the Main Menu and then select “System” on the next screen. From there you need to select “Outputs.” This will open the screen where you can set the operating temperature range(s) for your fan or fans.
Adjust the Degrees
The screens described adjust the fan control points.
It’s recommend that you set each fan to turn off at least five to ten degrees above the temperature at which it turns on. This keeps it repeatedly cycling on and off. Fan 1 should be turned on about five to ten degrees above where the thermostat opens. Fan 2 should turn on about 15-20 degrees above that.
Super Sniper Can Also Keep Engine from Surging When A/C Cycles
AC Kick controls engine surge or stumble when the air conditioner cycles.
If you’re building a race car, you can skip this section. Read on if you’re building a streetable hot rod with A/C. Input #1, the orange wire on the 10-pin harness, controls what’s known as “A/C Kick.” This is a rapid adjustment of the Idle Air Controller to keep the engine from stumbling when the A/C kicks on. This orange wire goes to the negative-switched side (pin 85, usually) of the A/C relay.
If you use this option, you need to tell the computer how to control it. From the “Tuning” menu, select “Advanced” and then “Adv. Idle.” From this menu select “Rampdown.” The last option in the next list is “AC Kick.” Adjust it as needed to keep the idle smooth.
Modifications to the Dashboard and Monitors/Gauges-Setting Display Scales
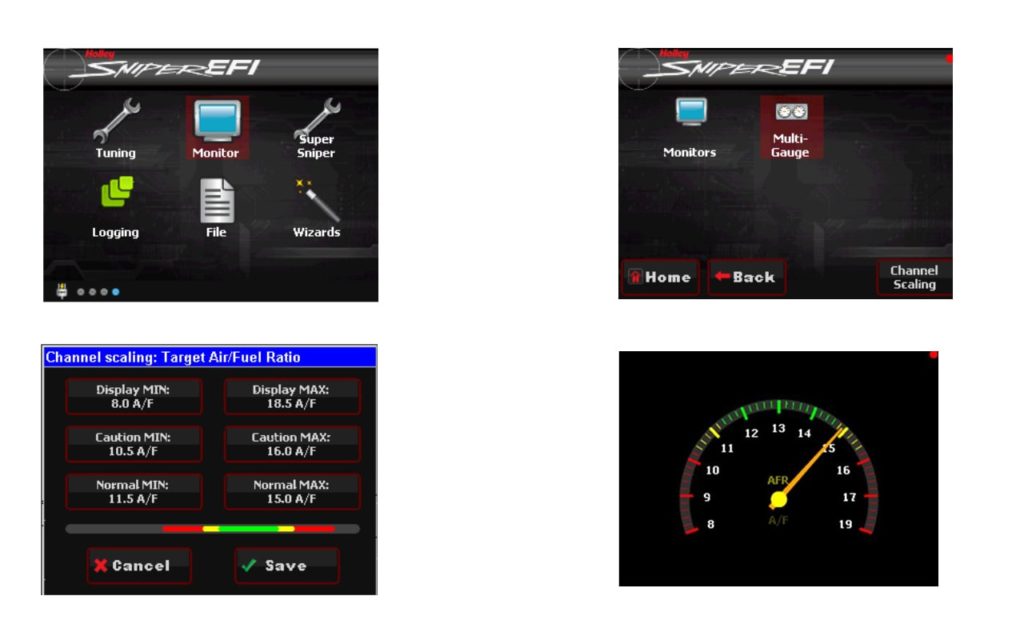
An example of scaling the AFR gauge. The examples in the images and I-VI below result in the air-fuel ration gauge shown at bottom right.
Scaling the gauges you see on the touchscreen when the Dashboard is selected can allow you wider or finer monitoring of your engine and let you set your own background warning thresholds for the gauges. When you tap the “Monitor” function icon, you’ll see the option “Channel Scaling” in the lower right corner of the display.
You’ll be presented with a number of sensor and gauge options that you can manipulate - Tach, AFR, engine temp, etc. You can choose between old school analog or newer digital gauges or a mix. From there you will have six ways that you can manipulate how gauges are displayed.
I. Display Min: This is the lowest value that an analog gauge will display. For example, you can have the temperature gauge start displaying when water temp reaches 100 degrees or the leanest air-fuel ratio being 8.0.
II. Display Max: This is the highest value that an analog gauge will display. An example would be the AFR gauge maxing at 18.5.
III. Caution Min: This is where the gauge warning will become red on the low side. An example would be where the AFR is too rich. Ex: 10.5
IV. Caution Max: This is where the gauge warning becomes red on the high side. An example would be on the air-fuel ratio gauge if the ratio goes too lean. Ex: 16.0
V. Normal Min: This is the point at which the gauge warning will become yellow on the low side. An example would be the beginning of the normal operating range for the AFR. Ex: 11.5
VI. Normal Max: This is the point at which the gauge warning will go yellow on the high side. An example would be the top of the normal AFR range. Ex. 15.0
Modifying the Dashboard Layouts
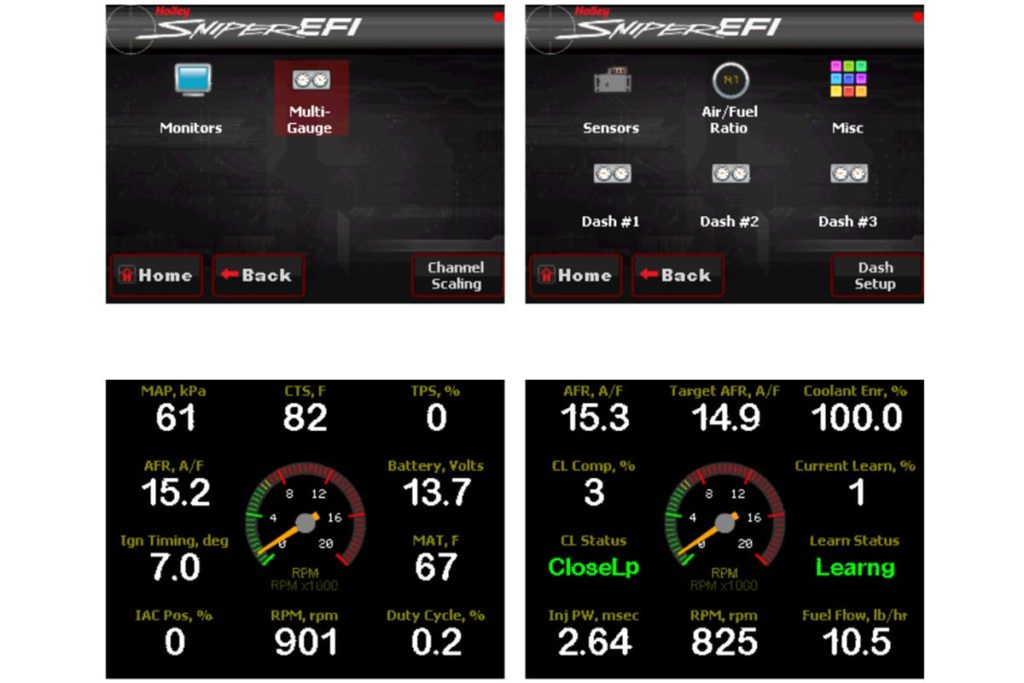
This image shows the Monitor screen at top left the Multi-Gauge screen at the top right, one of the preset Multi-Gauge displays at bottom left and a preset AFR display at bottom right.
The “Multi-Gauge” screen has a Dash Setup button at the lower right that will allow you to either choose one of three pre-configured dashboards or configure your own. If you choose to design your own custom dashboard, after you select the dash layout to customize, you can choose to customize just the layout of the preset gauges or you can change the layout and which channels and gauges are displayed. Once you select the display (Dash 1, Dash, Dash 3), you can either hit “Save” and return to the Multi-Gauge menu or keep customizing.
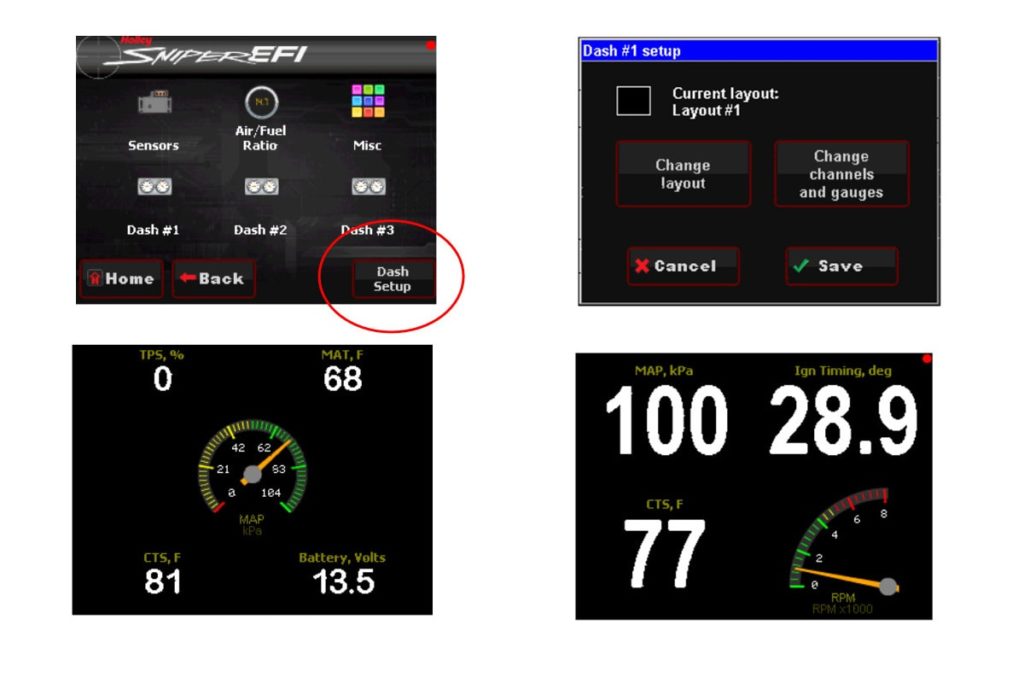
Switch Out Layouts
The bottom left shows a preset dash and the bottom right shows a modified dash.
To customize what is displayed as well as how it’s displayed, select the “Change channels and gauges” option on the right. You’ll be presented with a list of all the sensors, channels and gauge display options available - digital/analog, AFR, tach, throttle position, etc. Once you’re through and like what you’ve created, hit “Save” and back out.
Mike's love of cars began in the early 1970's when his father started taking him to his Chevron service station. He's done pretty much everything in the automotive aftermarket from gas station island attendant, parts counter, mechanic, and new and used sales. Mike also has experience in the amateur ranks of many of racing's sanctioning bodies.
2 Comments on Holley Super Sniper HP EFI Install: Advanced Features
Hey Kelly,
Thanks for reading and commenting!
I’m not an expert on the Sniper by any stretch. I know there are options to tell the computer that the engine has forced induction. My best advice to you would be to call Holley’s excellent technical support people. I’ve been dealing with them for decades and they’ve always given me the word I needed. I’m pretty sure you’re going to need their CAN to USB dongle to hook it up to your laptop.
On Holley’s EFI Tech Resources page (https://www.holley.com/support/resources/#Fuel_Injection) you’ll see Holley Sniper EFI V5. That’s the latest and greatest version. You’ll need Winrar or Winzip or PKzip (or similar) to extract the installation package.


![[Gallery] 3rd. Annual Father's Day Classic Car Show](https://www.racingjunk.com/news/wp-content/uploads/2026/07/Calistoga-2026-18-scaled-e1783026475349-376x206.jpg)

![[Gallery] Blackhawk Museum Stop Over](https://www.racingjunk.com/news/wp-content/uploads/2026/06/DSC_0918-e1782449621944-376x206.jpg)
Hey Kelly,
Thanks for reading and commenting!
I’m not an expert on the Sniper by any stretch. I know there are options to tell the computer that the engine has forced induction. My best advice to you would be to call Holley’s excellent technical support people. I’ve been dealing with them for decades and they’ve always given me the word I needed. I’m pretty sure you’re going to need their CAN to USB dongle to hook it up to your laptop.
On Holley’s EFI Tech Resources page (https://www.holley.com/support/resources/#Fuel_Injection) you’ll see Holley Sniper EFI V5. That’s the latest and greatest version. You’ll need Winrar or Winzip or PKzip (or similar) to extract the installation package.
Again, thank you for reading.
Aww, you’re too kind Tom! Thank you very much for the kind words and for reading. It’s readers like you that keep me doing these.