

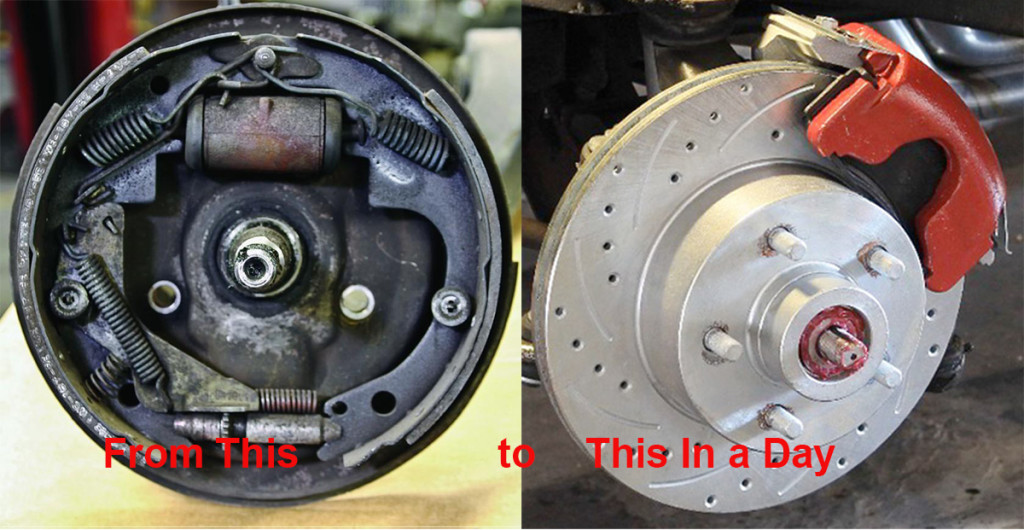
Want to make your classic car brake more efficiently? Replace the drum brakes with disc brakes. You can do it in an afternoon.
The first thing I tell people when they want to convert to disc brakes is to think about squeezing instead of pushing. If your classic car is equipped with drum brakes, when you step on the brake pedal, a part known as a wheel cylinder pushes the brake shoes outward against the brake drum to stop the car. On the other hand, when you upgrade to disc brakes on that classic car, when you step on the pedal a part known as a brake caliper causes the brake pads to squeeze the turning rotor, thus slowing and stopping the car. Discs are much more efficient than drums so it’s easier to slow your strip burner down after a pass.
Drum brakes are incredibly inefficient. Too much drag on the shoes and the drum will warp and burn, diminishing the braking efficiency. However, the shoes dragging on the drum is how we know they’re properly adjusted. This drag robs you of power, causing your ETs (Elapsed Times) in the quarter to suffer. Disc brakes have what’s known as a “take-up” built into the system so when you release the pedal, the pads are released and no longer dragging on the rotor-no drag equals more power being used to shoot you down the track instead of overcoming that drag. Another problem with drum brakes is that they are notoriously impossible to get both sides adjusted so they create the same amount of drag.
Converting Drum Brakes to Disc Brakes Isn’t That Hard
I know. When I did my first drum-to-disc conversion, I was scared I was going to muck things up and ruin my car. I barely had the money for the kit, which meant I had no money to fix any problems I created. However, I found that if I read the instructions thoroughly a couple times before doing the work and followed along by checking out the various parts mentioned as I read, the proverbial clouds cleared and I realized it was going to be a bit time-consuming, but pretty easy. You will too. The conversion kits that are available have everything you need to do the conversion, including very detailed instructions. I’m just going to try and break those instructions down into an easier to digest and understand format. So, grab your Brakleen and shop rag and let’s get wrenching, shall we?
Notes:
- Most disc brake conversion kits come with new spindles. Because of this I’m going to describe the conversion including new spindles. If you’ve only got two jack stands, just do one side of the car at a time instead of both. When ordering your kit, pay attention to rotor diameter. If you’re keeping your old wheels and tires, you’ll need to make sure the rotors aren’t larger than the wheels. If going with new wheels, make sure you take into account the rotor diameter.
- You should either get the Haynes or Chilton Motor Manual/Repair Guide for your year, make, and model of car, or look up the torque specs that you’ll need for this project. I highly advise against just “tightening it until it’s tight” at any cost.
- The procedure I’m about to describe is specific to 1964-81 GM products such as the Nova, Firebird, Camaro, etc. Cars from Ford and Chrysler will have certain differences. This is another reason I recommend using a repair manual as well as reading this description.
Here’s What You’ll Need to Complete This Project
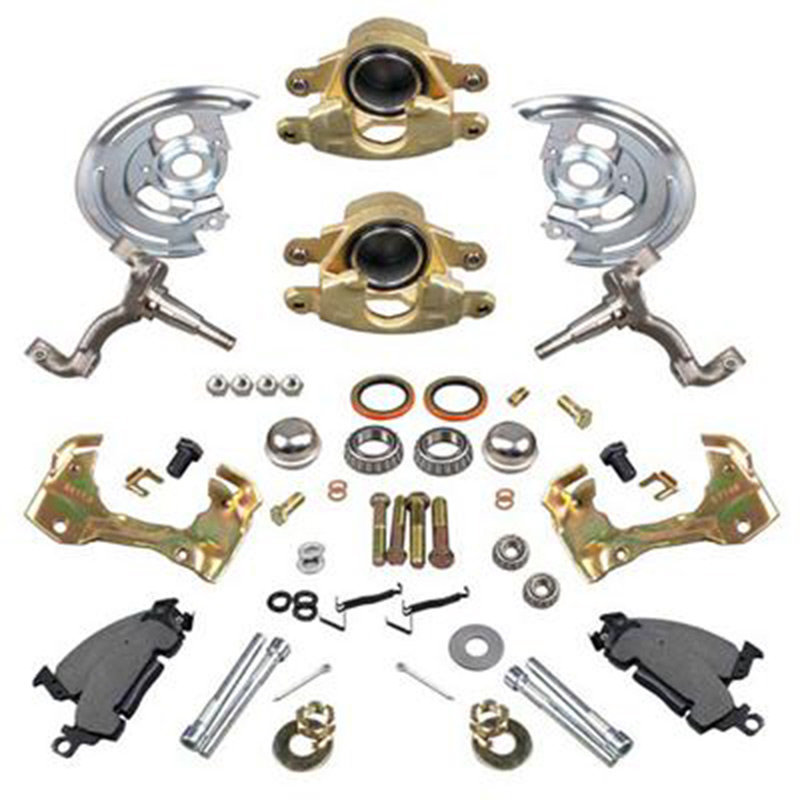
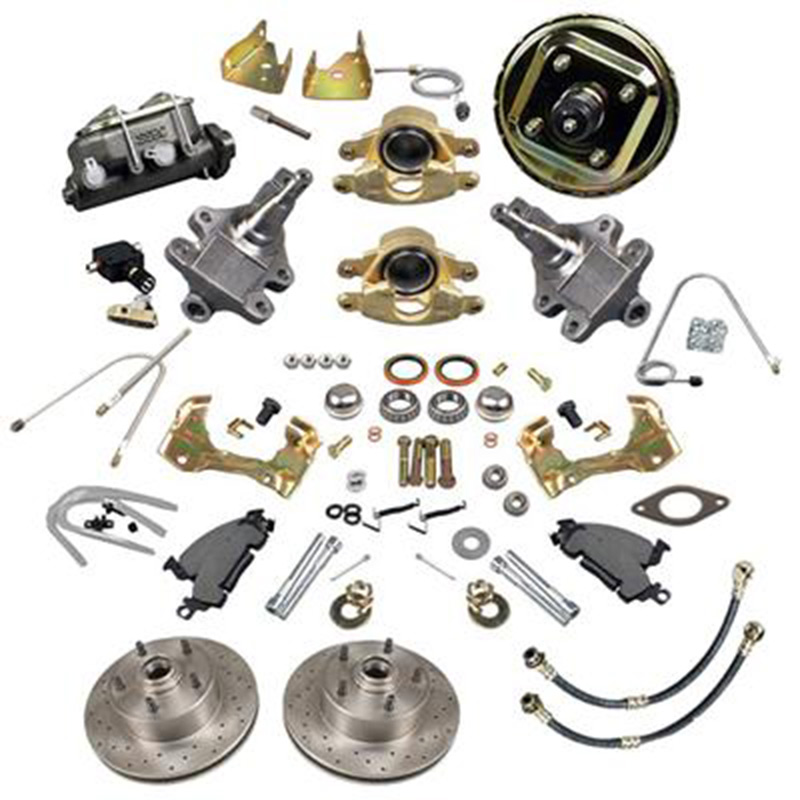
Obviously you’re going to need the brake conversion kit that is correct for your vehicle. These are available for both power and non-power systems. If you’ve got the pennies, get the power kit, spring for it. You won’t be sorry. You will also need a handful of tools:
- Wrench set
- Socket set
- Jack
- Jack stands (3)
- Lug wrench/tire iron
- Pliers or wire cutters
- Large slipjoint (Channellock) pliers
- Screwdriver
- Hammer
- Pickle fork/ball joint separator
- Torque wrench (Not necessary, but highly recommended)
- Line/flare nut wrenches (Not necessary, but even more recommended
- Large bottle of the correct DOT-level brake fluid
- Wheel bearing grease
- Latex or vinyl gloves
- Bucket or catch pan for brake fluid
- Brakleen or similar cleaning solvent for brakes
- One afternoon in which to work unmolested
Line/flare nut wrenches are open-end wrenches that have open ends that are almost closed. They are recommended when working with brake lines because they tend to not slip and round the fitting on which you’re working.
If you’re using donor parts, drain the caliper and replace the pads at this stage. If you’re not sure how to replace the pads, refer to our article on the subject.
Step 1: Get It Up and Get Them Off
Find a flat and level surface on which to park your car. Block off the front and rear of one rear wheel. Loosen the lug nuts on the front wheels. Place the jack under the radiator support or front frame member and jack the car up enough to get the front wheels off the ground. Place the jack stand(s) on the frame rail directly behind the front wheels and lower the car onto the stands. You can keep the jack where it is. Remove the wheels. I put a piece of cardboard or something on the wheel and use it as a seat while working. Place the catch pan under the brake line and hose connection.
Step 2: Remove the Drum Assembly
 I say the drum assembly because some cars are equipped with “floating drums (they slide over the lug nuts and are secured to the hub by the wheel and lug nuts) and non-floating (these have the bearings and retainer nut inside the drum housing.). If you have one or know someone that does, use the special dust cap removal tool to remove the hub dust cap. If not, pry it off carefully with a somewhat large flat screwdriver. You can also use the slipjoint pliers if they go big enough. Just wiggle it back and forth and it’ll come out.
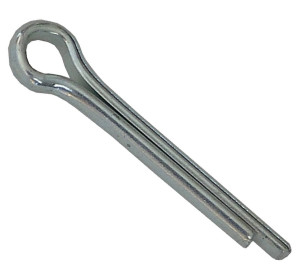
Now, in the area just exposed, you’ll see a cotter pin (See image above for example) bent over the spindle retaining nut. Straighten it and pull it out with pliers or wire cutters. Next, remove the castellated nut cover (it has opening in the top that the cotter pin fits in). Now, remove the nut. Now, remove the drum and hub assembly as a unit.
Step 3: Separate the Rubber Brake Hose from the Hard Line
You can cut the rubber brake hose if you want, but that’s an added step that’s not needed, although it might make things a little easier. Using a 3/8 wrench (preferably a line wrench), loosen and remove the flare nut fitting on the hard line side from the banjo fitting on the rubber hose side. Remove the clip that secures the banjo fitting to the bracket.
Step 4: Separate Tie Rod from Tie Rod Arm
Using pliers or wire cutters straighten and remove the cotter pin from the tie rod at the tie rod arm. With a socket or wrench loosen the tie rod nut several threads. This is usually either a ¾| or 7/8” nut. Insert the pickle fork between the tie rod and arm, with the sloped side towards the knuckle. Firmly strike it with the hammer until it pops loose. Remove the nut and let it fall out the rest of the way. If you have a ball joint separator instead of the pickle fork, use it. Slide it over the tie rod arm with the extension screw cupping the tie rod nut and rotate the extension nut to separate the arm and tie rod.
Step 5: Remove the Spindle Assembly
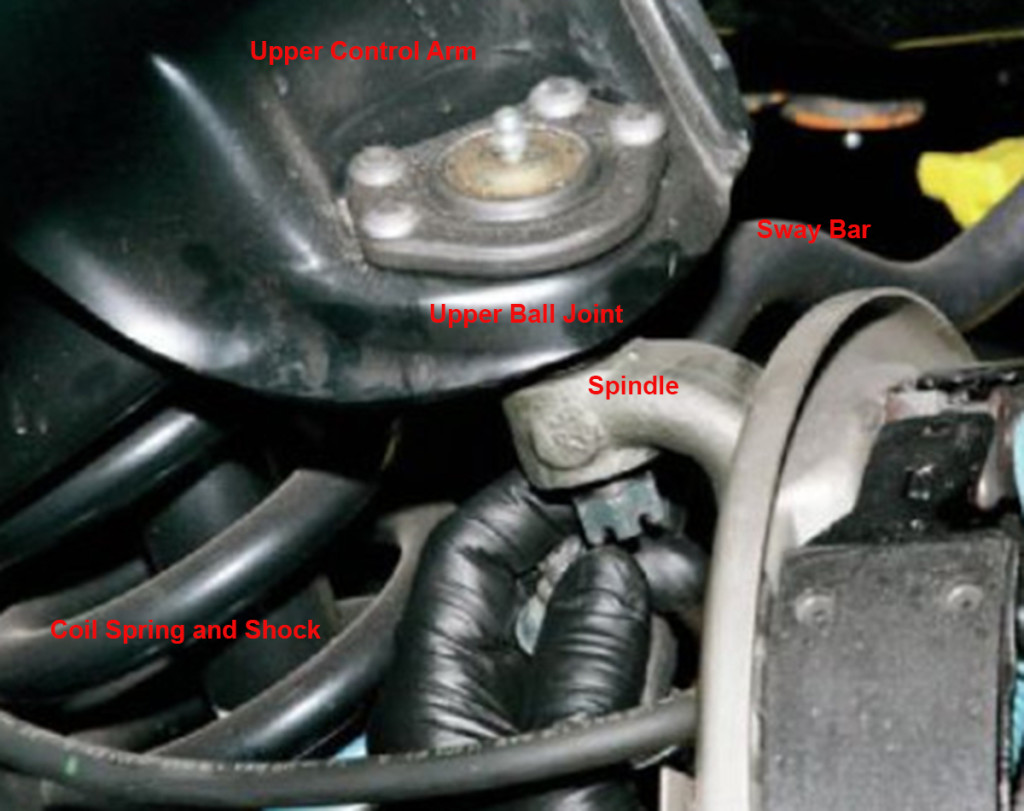
Some people just use the jack for this next step, but I prefer a bit more stability and security. If you want to go that way, raise the jack under the upper control arm enough to fully support the control arm. With some jack stands, you actually may have to forego my method and just use the jack.
Otherwise, put the jack under the frame behind the jack stand and raise it off the jack stand. Move the jack stand under the upper control arm. Lower the car enough so your jack stand can safely support the control arm, normally half of the stand’s extension. Pivot the knuckle so you have easier access to the ball joints.
Straighten and remove the cotter pins from the ball joints. Using a wrench or socket, loosen the ball joint nuts several threads. Separate the upper and lower ball joints from the arm and spindle assembly using either the pickle fork or ball joint separator as described above. Remove the ball joint nuts, lowering the lower control arm with a jack and removing the spindle assembly from the car.
Step 6: Remove and Replace the Old Spindle
This is going to take some elbow grease. Using wrenches and sockets in whatever combination you need loosen and remove the bolts securing the tie rod arm from the spindle. You might want to spray these bolts down pretty good with WD-40 or some other lubricant. If you’ve gotten a kit that doesn’t come with a new spindle, or you get the complete assembly from a junkyard or donor car (my favorite option and usually much cheaper), skip this step.
Step 7: Install the Spindle Assembly
Slide the lower portion of the spindle assembly over the lower ball joint and roll the ball joint nut down a few threads to hold it. Lift the lower control arm while guiding the upper ball joint stud through the corresponding hole in the spindle and run its nut down. Some guys like to do the top and then the bottom. Tighten and torque (preferably) both of these nuts. Tighten them again just enough to slide the cotter pin through. Bend the pin over or around stud to retain it in the stud. Raise the jack under the lower control arm and take the weight off the jack stand if you used one. Lower the jack and pull it out.
Step 8: Reattach the Tie Rod End
Bring the tie rod end up to the tie rod arm and guide the stud through the opening upwards. Thread and tighten the nut, preferably torqueing it. Again, tighten it sufficiently to get the cotter pin through the stud and bend the cotter pin over or around the stud and nut.
If you’ve gotten the disc brake and spindle/steering arm assembly off a donor car, skip the next few steps until I get to the step for hooking up the brake line and hose, which should be replaced.
Step 9: Attach the Caliper Bracket and Backing Plate to the Spindle
The backing plate goes on the outside of the spindle while the caliper bracket goes on the inside. The bolts go through from the outside. The caliper bracket is attached to the rear. You can use the factory nuts and bolts you removed earlier. These should also be torqued.
Step 10: Pack and Install the Bearings and Seals on Both Rotors
If you’ve got a bearing packer, which I recommend, pack the bearings. Open the container of wheel bearing grease and put the gloves on, this is where it gets messy. Place a generous scoop of grease in the palm of your hand. Hold the bearing in your hand by the edge and force it into the scoop of grease all the way to your palm. Don’t just dab it or push it halfway in, you’ve got to really pack the grease in. Keep doing this until grease comes out the other side of the bearing. Do this the full circumference of the bearing. Repeat this for all four bearings. While you’re at it, coat the spindle with a bit of grease. Remove the gloves.
Install the large bearing into the backside of the hub on the rotor with the smaller end in. Press the grease seal into the opening on the back of the rotor as much as you can by hand. If you’ve got a seal installer, use it to properly seat the seal. If not, a small block of wood that extends about one inch over either side of the seal is fine. Tap it until the seal is fully seated.
Step 11: Install the Rotor and Hub Assembly
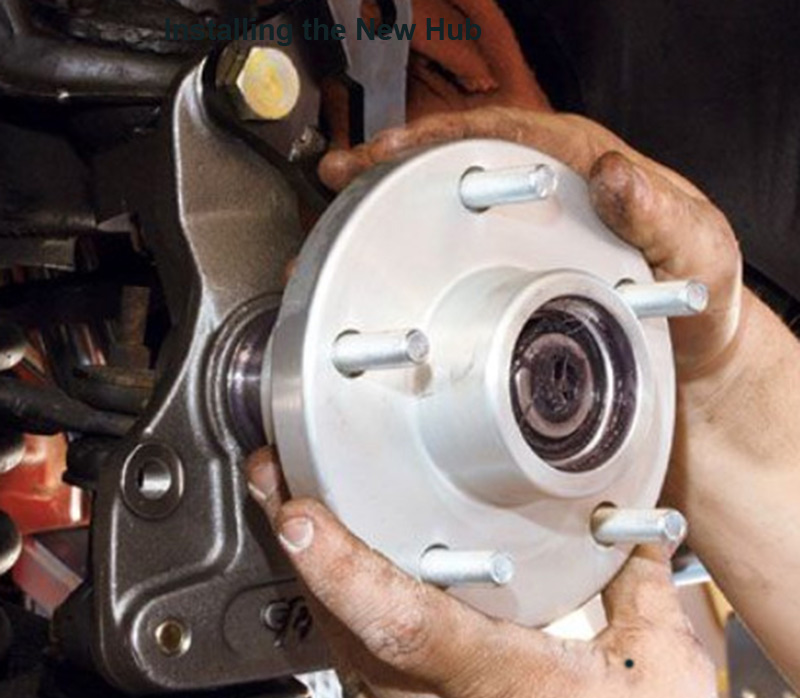
Slide the rotor assembly onto the spindle until it is fully seated. Install the smaller bearing, again with the smaller end towards the inside of the hub. Place the keyed washer over the spindle, lining up the key with the groove in the spindle. Thread the spindle nut down until tight enough that the rotor doesn’t wobble when pushed in alternately at the top and bottom. Make sure it still spins freely, though. Slide the castellated nut cover over, lining up the grooves in its top with the hole in the spindle. Lock it down with a cotter pin.
Step 12: Install the Caliper
Slide the copper gasket over the bolt for the rubber brake hose. Slide the bolt through the banjo fitting and slide another copper gasket on. Thread the brake hose bolt into the caliper. Do this for both calipers to save a step on the other side. Route the banjo fitting end of the hose to the fitting and bracket at the end of the steel line. Thread the flare nut fitting into the banjo fitting and tighten it down. Install the clip securing it to the bracket.
Holding the brake pads apart, slide the caliper over the rear of the rotor and line the bolt holes up with the holes on the tie rod arm. Thread the caliper bolts in and tighten them. These should be torqued to be “by the book” but you really just need to ballpark them to a minimum of 50-60 lb-ft of torque. Remember, calipers are side-specific-the bleeder/drain screw needs to be at the top of the caliper. If not, you’re using the wring caliper, swap sides.
Step 13: Repeat the Required Steps on the Other Side
Just like the heading says, move to the other side and repeat the steps you need to in order to get to where both calipers are on and the brake lines installed. If you’ve bought the power brake kit, skip to the article on installing the new brake booster and master cylinder, otherwise, move on to Step 14.
Step 14: Bleed the Brakes
If you’re doing conversions on both the front and rear, finish up the conversion process for the rears and come back to this step. Once completed, place a catch pan under each wheel and loosen the drain/bleeder screw on the top of each caliper. Pop the cap on the brake master cylinder. Either use a suction bulb or old turkey baster to remove the old fluid, or allow it to flow.
Once the reservoirs are empty, clean out the bottom, it’ll probably have a coating of gunk down there. You can go one step further and flush it out using denatured alcohol if you want to be sure of getting every bit of the gunk out. If you do, make sure you dry the reservoirs of the alcohol. Refill the reservoirs with new brake fluid and keep refilling it until the fluid drips clean out of each of the new calipers. Tighten the bleeder screws down.
Now you need a helper. Have the helper firmly pump the brakes five times and hold the pedal without forcing it down. You go to the right (rear if doing all four) caliper and pop the bleeder screw. Your helper should tell you when the pedal reaches the floor. Again, this person should basically just rest the weight of their foot on the pedal, don’t stomp it. When informed that the pedal has reached the floor, tighten the bleeder and have the helper pump and hold again. Do this until no air bubbles escape. Move to the left (rear for all four) side and repeat the process until no bubbles come out. Remember, if the helper really presses hard on the brake pedal, this will take longer and use more brake fluid than it has to.
Note: Inform your helper to not release the pedal once it hits the floor until after you’ve tightened the bleeder screw. Otherwise, as the pedal comes back up, air will be sucked back into the system. Air is compressible and degrades the efficiency of the brakes, whereas brake fluid isn’t.
Step 15: Put the Tires Back On and Lower the Car
Hang the tires. Thread the lug nuts down and snug them up by hand or lug wrench. Raise the car off the jack stands under the frame and lower it until the wheels take some of the weight. Tighten the lug nuts. Again, these should be torqued, but can be ballparked to about 80 lb-ft of torque. Lower the car the rest of the way.
Notes for Those Using Used Parts from a Junkyard or Donor Car:
Buy two new sets of inner and outer bearings and races as well as grease seals unless they have been recently replaced. I will describe this process in the next article.
Have the rotors turned, again, unless this has recently been done.
New brake pads are a must if they aren’t new or relatively new, also.
what about the brake master cylinder? Don’t you need a different one for disc front brakes? and also a proportioning valve?
IF you go power brakes, yes. But technically, unless you convert from manual to power, no.