

If you take your car to a brake shop and they diagnose leaking or stuck calipers, they’re going to recommend that you buy and have them install rebuilt calipers. This is the accepted practice because it ends up being cheaper for you because the tech can complete the job in far less than half the time required to rebuild the calipers there in the shop.
If you’ve got a couple hours, you can rebuild the disc brake calipers yourself, which will save money for you to spend on other projects.
Why It’s Cheaper for Shops to Install “Rebuilts” than to Rebuild
So, how is it cheaper to have the shop install two rebuilt calipers that average 80 bucks together than it is to have them rebuild the ones you’ve already got? I mean, the rebuild kits cost less than 20 bucks. Simple math, right, 80 (two calipers) is 60 more than 40 (two rebuild kits), right?
Sure. But installing two rebuilt calipers takes less than an hour while properly rebuilding the calipers can take up to three hours. Shops charge in the area of $100 an hour in labor. That means that replacing the calipers totals 180 bucks, whereas the three hours of labor that rebuilding them takes brings the total cost up to almost 400 bucks, when fluids and solvents are added in. If you can remove the calipers yourself and have access to a couple things, you can rebuild your own calipers and put the money you save to good use elsewhere on the car.
List of Tools and Materials You’ll Need
That you’ll need a jack and at least one jack stand plus two wheel blocks is a given. You’re also going to need something like a tire iron or lug wrench to get the tires off. Here’s what else:
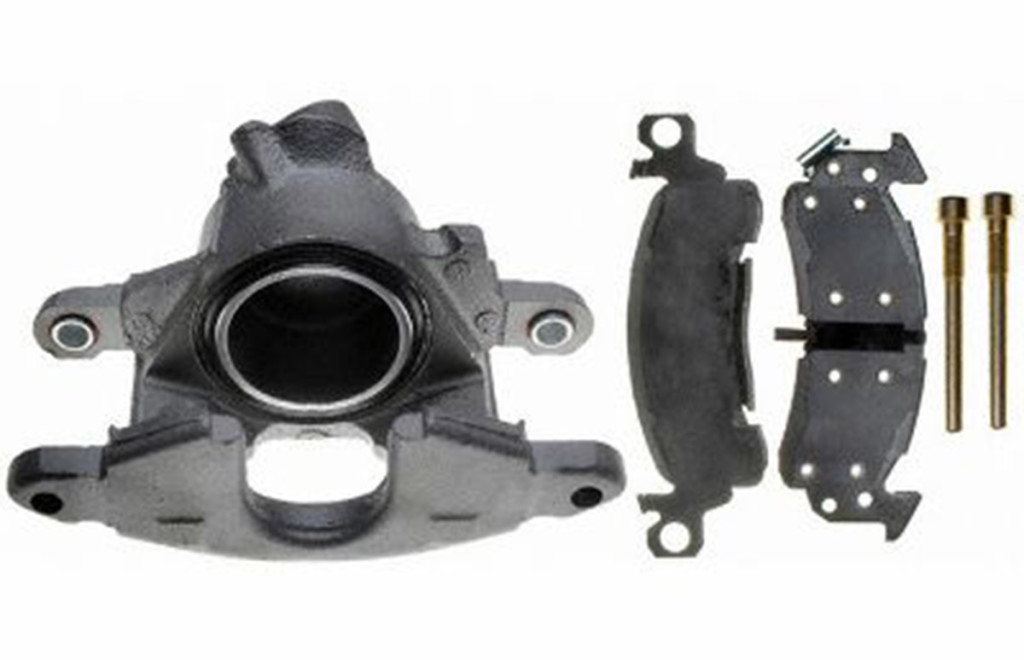
- Two caliper repair kits for the calipers on your car
- One large bottle of brake fluid
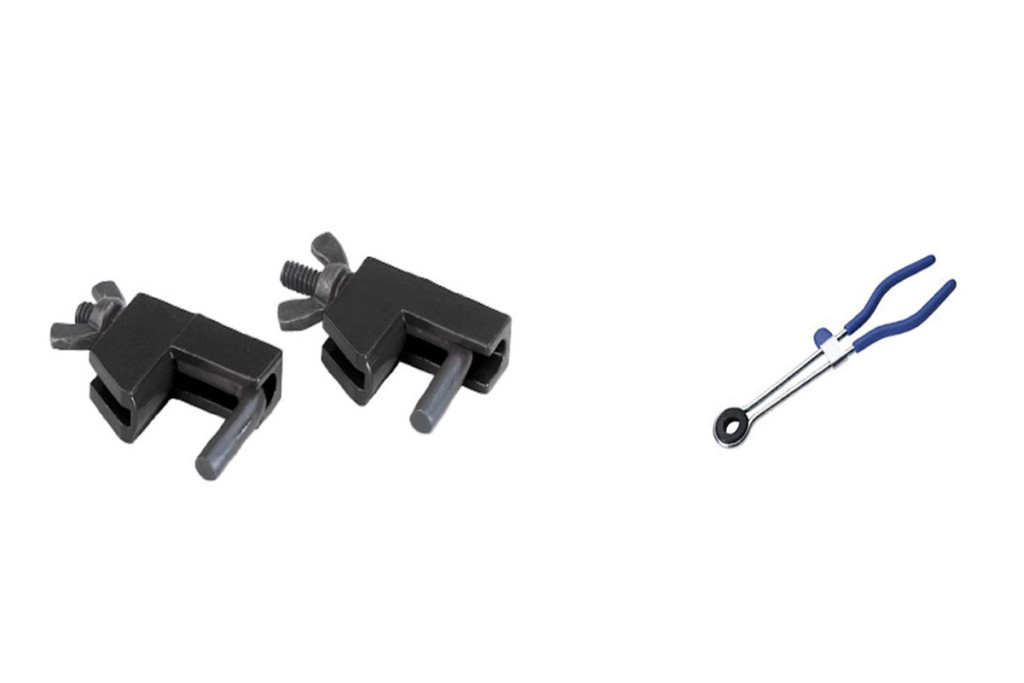
- One brake hose clamp
- Line wrench
- Wrenches or sockets/ratchet
- Block of one inch thick wood
- Scotch-brite pad or brass brush
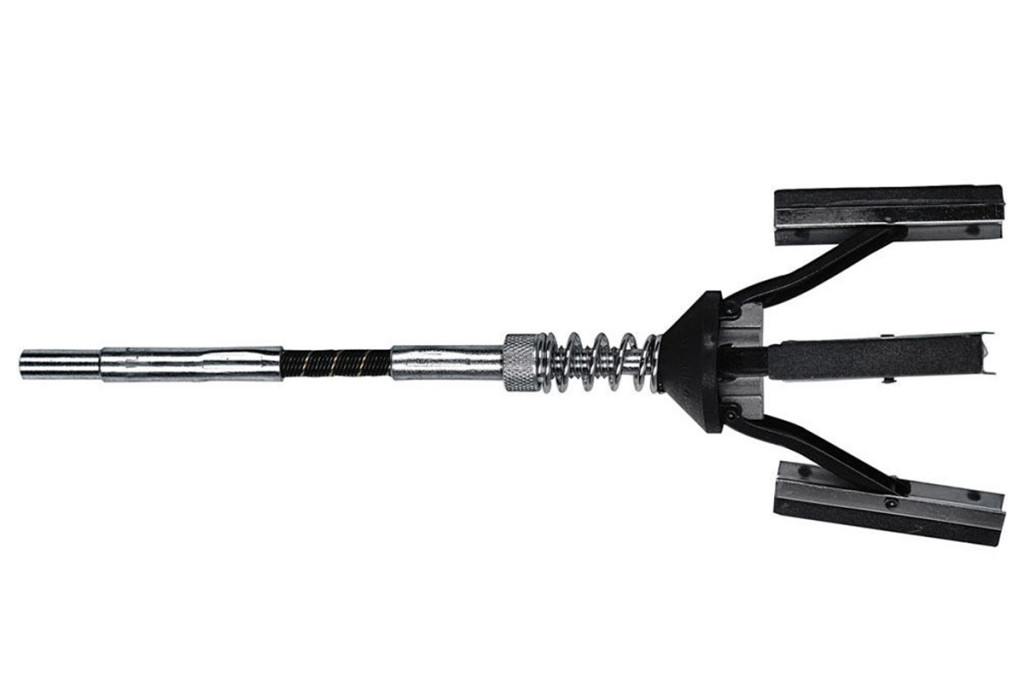
- Caliper/cylinder hone fitting caliper piston bore
- Set of brake pads for the calipers on your car
- Stop Squeak/Disc Brake Quiet
- Air nozzle with rubber tip with pressurized air source
- Two catch pans
- Safety glasses (face shield preferable)
- Drill- air or electric (high speed preferably)
I say “for the calipers on your car” twice because if you’ve got an older car, chances are pretty good that it didn’t come with disc brakes from the factory, somebody retrofitted them. Maybe you. If you don’t know the year, make, and model of the car your calipers came off, you will need to bring one of them down to the parts store with you.
Step 1: Get the Wheels Off
Put your safety glasses on. Prep the new pads with Disc Brake Quiet and any shims/spacers, clips, or springs. Block off the front and rear of one rear wheel, place the jack under the radiator support or front frame rail and lift it enough to take up some of car’s weight. Loosen the lug nuts on both wheels. Finish raising the car and support it with jack stands under the frame rails behind the front wheels. If you only have one jack stand, do one side at a time. Remove the lug nuts and the wheels.
Step 2: Get the Calipers Off
Lay the wheel in front of the spindle and place a piece of cardboard or a shop rag on it so you can use it as a seat. Turn the ignition key to unlock the steering if necessary and turn the wheels to give you easier access to the bolts securing the caliper to the spindle. Use the line wrench to loosen the brake hose at the caliper. Loosen and remove the bolts securing the caliper to the spindle/knuckle assembly. Use the brake hose clamp (NOT pliers) to clamp off the brake line. Put a catch pan under the ball joint. Remove the brake hose, placing the end in or over the catch pan. Loosen the bleeder screw and drain most of the brake fluid. Put your safety glasses back on.
Step 3: Remove the Piston from the Caliper Bore
This is the hardest part. It’s also the most dangerous. You should do this away from anything that is painted because brake fluid is corrosive to paint. Put your safety glasses back on. Preferably you’ve got something that protects the sides of your eyes. Remove both brake pads from the caliper and toss them.
Place the block of wood in the caliper lengthwise in front of the piston. Cover the caliper with a shop towel. Place the tip of the air nozzle into the brake hose opening and push firmly. Use your other hand to firmly hold the caliper in the catch pan. Release air through the nozzle until the caliper piston pops out of the caliper bore. You’ll know when. Thoroughly clean the piston with a Scotch-brite or steel wool soaked in brake fluid, checking for scratches and pitting. Replace badly scratched or pitted pistons.

If you don’t have access to an air compressor or compressed air, you can use the hydraulic pressure generated by the master cylinder. Don’t remove the brake line from caliper yet. Wrap a shop rag around the caliper and have a helper slowly but firmly press the brake pedal by hand until the piston pops. This method should only be used if no air is available as damage to the car and the paint can happen more easily. Once the piston is out, loosely reattach the caliper to the mount and loosen the brake hose.
Step 4: Remove the Old Rubber and Clean the Parts
Use a pick or the tip of a knife to remove the dust boot and piston seal from the caliper. When removing the seal, be careful as you need to examine it to determine its orientation (more later). Use the Scotch-brite or steel wool to remove as much rust and “gunk” from the caliper bore and the piston as possible, using the old brake fluid as a lubricant/cleaning fluid.
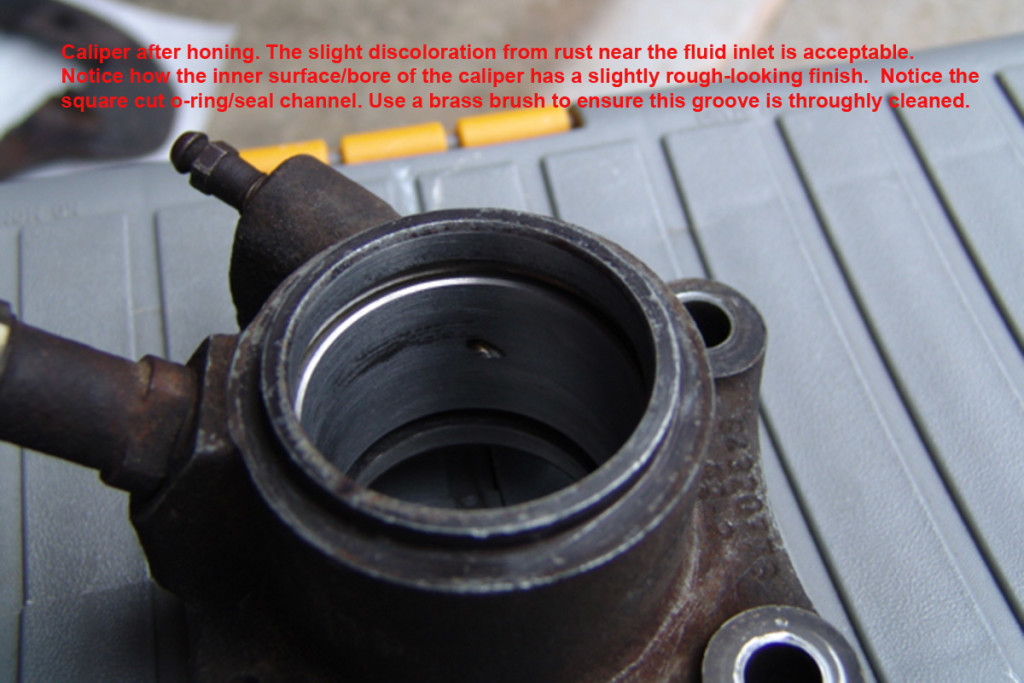
Step 5: Hone the Caliper Bore
Attach the hone to your drill and set the drill for the highest speed possible. Put your safety glasses back on and start the drill spinning at slow speed. Insert the spinning hone into the caliper bore and bring the drill speed up. If necessary, dribble some brake fluid into the caliper bore to keep it wet. Increase the drill’s speed to maximum and let it run for about 20-30 seconds, moving the hone up and down slowly. Keep the cylinder and hone moist.
Slow the drill and remove the hone. Dump any fluid into the catch can. Wipe the cylinder bore well and rinse as needed to get remove any filings from the honing process. Remove all rust and pitting from the seal areas, areas about half an inch above and below the seal. Don’t worry so much about pits deep in the bore, just be sure to clean up the areas where the piston seals to the bore. When I’m done honing, I like to hang the caliper over the can and spray it down liberally, inside and out with something like Brakleen.
Step 6: Reassemble the Caliper
Remember when you removed the old seal from the caliper and you paid careful attention to the orientation of the seal when it came out of the groove in the bore? One side is chamfered, while the other is a perfect right angle. The new seal has to go in the exact way the old one came out. Liberally coat it with brake fluid (the books say use brake assembly fluid but why waste the money?).
Pour some brake fluid into the caliper piston bore and coat the walls and the piston generously. Push the piston into the bore evenly and smoothly, being sure it’s installed the way it came out. Place the dust boot onto the piston, sliding the bead into the groove on the piston. Lubricate the outside of the dust boot where it slides into the caliper bore and finish seating the piston in caliper bore.
Step 7: Flush the Brake Line
If you’re doing this one side at a time, start on the side away from the master cylinder, the passenger side. This makes things a little easier for you. Pop the cap on the master cylinder, remove the brake hose clamp, and let fluid drain from the master cylinder. Suctioning it out with a suction bulb makes this go quicker. Scrape the bottom of the master cylinder lightly to clean the sludge off the bottom of the reservoirs.
Refill the reservoirs with clean fluid and allow the fluid to run freely until the fluid coming from the hose runs clear. Using your hand, slowly depress the brake pedal a few times to help flush the lines more thoroughly. Clamp off the rubber brake hose again.
Step 8: Reassemble and Reinstall the Calipers
Install the new brake pads into the caliper(s) being sure to install any keepers, shims, or clips. Also be sure to use a hammer to slightly bend any “ears” or “wings” on the pads to keep them from rattling Thread the caliper onto the brake line until finger tight.
Holding the pads apart, slide the caliper over the brake rotor and line up the mounting holes on the caliper and the knuckle/spindle assembly. Thread the caliper bolts in finger tight and tighten them with a wrench or socket and ratchet. Technically these should be torqued to factory spec, but if you don’t have a torque wrench, tighten them to about 60 ft-lbs. Use the line wrench to tighten the brake hose where it meets the caliper.
Step 9: Repeat on the Other Side
Repeat Steps 1 through 8 above on the other side.
Step 10: Bleed the Brakes
Chances are, even if you’ve taken every precaution possible, air has gotten into your brake lines. Air is your brake system’s enemy for a couple reasons. First and worst is why brake fluid is used instead of air: fluids aren’t compressible. This means every bit of force is transferred to the brakes. If we used air, part of your braking effort would go towards compressing the air. The other reason we don’t like air is because air has moisture which causes brake system components to rust. So, when we finish, we bleed the brakes. You’ll need a helper.
Have the helper carefully climb into the driver seat and carefully pump the brake pedal five times and hold it, using just enough force on the pedal to keep it from coming up. As your helper holds the pedal down firmly, loosen the bleeder screw (not the brake hose) on the passenger side caliper, letting the fluid escape.
Your helper needs to let you know when the brake pedal reaches the floor. We use the following litany in our shop:
- You: “Pump it! Hold it!”
Helper: “Down!” (Loosen bleeder)
Helper: “On the floor!”
You: “Hold it!” (Tighten) “Pump it!”
This procedure is repeated until no air bubbles escape with the fluid. Make sure you keep the master cylinder full of clean fluid. When you no longer see air bubbles, tighten the bleeder screw and move to the driver side and repeat the process.
Step 11: Hang the Tires, Kick the Fires
Hang the tires. Thread the lug nuts down as tight as you can with the tires in the air. Raise the car enough to remove the jack stand(s). Lower the car until enough weight is on the tires to allow you to properly tighten the lug nuts. Tighten the lug nuts, torqueing them to spec if possible. Finish lowering the car and double check the lug nuts. Test drive the car.
Note: Use a fine file or 80-100 grit sandpaper to chamfer the edges of the new brake pads. This takes the sharp edges off and lessens the chances of the pads vibrating and squeaking.
Remember, on some newer rear calipers, especially those on cars with ABS, the piston rotates in and out of the bore.
Leave a Reply