
Come Through in the Clutch by Installing a New One
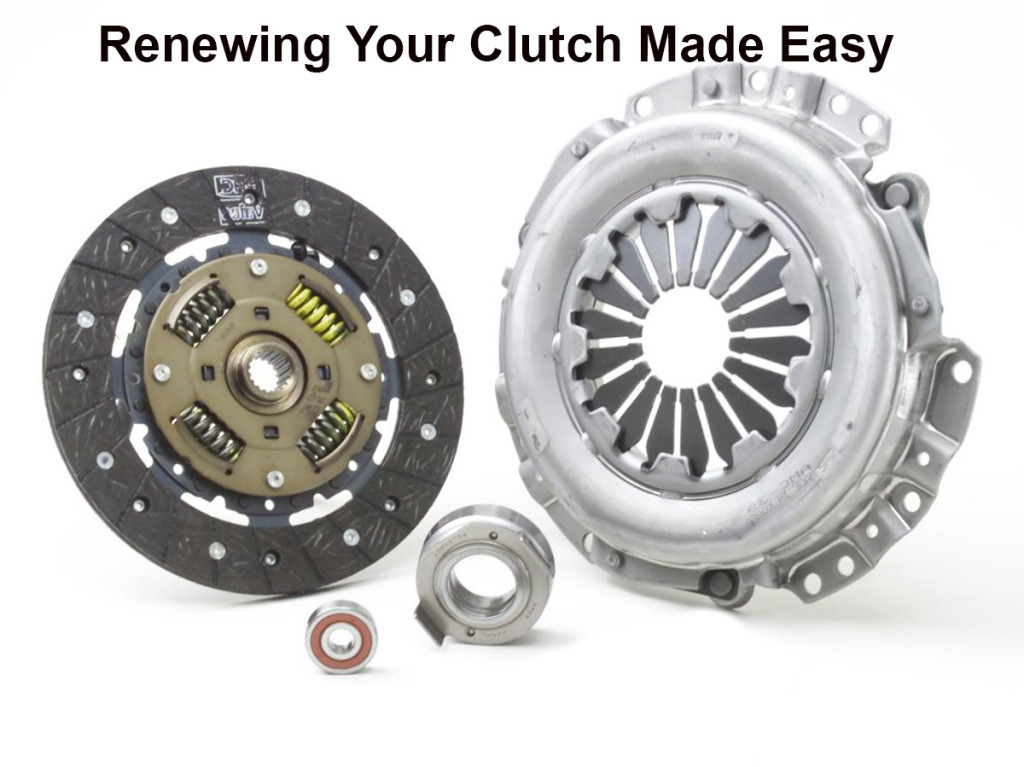
The clutch is a vital part of your manual transmission. It allows you to temporarily disconnect the transmission output from the input so you can shift. Worn clutches slip. They don’t transfer all the power they should through the transmission and to your wheels. In short, a worn transmission can negate the time and money you put into your strip burner’s engine.
How Can You Tell When You Need a New Clutch?
Determining that you need a new clutch can be easy or difficult. Start the engine, slip the trans into first (feeling it “lurch” into gear), apply throttle as you slowly release the clutch, and the car goes nowhere as the engine revs. That’s pretty obvious you need a new clutch.
However, not all worn clutches are going to give up the ghost that quickly. You’ll probably still have decent acceleration from your strip burner, with a mildly worn clutch. However, there will be signs and symptoms that your clutch is giving you. One of those signs is the smell. The only way to describe it is as a burning friction material smell, or maybe burning transmission fluid smell.
However, what if there is no smell and your car still moves at a fairly decent clip, how do you know if your clutch is on its last legs? Years ago, a buddy of mine, a senior technician for Aamco told me a really simple way to check: Dump the trans. Shift into first and get going. When you should be shifting it into second, shift it into third. A sign that your clutch is in good condition is the engine bogging down and almost dying. However, if the engine only bogs a little but then begins to pull, you know you need a new clutch pretty soon. Changing the clutch is pretty easy, although time consuming, especially if you have to have the flywheel turned.
Tools and Equipment You’ll Need
It’s a given that you’re going to need at least two jack stands and a jack. Four jack stands tends to ease the mess you’ll need to clean up afterwards. You’ll also need a new clutch kit for your car and transmission. This will normally consist of the pressure plate, clutch disc, and a throwout bearing. The rest of what you’ll need consists mainly of tools and can vary by make and model.
• Socket set with extensions and a universal swivel.
• Wrenches
• Pliers or wire cutters
• Catch pan
• Gear oil specific for your transmission
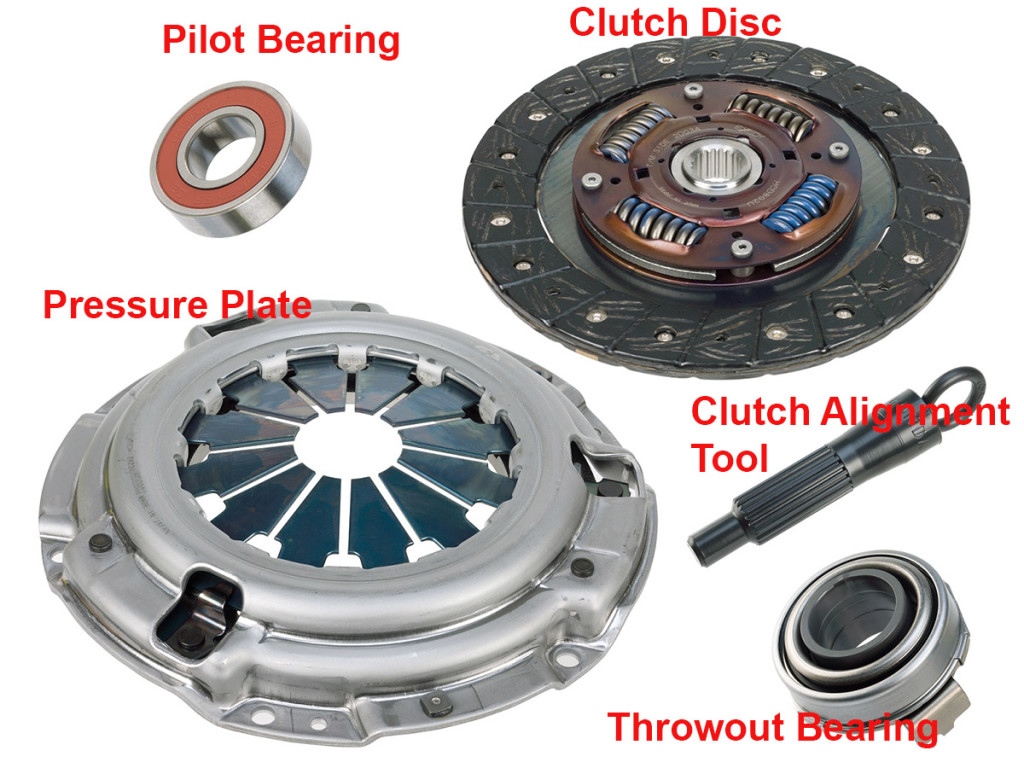
Step 1: Get the Car in the Air
Park the car on a firm and level surface not your driveway. Firmly set the parking brake. Disconnect the battery. (Don’t worry about putting the trans in gear, we’re taking it out soon.) Block one (both) rear wheel (s) front and rear. Place the jack under the front frame crossmember or radiator support and lift the car high enough for you to slide under. Place one jack stand under the frame behind each of the front wheels. Lower the car onto the jack stands and remove the jack. If you have four jack stands, next place the jack under the differential and raise the car an equal amount. Place the jack stands under the rear axle housing and carefully lower the rear of the car onto the jack. The car should now be level or slightly lower in the front than the back.
Step 2: Drop the Drive Shaft
You’ve got to drop the driveshaft in order to get to the transmission. This is where it can start to get messy. Place the catch pan under the tailshaft of the transmission. Using a wrench, remove the two u-clamps securing the rear u-joint to the differential yoke. Slide the driveshaft towards the front to release it from the yoke. Carefully pull the driveshaft from the transmission tailshaft. I like to wrap the transmission side in a towel or shop rag before I set it aside.
Note: Get a drop on possible future repairs by checking and replacing the u-joints if needed. Grasp the driveshaft and wiggle it side to side and up and down. The only play should in the pliability of your skin. Next, rotate the driveshaft back and forth. Again, there should be no play. If there is, replace the u-joints.
Step 3: Disentangle the Transmission
By “disentangle” I mean disconnect everything such as clutch cable or linkage. Shifter cable or linkage. Speedo cable. Neutral safety switch cable. I recommend taking pictures so you don’t get confused when reassembling everything.
This is where things start moving apart. Some cars have mechanical linkage connecting the clutch pedal to the clutch assembly. Others use a cable while still others use hydraulics. The shifter on your manual trans may connect directly to the top of the trans. It may also be connected via linkage in the top or side of the transmission. If your car is REALLY old, the shifter may be on the steering column and you’ll have quite a bit of linkage to disconnect. These differences are why I recommend a motor manual for your car.
Step 4: Remove the Starter
Remove the starter. It will have either two or three bolts securing it to the engine and transmission. Just slide it forward to get it out of your way; it doesn’t have to come all the way out unless you’re replacing it.
Step 5: Remove the Transmission
Slide the jack under the middle of the transmission and raise it enough to just support the transmission. Line it up North and South under the transmission. Next, using either wrenches or ratchet and sockets, remove the bolts securing the transmission to the engine. There will be anywhere from eight to fifteen bolts that need to be removed.
With all bolts securing the transmission to the engine removed, grasp the transmission tailshaft and wiggle it back and forth while pushing/pulling towards the rear of the car. Once the input shaft has cleared the clutch assembly, slowly lower the jack to the ground.
Note: When doing this in a home garage, I usually use a small-ish tie down strap to secure the transmission to the jack. Nothing is worse than a garage floor full of gear oil..
Step 6: Remove the Clutch Assembly from the Flywheel
Check out the picture above. It shows the flywheel (attached to the crankshaft) with the clutch disc and pressure plate attached. The pressure plate sandwiches the clutch disc to the flywheel and is held to the flywheel by studs and bolts. The studs are used to properly position the pressure plate on the flywheel while the bolts are used to secure them together.
Using a wrench or socket, loosen the bolts holding the pressure plate to the flywheel. As you hold the pressure plate and clutch disc in position, remove the bolts and place the clutch parts on the ground.
Step 7: Inspect
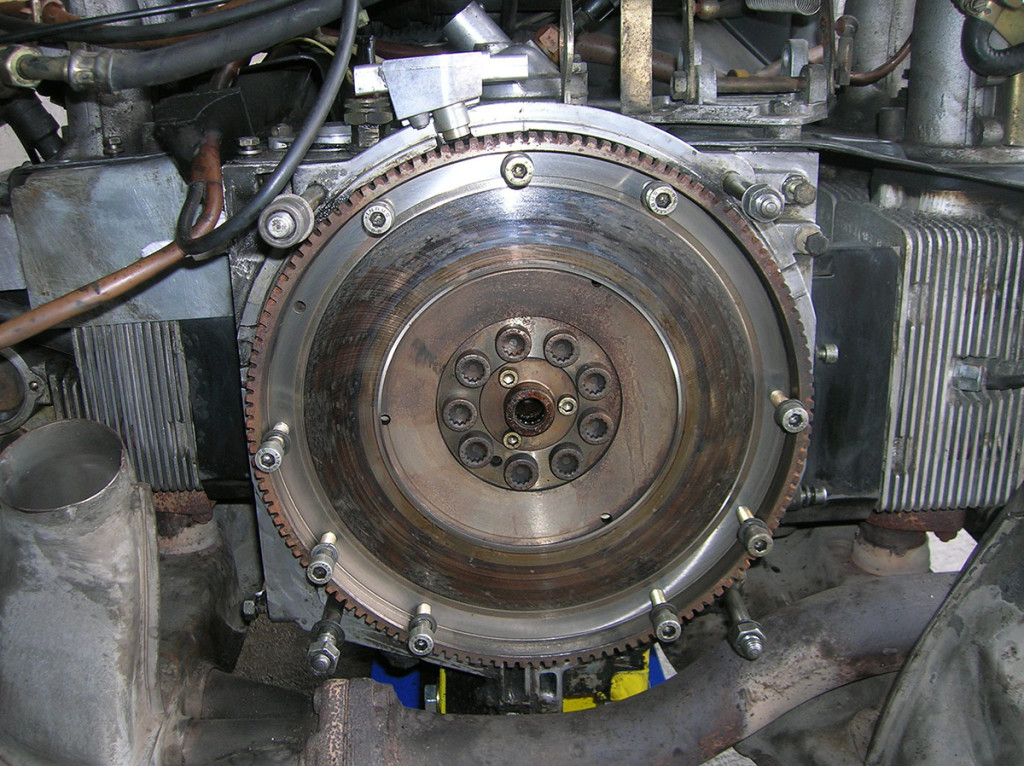
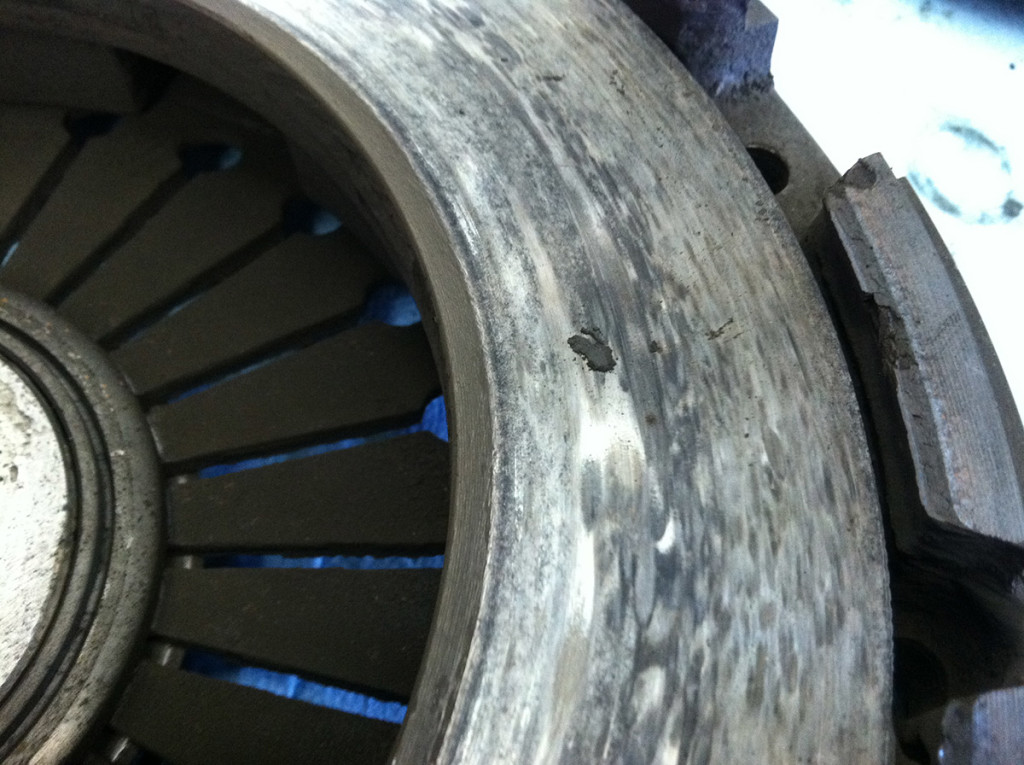
Once you’ve got the clutch plates off the flywheel, check the friction surface of the flywheel. It should be smooth with little to no heat bluing. There should also be no grooves worn into the surface. See the images above and below. If the friction surface is heat-blued, grooved, or otherwise problematic, you will need to drop the flywheel and have it turned/resurfaced. Be careful. That bad boy isn’t light, and trust me, it really hurts when it lands on your hand.
Next, run your fingers over the input shaft splines. Check for any burrs. For hydraulic clutches, check the master and slave for leaks. For clutches with mechanical linkages, check to ensure they aren’t bent and the holes ar eon good shape (not oblonged).
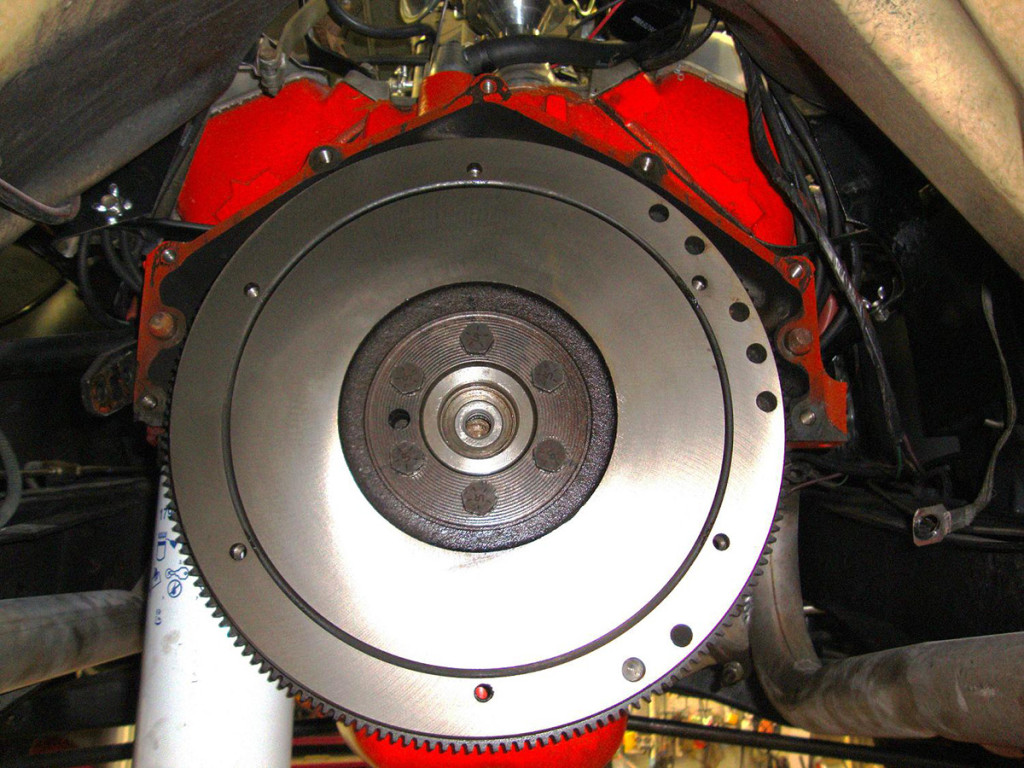
This flywheel has just been turned. Notice the color and no grooves.
Step 8: Reassemble the Clutch Assembly
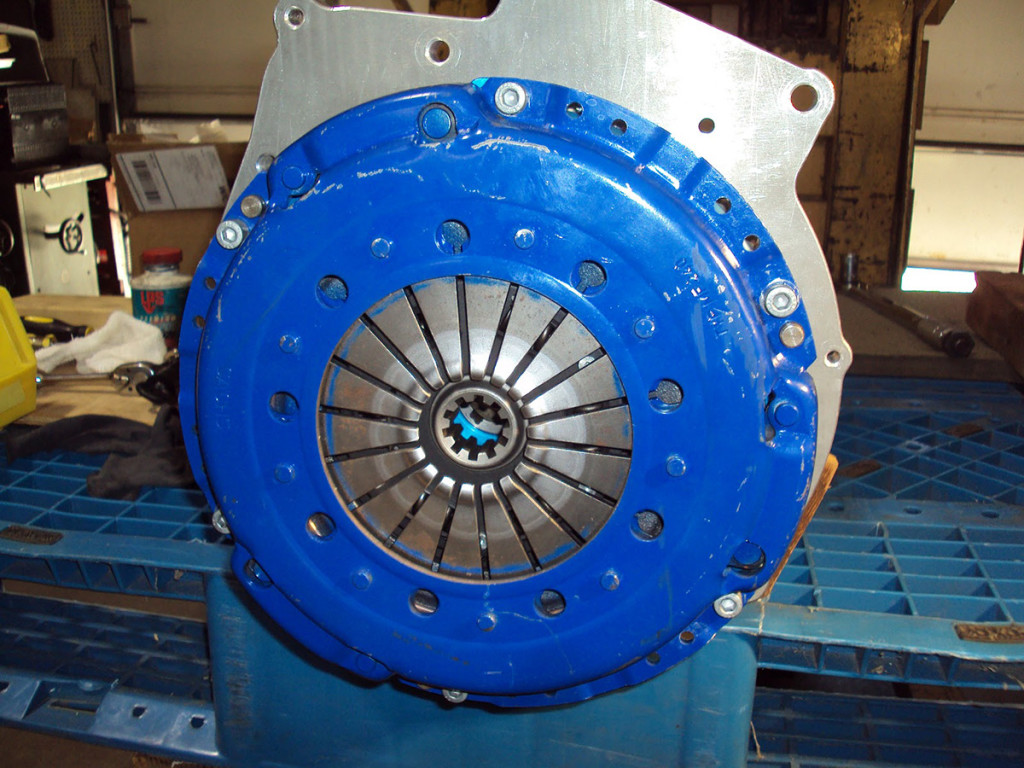
Other than the colors, this is what your finished product should look like before mating up the transmission.
Ok. You’ve got your newly resurfaced flywheel back from the machine shop and you’re ready to go. If you look carefully, in the center of the flywheel you’ll notice a small bearing. This is called the pilot bearing or bushing. Stick your finger in it and rotate it back and forth. It should roll smoothly. If not, replace it.
My dad and the guys that taught me how to do this repair job years ago always told me I should use a trans spline tool whenever doing clutches, but I believe I’ve only used one once. For someone who doesn’t do this on a daily basis, it can help getting the pressure plate and clutch disc aligned properly before tightening. I just use my finger.
The clutch disc has to be perfectly centered under the pressure plate. Any misalignment will cause serious issues in the transmission due to imbalances. Line up the studs and threaded holes for the bolts and hold the pressure plate/disc assembly against the flywheel as you thread the bolts in and tighten them down.
Step 9: Replace the Throwout Bearing
The throwout bearing helps during shifting. It slides into the clutch fork and rides on the input shaft and provides a better surface for the clutch fork to press against and release the clutch pressure fingers. Remove the old one and slide the new one on.
Step 10: Reattach the Transmission
With the clutch assembly fastened to the flywheel, it’s time to get the transmission back up in place. While maintaining the balance of the transmission on the jack, slowly raise the jack until it’s pretty durn near in place. Now you can use small up or down movements of the jack, along with side to side wiggling to get the transmission in place on the engine. Remember, there are also studs on the block that need to line up with unthreaded holes on the transmission body. You may need to get it within about an inch of mating up perfectly and then use a couple bolts to “suck them together.” Sometimes that last inch is “problematic” to say the least.
Step 11: Hook Everything Back Up
Reattach the shifter and clutch actuation assemblies and the starter/battery cable. This is where the pictures I mentioned earlier come in handy. Just compare what you have with the pictures. This is also another part where the motor manual will come in handy.
Step 12: Stick the Driveshaft
Slide the front yoke of the driveshaft into the tailshaft of the transmission all the way until it stops. You may need to wiggle a little to get it to go in. Slide down to the rear end and lift the rear of the driveshaft into position. If you need to, rotate one of the wheels to get the yoke and u-joint to line up properly. Reattach the u-bolts and tighten.
Step 13: Adjust (If Required)
The final step in replacing the clutch is adjusting it. If your clutch is hydraulic, you don’t need to worry about this. However, if it is cable-actuated or mechanical, you most likely will. Again, motor manuals give you the exact process for this.
Once the clutch is adjusted properly, lower the car and test drive it. Drive it hard to make sure the clutch is grabbing properly. Keep the motor manual and whatever tools you need with you in case you need to tweak the adjustment a bit while test driving.
Drive it like ya stole it, dear readers!


You made a great point about how you can tell by starting the engine and slipping the trans into the first gear. My husband and I are looking for a clutch replacement service that can help us with his manual car. We will keep these tips in mind as we search for a professional that can help us best.