RacingJunk’s Top 10 How-To Articles of the Year


- Verify that the vehicle tracks straight before aggressively launching from the line. Begin with light acceleration and low speeds. If the vehicle tracks and drives acceptably at this level, make incremental increases in acceleration and top speed until the vehicle is safe at higher speed. Vehicles not tracking straight at speed should verify all chassis settings including but not limited to alignment, bump steer, tire pressures, etc.
- Once the vehicle drives in a safe manner at speed, move on to test launching. Test launches should consist of only the initial launch with no subsequent gear changes. Begin with low rpm launches and gradually increase rpm and severity if the car launches acceptably.
- The vehicle should leave in a straight line without extreme wheel standing or harsh bounces. Sudden, uncontrollable front end lift should be corrected by making suspension instant center adjustments, if possible. More gradual front end lift can be corrected by adjusting the shock valving, if possible. If the car gradually wheel stands or bounces violently, adjust front suspension first, then rear.
- If there is rear tire shake, wheel hop or excessive body separation, adjust rear suspension first, then front.
- After the car has been adjusted to launch straight, test launch and include the first gear change. Make any required adjustments and add the next gear change. Repeat until the car can be launched straight and driven at speed safely.
| Front Wheels Lose Contact with Ground | Increase Rebound Stiffness | Violent chassis separation and may result in jerking the front wheels off the ground. Increase spring or shock stiffness, then test again. |
| Rear Tires Hook Then Lose Traction | Increase Rebound Stiffness | If weight transfer occurs too quickly the rear tires may hook then lose traction as the front end begins to travel downward. Slowing the rate at which the front end rises prevents the shocks from topping out too quickly and increases the duration of time that the rear tires benefit from the weight transfer. Increase spring or shock stiffness, then test again. |
| No Front End Rise | Decrease Rebound Stiffness | Too firm of a shock setting limits the amount of weight transferred to the rear tires, resulting in poor traction. Decrease spring or shock, then test again. |
| Front “Bottoms Out“ After Launch | Increase Stiffness | If front suspension settles too fast after launch or gear change it may cause the front suspension to bottom out at the end of its downward travel. If the suspension bottoms out hard enough, rear traction may be lost. Increase spring or shock stiffness, then test again. If increasing shock stiffness cannot extend weight transfer duration long enough, a higher rate spring should be installed. |
| Hard Front End Bounce (After Launch or Gear Change) | Decrease Bump Stiffness | If the tires cause the front end to bounce upon landing, the shocks are too stiff. The front end should settle in a single, smooth motion. Decrease spring or shock stiffness, then test again. This can be a very subtle problem. Watch the front tire sidewall as it contacts the ground. |
| Rear End Squats | Increase Bump Stiffness | Some vehicles will squat during launches instead of pushing the vehicle forward. To assist in planting the tires, increase shock bump stiffness by one, then test again. Spring rates should only be increased if the shock valving range is not great enough to correct the issue. |
| Vehicle Separates from Rear End | Increase Rebound Stiffness | Some suspension geometries plant the tires so forcefully that the rear end of the vehicle rises away from the housing too rapidly. The vehicle may hook initially, then spin the tires once the shocks are topped out. Slowing the rate at which the rear end rises increases the duration of time that the rear tires benefit from the improved traction. Increase shock rebound stiffness by one, then test again. Spring rates should only be increased if the shock valving range is not great enough to correct the issue. |
| Loss of Traction with Minimal Chassis Movement | Decrease Bump/Rebound Stiffness | A suspension system that is too stiff can hit the tires too hard, causing a loss of traction. Softening the suspension slows the transfer of weight and reduces the initial tire shock. Minimal chassis movement makes if very difficult to visually tell if the bump or rebound needs to be decreased. We suggest adjusting bump first and watch for a gain or loss in the ET. If ET does not improve, return to previous setting, then adjust rebound instead and test again. Spring rates should only be decreased if the shock valving range is not great enough to correct the issue./td> |


| POSSIBLE CAUSE | CORRECTIVE ACTION |
| Improper starting procedure used | Check to determine if proper starting procedure is used, as outlined in owner's manual |
| No fuel in gas tank | Add fuel. Check fuel gauge for proper operation. |
| Choke valve not closing sufficiently when cold | Adjust the index of the choke thermostatic (bi-metal) coil |
| Choke valve or linkage binding or sticking | Realign the choke valve or linkage as necessary. If caused by dirt and gum, clean with automatic choke cleaner. Do not oil choke linkage. If parts are replaced, readjust to specifications. |
| No fuel in carburetor | (1) Remove fuel line at carburetor. Connect hose to fuel line and run into metal container. Remove the high tension wire from the center tower on distributor cap and ground. Crank over engine - if there is no fuel discharge from the fuel line, check for kinked or bent lines. Disconnect fuel line at tank and blow out with air hose, reconnect line and check again for fuel discharge. If none, replace fuel pump. Check pump for adequate flow, as outlined in factory service manual. (2) If fuel supply is o.k., check the following: (a) Inspect fuel filter(s). If plugged, replace. (b) If filters are o.k., remove air horn or fuel bowl and check for a bind in the float mechanism or a sticking float needle. If o.k., adjust float as specified. |
| Engine flooded. NOTE: to check for flooding remove the air cleaner. With the engine off look into the carburetor bores. Fuel will be dripping off nozzles and/or the carburetor will be very wet. | Be sure that the proper "unloading" procedure is being used. Depress the accelerator to the floor and check the carburetor to determine if the choke valve is opening. If not, adjust the throttle linkage and unloader. |
| Carburetor flooding. | NOTE: Before removing the carburetor air horn, use the following procedure which may eliminate the flooding: (1) Remove the fuel line at the carburetor and plug. Crank and run the engine until the fuel bowl runs dry. Turn off the engine and connect the fuel line. Then re-start and run engine. This will often flush dirt past the carburetor float needle and seat. (2) If dirt is in the fuel system, clean the system and replace filter(s) as necessary. If excessive dirt is found, remove the carburetor unit. Disassemble and clean. (3) Check float needle and seat for proper seal. If the needle is defective, replace with a Holley matched set. (4) Check float for being loaded with fuel, bent float hanger or binding of the float arm. (5) Adjust float to specifications. |
| POSSIBLE CAUSE | CORRECTIVE ACTION |
| Choke valve not opening completely. | (1) Check for binding choke valve and/or linkage. Clean and free-up or replace parts as necessary. Do not oil choke linkage. (2) Check and adjust choke thermostatic coil. (3) Check for choke thermostatic coil binding in well or housing. (4) Check for vacuum leak with integral choke system. |
| Engine flooded - Carburetor flooding. | See procedure under "Engine cranks, will not start" |
| No fuel in carburetor. | (1) Check fuel pump. Run pressure and volume test. (2) Check float needle for sticking in seat, or binding float. |
| Leaking float bowl. | Fill bowl with fuel and check for leaks. |
| Fuel percolation. | Open throttle wide and operate starter to relieve over rich condition. |

| POSSIBLE CAUSE | CORRECTIVE ACTION |
| Engine does not have enough fast idle speed when cold. | Check and re-set the fast idle setting and fast idle cam. |
| Choke vacuum diaphragm unit is not adjusted to specifications or unit is defective. | (1) Adjust vacuum break to specification. (2) If adjusted O.K., check the vacuum opening operation as follows: (a) On externally mounted vacuum diaphragm unit, connect a piece of hose to fitting on the vacuum diaphragm unit and apply suction preferably ∫y hand vacuum pump or another vehicle. Plunger should move inward and hold vacuum. If not, replace the unit. (b) On the integral vacuum piston unit, remove cover and visually check piston and vacuum channel. If piston is sticking, replace assembly. NOTE: Always check the fast idle cam adjustment before adjusting vacuum unit. |
| Choke coil rod out of adjustment. | Adjust choke coil rod. |
| Choke valve and/or linkage sticking or binding. | (1) Clean and align choke valve and linkage. Replace if necessary. (2) Re-adjust if part replacement is necessary. |
| Idle speed setting. | Adjust idle speed to specifications on decal in engine compartment. |
| Not enough fuel in carburetor. | (1) Check fuel pump pressure and volume. (2) Check for partially plugged fuel inlet filter. Replace if dirty. (3) Remove air horn or fuel bowl and check float adjustments. |
| Carburetor flooding. | (1) Check float needle and seat for proper seal. If needle is defective, replace with a Holley matched set. (2) Check float for being loaded with fuel, bent float hanger or binding of the float arm. (3) Check float adjustments. (4) If excessive dirt is found in the carburetor, clean the fuel system and carburetor. Replace fuel filters as necessary. |

| POSSIBLE CAUSE | CORRECTIVE ACTION |
| Idle mixture adjustment | Adjust idle mixture screws to lean best idle. Repeat the operation on 2 and 4V carburetors. Now, turn mixture screws in until idle speed drops 25 RPM on tachometer. |
| Idle speed setting. | Re-set idle speed per instructions on decal in engine compartment. Check solenoid operation. |
| Manifold vacuum hoses disconnected or improperly installed. | Check all vacuum hoses leading to the manifold or carburetor base for leaks, being disconnected or connected improperly. Install or replace as necessary. |
| Carburetor loose on intake manifold. | Torque carburetor to manifold bolts (100 inch pounds) |
| Intake manifold is loose or gaskets are defective. | Using a pressure oil can, spray light oil or kerosene around manifold legs and carburetor base. If engine RPM changes, tighten or replace the manifold gaskets or carburetor base gaskets as necessary. |
| Hot idle compensator not operating (where used) | Normally the hot idle compensator should be closed when engine is running cold and open when engine is hot (approximately 140° F at comp.) replace if defective. |
| Carburetor flooding NOTE: Check by using procedure under "carburetor flooding". | (1) Remove air horn and check float settings. (2) Check float needle and seat for proper seal. If the needle is defective, replace with a Holley matched set. (3) Check float for being loaded with fuel, bent float hanger or binding of the float arm. Adjust to specifications. (4) If excessive dirt is found in the carburetor, clean the fuel system and carburetor. Replace fuel filters as necessary. |
| POSSIBLE CAUSE | CORRECTIVE ACTION |
| Fuel restriction. | Check all hoses and fuel lines for bends, kinks or leaks. Straighten and secure in position. Check all fuel filters. If plugged or dirty, replace. |
| Dirt or water in fuel system. | Clean fuel tank and lines. Remove and clean carburetor. |
| Fuel level. | Adjust float. Check for free float and float needle valve operation. |
| Main metering jet defective, loose or incorrect part. | Replace as necessary. |
| Power system in carburetor not functioning properly. | Power valve or piston sticking in down position. Free up or replace as necessary. Power valve loose, incorrect gasket or leaking around threads. Replace as necessary. Leaking diaphragm. Test with Holley hand vacuum pump. Replace as necessary. |
| Vacuum leaks. | It is absolutely necessary that all vacuum hoses and gaskets are properly installed with no air leaks. The carburetor and manifold should be evenly tightened to specified torque. |


| POSSIBLE CAUSE | CORRECTIVE ACTION |
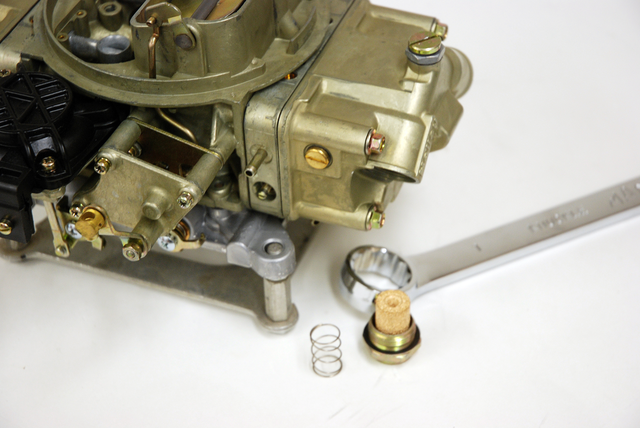
| Defective accelerator pump system. NOTE: A quick check of the pump system can be made as follows: With the engine off, remove air cleaner and look into the carburetor bores and observe pump stream, while briskly opening throttle valve. A fuel stream of fuel should emit from pump jet and strike near the center of the venturi area. | PISTON TYPE - Remove air horn and check pump cup. If cracked, scored or distorted, replace the pump plunger. PISTON & DIAPHRAGM TYPES - Check the pump discharge ball for proper seating and location. The pump discharge ball is located in a cavity next to the pump well. To check for proper seating, remove air horn and gasket and fill cavity with fuel. No "leak down" should occur. Restake and replace check ball if leaking. make sure discharge ball, spring and retainer are properly installed. DIAPHRAGM TYPE - Check pump discharge as above. Inspect diaphragm, replace if defective. Check pump inlet ball valve clearance. Adjust pump operating lever clearance. |
| Dirt in pump passages or pump jet. | Clean and blow out with compressed air. |
| Fuel level. | Check for sticking float needle or binding float. Free up or replace parts as necessary. Check and reset float level to specification. |
| Leaking air horn to float bowl gasket. | Torque air horn to float bowl using proper tightening procedure. |
| Carburetor loose on manifold. | Torque carburetor to manifold bolts (100 inch pounds). |

| POSSIBLE CAUSE | CORRECTIVE ACTION |
| Carburetor throttle valve (s) not going wide open. (Check by pushing accelerator pedal to floor). | Adjust throttle linkage to obtain wide open throttle in carburetor. |
| Dirty or plugged fuel filter(s). | Replace with a new filter element. |
| Power system not operating. | PISTON TYPE - Check power piston for free up and down movement. If power piston is sticking check power piston and cavity for dirt, or scores. Check power piston spring for distortion. Clean or replace as necessary. PISTON & DIAHRAGM TYPES - Check power valve channel restrictions. Clean if necessary. |
| Float level too low. | Check and reset float level to specification. |
| Float not dropping far enough into float bowl. | Check for binding float hanger and for proper float alignment in float bowl. |
| Main metering jet(s) dirty or incorrect part. | (1) If main metering jets are plugged or dirty and excessive dirt is in fuel bowl, carburetor should be completely disassembled and cleaned. (2) Check the jet(s) for being the correct part. Cross reference against Holley specifications. The last two digits stamped on the jet face are the same as the last two digits of the part number. |

| POSSIBLE CAUSE | CORRECTIVE ACTION |
| Engine needs complete tune-up. | Check engine compression. Examine spark plugs (if dirty or improperly gapped clan and re-gap or replace). Check ignition point condition and dwell setting. Readjust ignition points if necessary and check and reset ignition timing. Clean or replace air cleaner element if dirty. Check for restricted exhaust system and intake manifold for leakage. Make sure all vacuum hoses are connected correctly. Make sure emission systems are operating properly. |
| Choke valve not fully opening. | (1) Clean choke and free up linkage. (2) Check choke thermostatic (bi-metal) coil for proper adjustment. Reset to specifications. |
| Fuel leaks. | Check fuel tank, fuel lines and fuel pump for any fuel leakage. |
| Main metering jet defective, loose or incorrect part. | Replace as necessary. |
| Power system in carburetor not functioning properly. Power valve or piston sticking in up position. | Free up or replace as necessary. |
| High fuel level in carburetor or carburetor flooding. | (1) Check for dirt in the needle and seat. If defective, replace needle and seat assembly with Holley matched set. (2) Check for fuel loaded float. (3) Re-set carburetor float to specifications. (4) If excessive dirt is present in the carburetor bowl, the carburetor should be cleaned. |
| Fuel being pulled from accelerator pump system into venture through pump jet. | Run engine at RPM where nozzle is feeding fuel and observe pump jet. If fuel is feeding from jet, check pump discharge ball for proper seating. This is done by filling cavity above ball with fuel to level of casting. No "leak down" should occur with discharge ball in place. Re-stake or replace leaking check ball, defective spring or retainer as required. |
| Air bleeds or fuel passages in carburetor dirty or plugged. | (1) Clean carburetor or overhaul as necessary. (2) If gum or varnish is present in idle or high speed air bleeds they can be cleaned with lacquer thinner or choke solvent in a spray can. |

| POSSIBLE CAUSE | CORRECTIVE ACTION |
| Choke valve fully or partially open, binding or sticking. | Free up with choke solvent. Realign or replace if bent. |
| Accelerator pump not operating properly. | (1) Remove air cleaner and observe pump discharge. Replace pump cup or diaphragm. (2) Readjust pump to specifications. (3) Restake or replace pump intake or discharge valve. |
| Old or dirty (fouled) spark plugs. | Clean or replace spark plugs. |
| Old or cracked spark plug wires. | Test with a scope if possible or observe wires on dark night with engine running. Replace wires. |
| Partially clogged fuel filter. | Replace filter on regular maintenance schedule. |
| Backfire on deceleration. Defective air pump diverter valve. | Check hoses and fittings for tightness and leakage. Disconnect valve signal line. With engine running a vacuum must be felt. If valve or hoses are defective, then they must be replaced. |

| POSSIBLE CAUSE | CORRECTIVE ACTION |
| Sticking throttle valves. | (1) Readjust secondary throttle valve stop screw. (2) Throttle valves nicked or throttle valve shaft binding. (3) Repair or replace throttle valve. (4) Check throttle body for warpage. (5) Torque throttle body screws evenly. |
| Ruptured or leaking secondary diaphragm. | Inspect diaphragm. Replace or install properly. |
| Venturi vacuum ports plugged. | Try cleaning ports with choke solvent or lacquer thinner. It may be necessary to remove the diaphragm assembly and back blow into the venturi. |


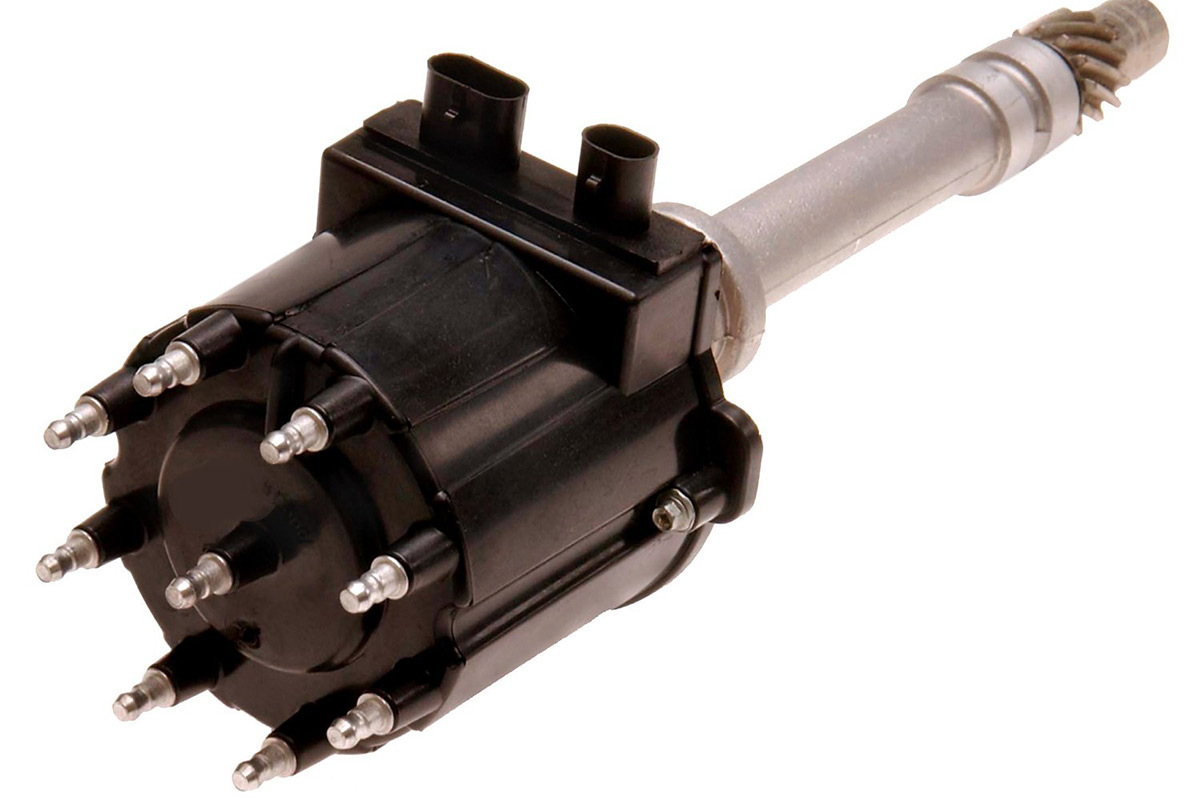
- Remove the distributor cap. This can mean popping a spring clip or turning a screw clip.
- Note the location of the wire going to number one cylinder and the vacuum advance bulb.
- Disconnect the electrical connector. Twi wires, the connector simply pulls apart.
- Loosen and remove the distributor clamp/retainer bolt. Usually ½ or 9/16 inch, this bolt can be difficult without a special distributor/timing wrench. Loosen and remove the bolt with the distributor clamp and set them aside.
- Remove the old distributor by pulling straight up. Wiggling and twisting may be required to help loosen it.
- Install the new electronic ignition distributor. Align the vacuum advance bulb and rotor to that previously noted and push and wiggle the distributor into the block until fully seated.
- Install the hold down and bolt. Thread the distributor clamp bolt with hold down and tighten to where there is resistance when moving the distributor left and right.
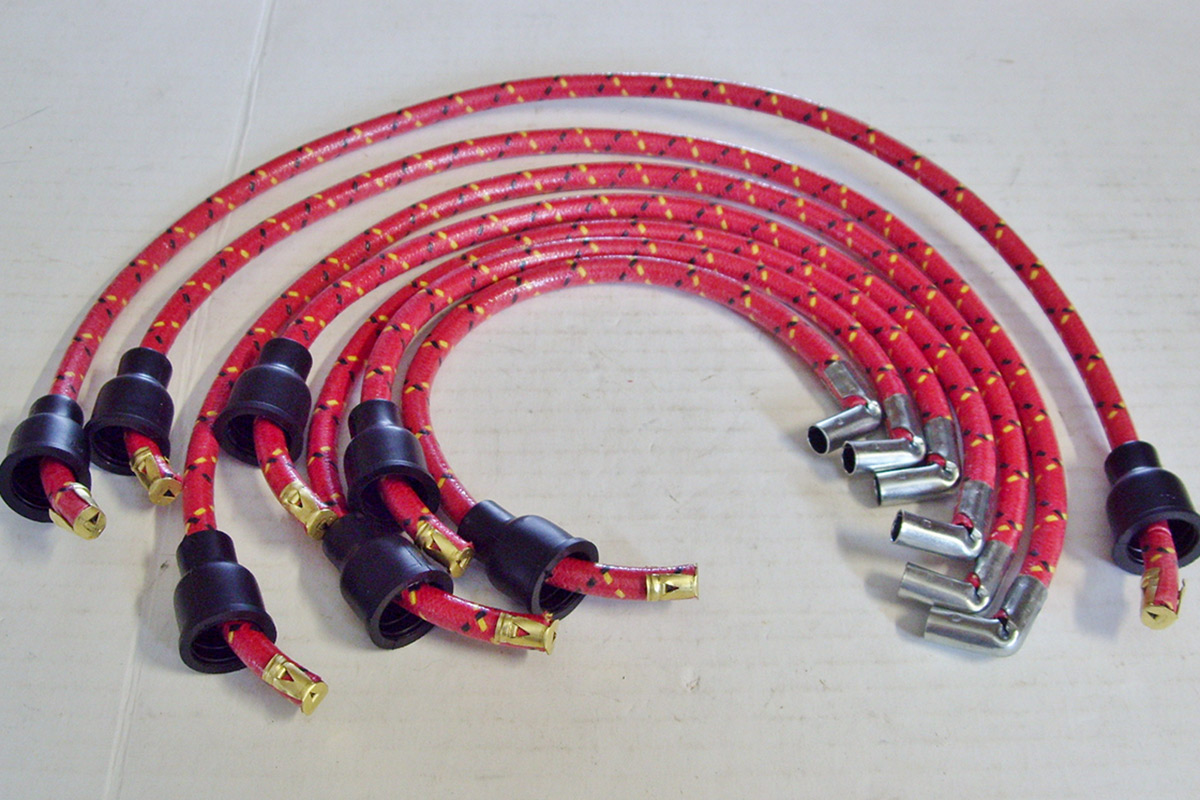
- Install the new cap and wires. You’re installing a performance ignition system, which needs new wires. This can mean cutting the wires to size and installing connectors.
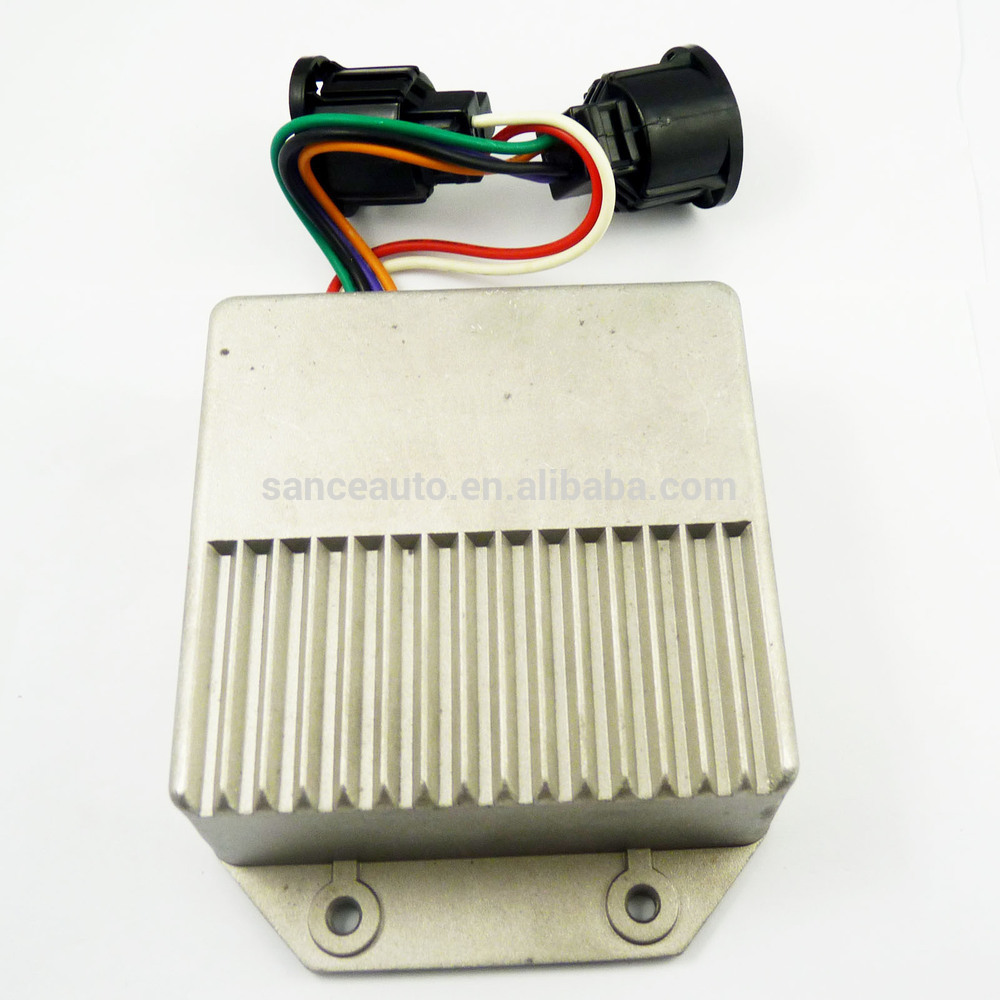
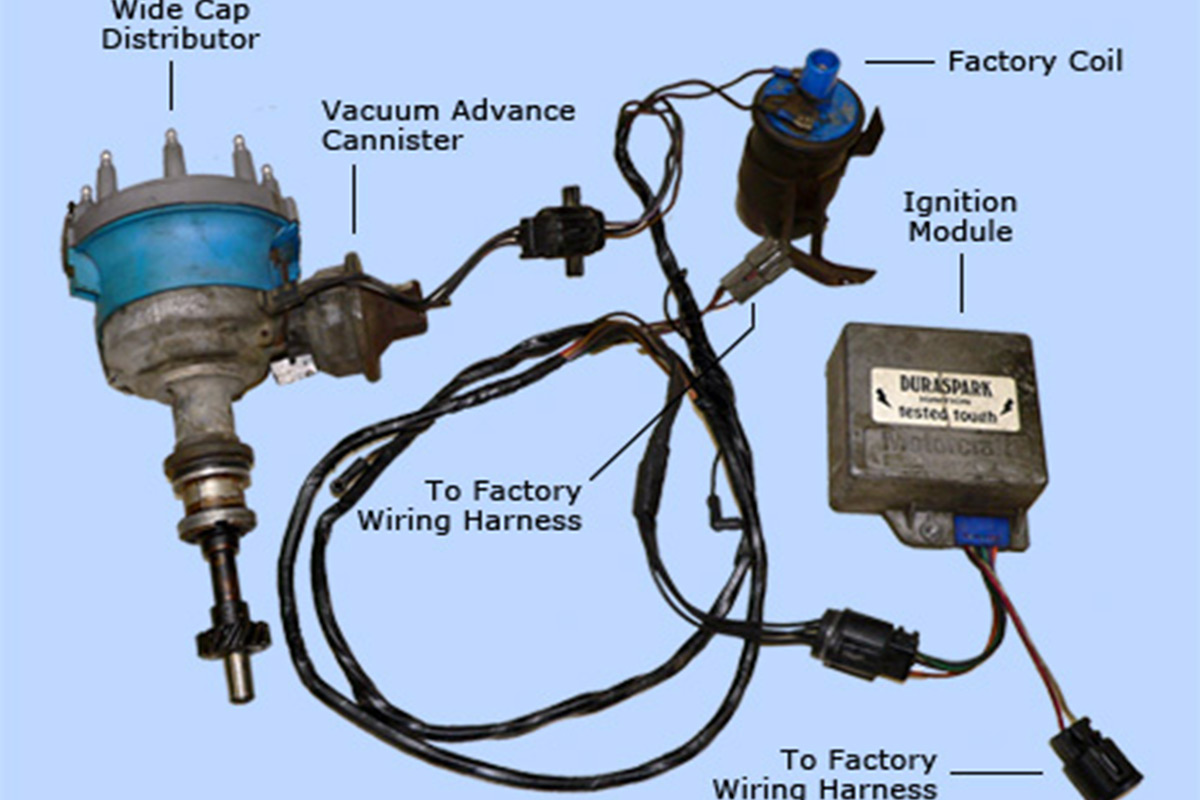
- Locate the heavy black and red wires from the control module and route them to the battery. Don’t hook them up yet.
- Locate the orange wire and the smaller black wire in the control module harness and route them to the ignition coil. Black goes to coil negative and orange goes to coil positive.
- Route the smaller red wire to where you can tap into the “Ignition” lead coming from the ignition key.
- Route the violet and green wires to the distributor and connect it to the trigger lead from the distributor.
- Route the grey wire to your tachometer and connect it to the tach trigger-usually a green wire.
- Make solid connections to battery positive and negative with the heavy black and red wires.


[caption id="attachment_14049" align="aligncenter" width="638"]


1 / 11