Click Here to Begin Slideshow
The leafspring suspension which came from the factory with your first generation Mustang was good enough for when it was produced and the horsepower and torque it was expected to handle at the time. Improvements over time made it incrementally better. Adding an extra leaf or recurving the stock springs and installing better shocks were some of our favorite ways of improving them back in the day.
However, there comes a point of diminishing returns where you just can’t make it any better. This is when we want to start thinking of replacing its obsolescence with something like a 4-link suspension in order to keep our rear wheels firmly planted on the track. A number of manufacturers offer good 4-link suspension systems, but Heidts makes one of the few that is truly bolt-in.
We'll install the Heidts 4-Link Rear Suspension Kit for the 1964 ½ to 1970 Mustang. Image shows some optional parts that don’t come with the standard kit.
List of Tools Required for This Install
You’re going to need a good floor jack and at least two sturdy jack stands to start. You’ll also need a set of sockets and wrenches. An air compressor and impact gun would be helpful but aren’t required.
Other tools that you’ll need are as follows:
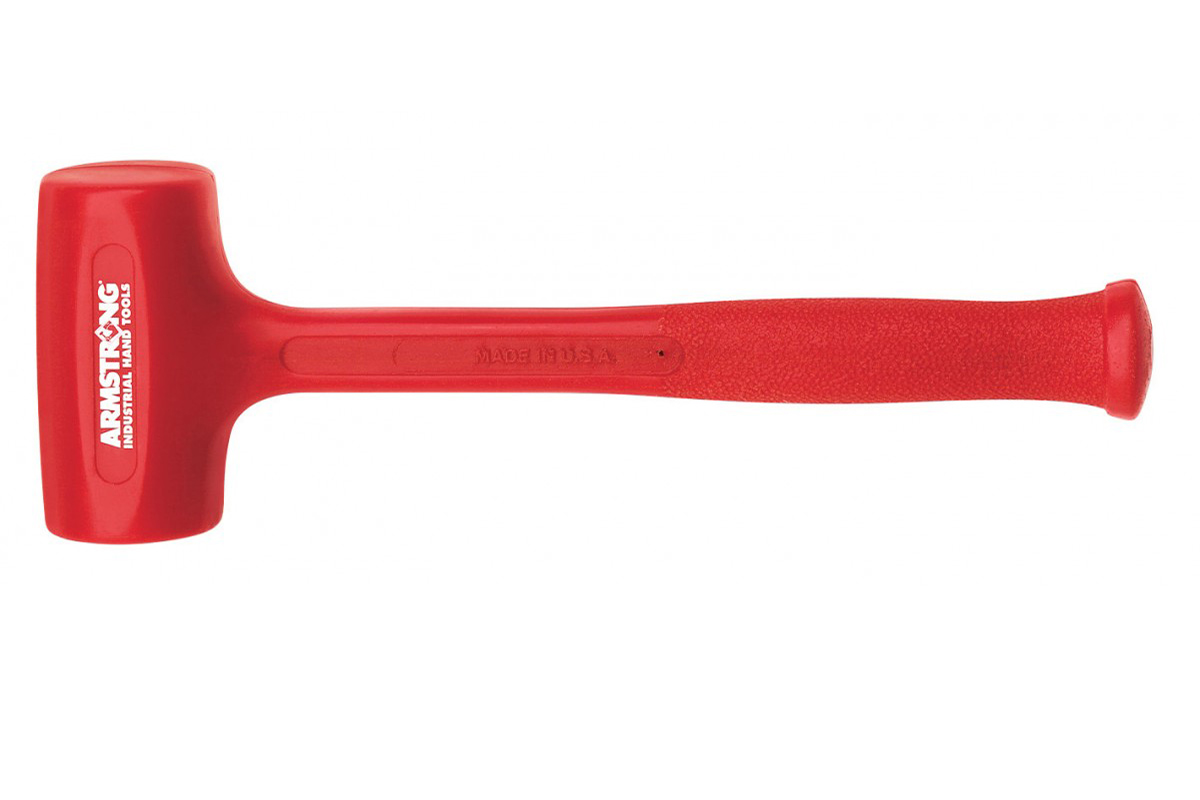
• Dead blow hammer
• Drill
• Unibit/stepper bit or three drill bits up to ½ inch
• Wire wheel or other cleaning abrasive
• Gear oil
• RTV Black or Blue (I prefer Black)
• Brake fluid (Only if replacing/upgrading the brakes)
• New axle-back exhaust
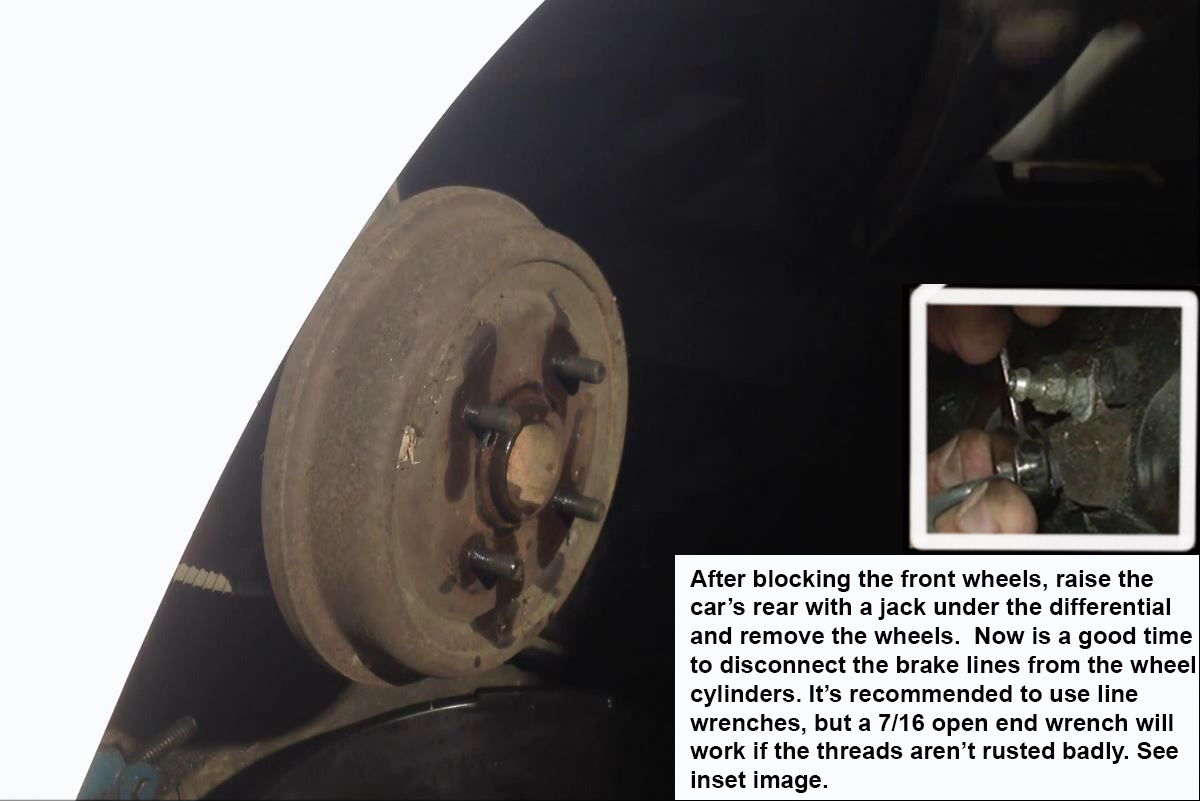
Raise the Rear and Remove the Tires
Park the car on a smooth and level surface and block a front wheel. Raise and support the rear of the car on the frame rails well in front of the axle housing.
Remove the Driveshaft, Exhaust and Rear End
I already covered this in an earlier article, which you can find here. The only difference is that you don’t want to cut the parking brake cables, and you can simply remove the axles and brake backing plates/calipers and brake line clips/clamps from the axle housing so you don’t have to bleed the brakes (unless you’re upgrading them as well). Just hang the components from the body during the installation. If you’re converting to disc brakes, simply disconnect the brake lines from the wheel cylinders and disconnect the parking brake cables prior to dropping the rear end. Heidts offers a really cool combination disc/drum set option when ordering that is easy to install.
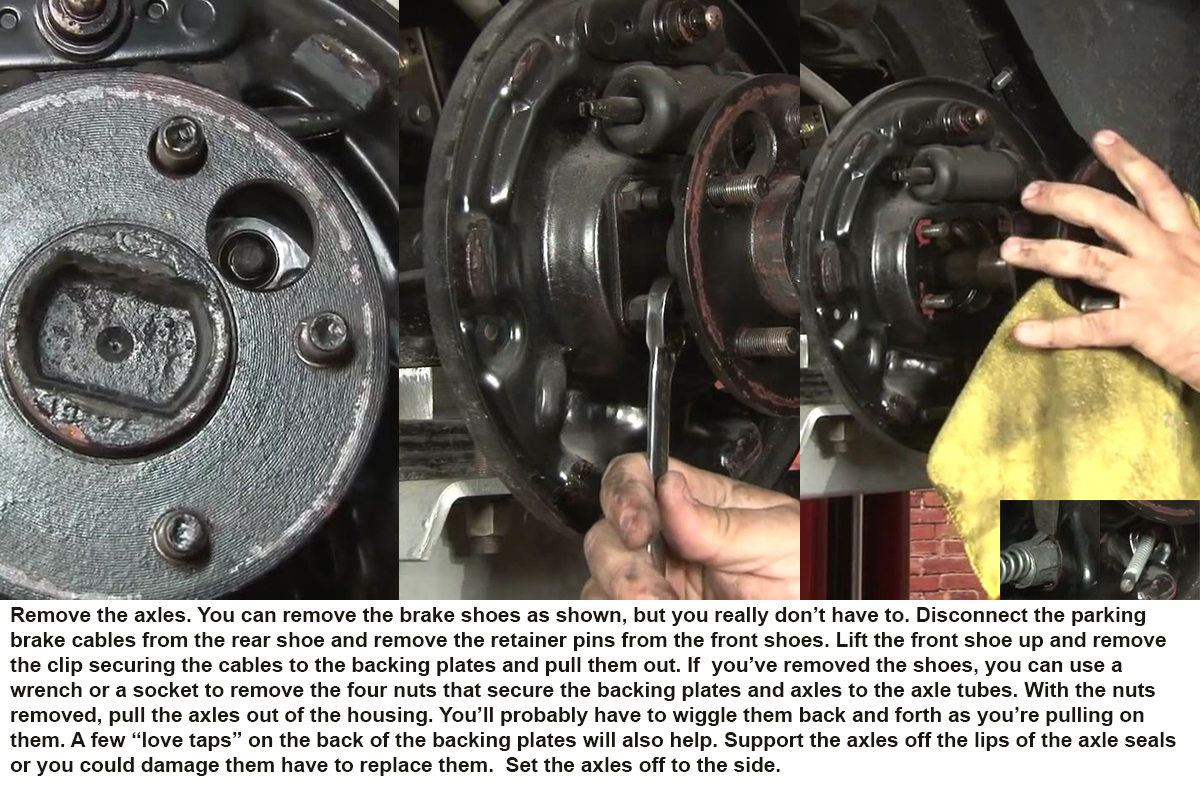
Remove the Axles and Backing Plates
Assemble and Install the Top Crossmember
The front of the saddles may need a little trimming, as the Ford factory never installed the snubber/bumpstop in exactly the same place on two different cars back then. Once the holes are drilled, use the included ½ inch hardware to secure the saddles to the frame rails and make sure all bolts/nuts are tight.
Install the Front Link Brackets
Don’t use a carpenter’s hammer or ball peen hammer when positioning the brackets, as you might inadvertently damage the brackets.
Install the Upper and Lower Link Bars
Remember that the non-adjustable ends of the link bars are installed in the brackets from the previous step.
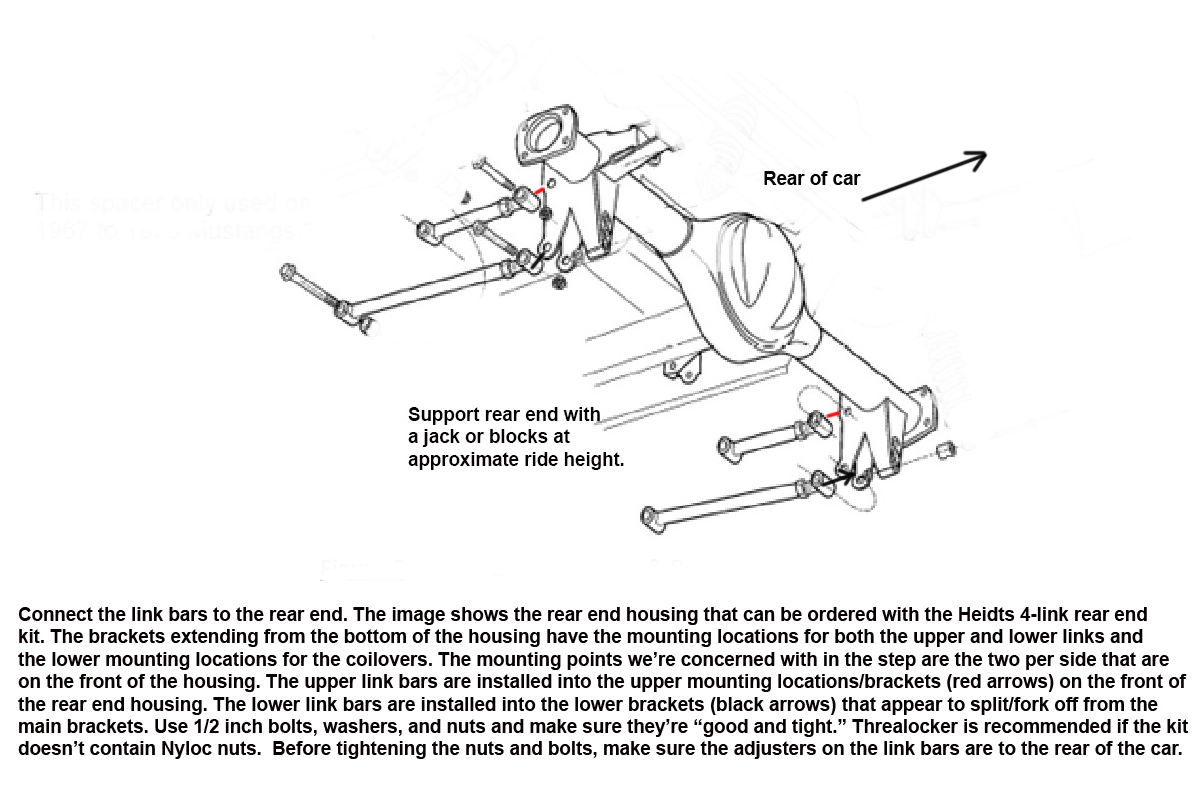
Install the Rear End Housing and Connect the Link Bars
If you provide your own rear end housing, you’re going to have to weld the link/coilover brackets yourself or send them out to have someone weld them for you. You will also have to worry about setting the proper pinion angle yourself. The brackets on the Heidts rear end housing are set to a two degree down angle. Once you have everything installed and the car on the ground, you’ll have to fine-tune the pinion angle using the adjusters on the link bars.
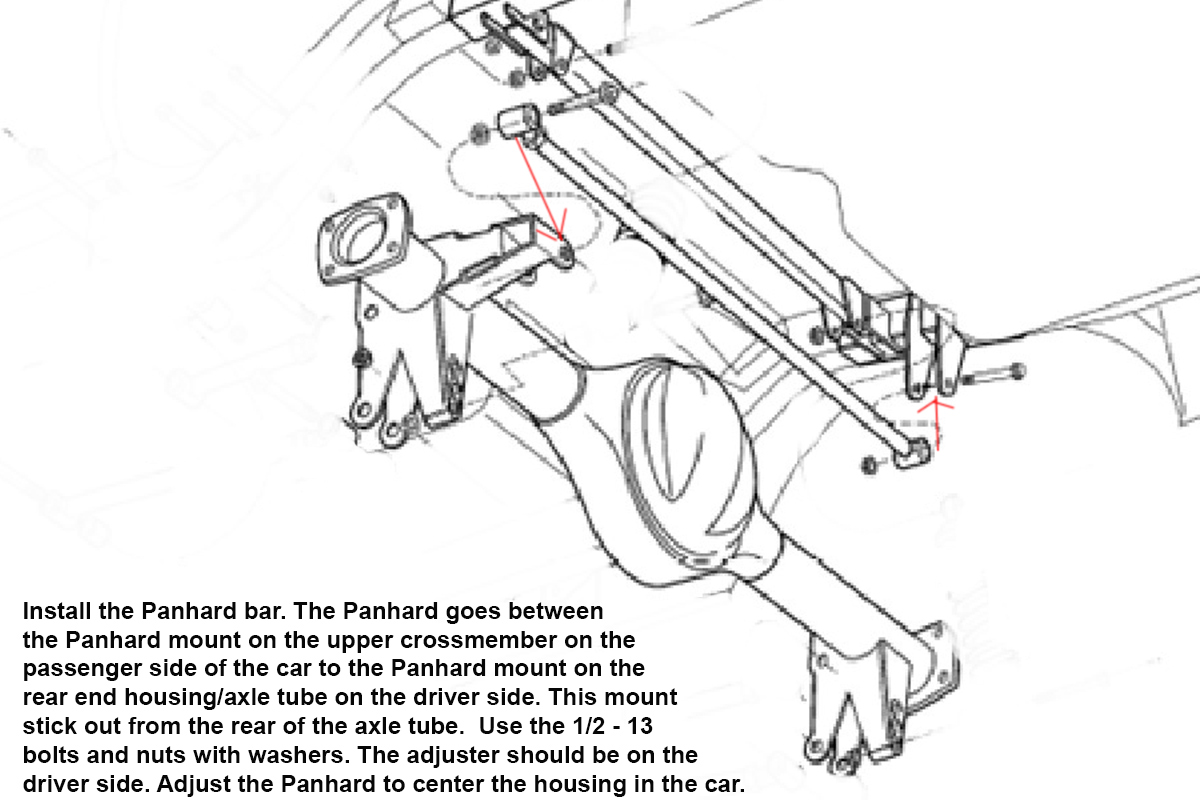
Install the Panhard Bar
The Panhard bar has two related functions. During installation, it centers the rear end housing in the car. While driving, it keeps the rear end housing centered in the car. The adjustable end of the Panhard must be installed in the Panhard bracket on the driver side of the axle housing. If you supply your own rear end housing, you will also have to weld the Panhard bracket to it or have someone do this for you.
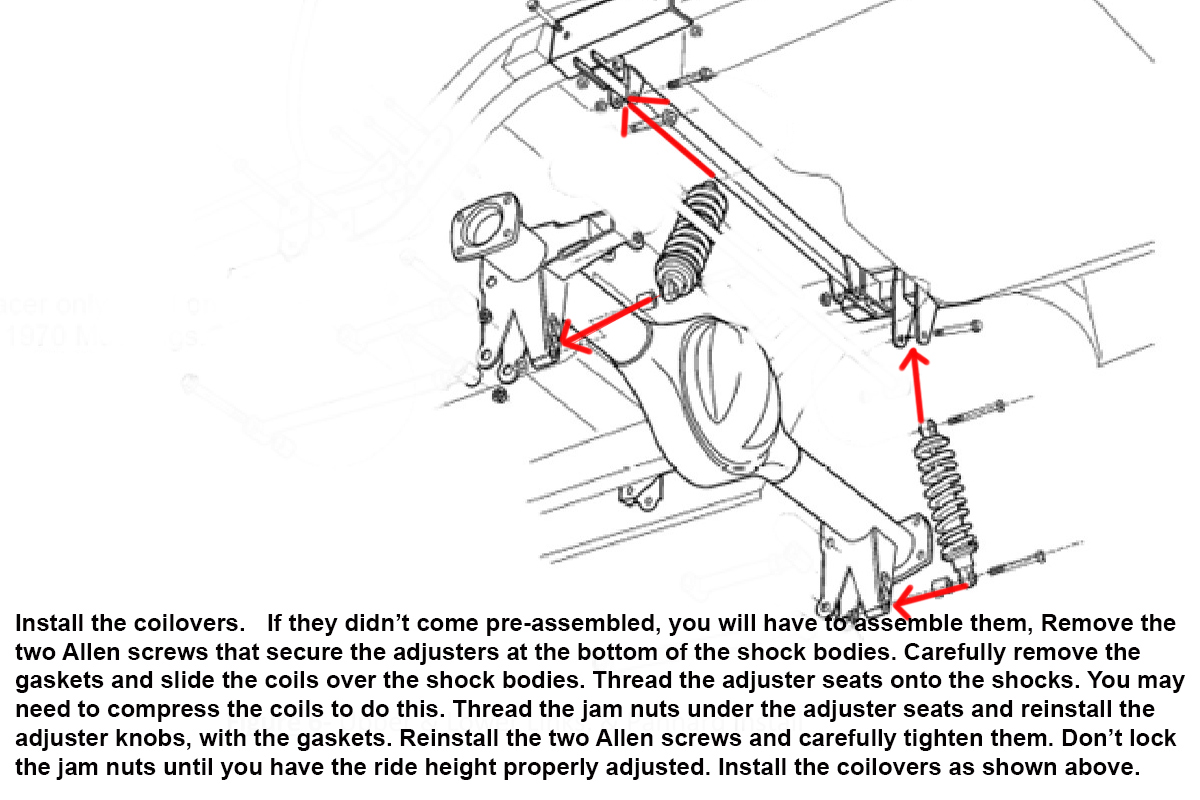
Assemble and Install Coilovers
Your coilovers might come pre-assembled from the factory. If not, make sure you don’t lose the “Jesus gaskets” under the adjuster knobs. We call them “Jesus gaskets” because if you lose one, you’ll be saying, “Jesus! Where am I going to get new ones?!?”
Reassembly
Locate and open the differential fill port on the passenger side of the differential and fill it with your favorite brand of gear oil in the recommended viscosity. Fill it until the gear oil just starts to drip out and reinstall the plug. If you haven’t already, reassemble the brakes by putting the backing plates back on and “the guts” back in, and then bleed the brakes if you’ve opened the brake lines. Reinstall the parking brake cables. You may need to readjust the parking brake. Reinstall the wheels.
Check Pinion Angle
Unless you’ve got stands, this can be a little difficult as you’ve somehow got to be under the car with the weight of the car on the wheels. The pinion angle refers to the angle between the driveshaft and the pinion, as measured at the pinion flange, and it should be as close to zero degrees (0º) as you can get it. Remember, if you bought the kit with the rear end housing, it was designed with a two degree down angle.
Adjusting Pinion Angle
Pinion angle is adjusted using the adjusters on the link bars. If the driveshaft and pinion meet at a downward angle (a V-shape is formed at the top of the joint between the two), you need to pull the lower arms in some and let the upper arms out an equal amount. If the angle forms an upside down “V,” you need to do the opposite - pull the tops in and let the bottoms out.
Drive the car around for a few days and then go back under and recheck all the nuts and bolts, and retighten as required. Then readjust the ride height and the pinion angle. After that, drive it like you stole it!
Mike's love of cars began in the early 1970's when his father started taking him to his Chevron service station. He's done pretty much everything in the automotive aftermarket from gas station island attendant, parts counter, mechanic, and new and used sales. Mike also has experience in the amateur ranks of many of racing's sanctioning bodies.
1 Comment on How to Install a Heidts 4-Link in 64.5-70 Mustang
Last time I’ll comment here. Can’t delete if you screw up and post the wrong picture. lol


![[Gallery] Okolona Street Rods Kentuckiana V Foundation Car Show](https://www.racingjunk.com/news/wp-content/uploads/2022/04/IMG_0774-e1650040587750-376x206.jpg)
![[Gallery] Road Rats Car Show](https://www.racingjunk.com/news/wp-content/uploads/2022/05/2A-e1651770667920-376x206.jpg)

Last time I’ll comment here. Can’t delete if you screw up and post the wrong picture. lol