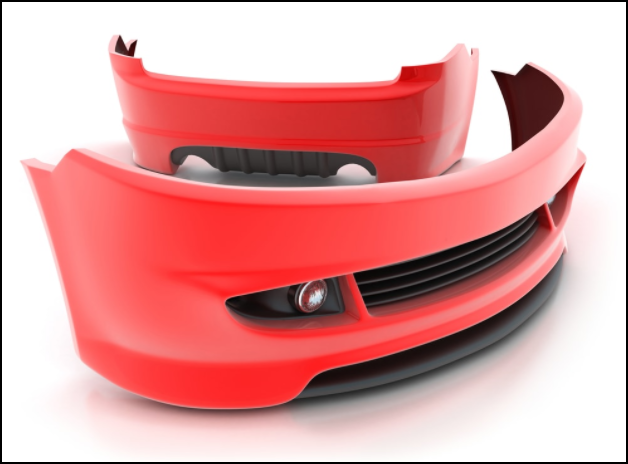
Does your bumper happen to look like this one does?
A cracked bumper can be an eyesore on just about any vehicle. In reality, repairing cracked bumpers can be done with the proper materials and a little technical know-how. For those of you that would like to learn how these sort of repairs are done in the body shop you’re in luck, we’ll be discussing that topic here today.
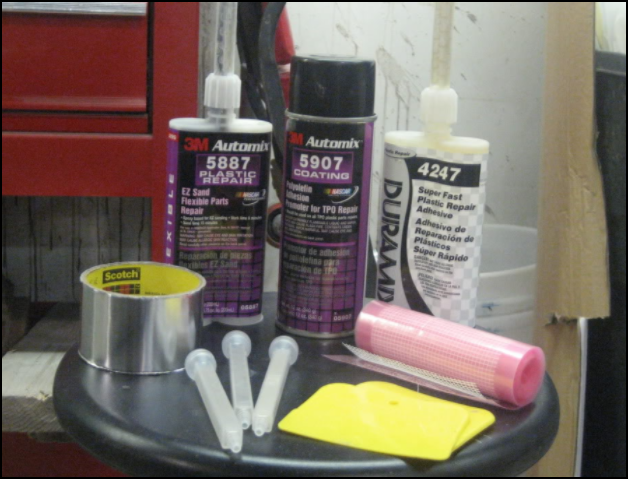
The repair materials used to fix a cracked bumper have come a long way from when I started working on cars. Using the proper material is vital in achieving a solid repair that will stand the test of time. In reality, the repair materials used in the shop today to fix a cracked bumper are very durable.
When finished, your bumper will be as strong as it was before the accident.
Tools/Materials Needed:
Scissors/Shears
3M Mesh Tape
1/4 Angle Grinder
3M TPO Plastic Repair
3M Easy Sand Plastic Repair (for Front)
Sandpaper
Primer
Paint
Click Here to Begin
Does your bumper happen to look like this one does?
A cracked bumper can be an eyesore on just about any vehicle. In reality, repairing cracked bumpers can be done with the proper materials and a little technical know-how. For those of you that would like to learn how these sort of repairs are done in the body shop you’re in luck, we’ll be discussing that topic here today.
The repair materials used to fix a cracked bumper have come a long way from when I started working on cars. Using the proper material is vital in achieving a solid repair that will stand the test of time. In reality, the repair materials used in the shop today to fix a cracked bumper are very durable.
When finished, your bumper will be as strong as it was before the accident.
The first step in repairing a cracked bumper is to remove the bumper from the car. Each manufacturer has different nuts, bolts, and fasteners in various locations so do yourself a favor and do a little research before starting. The reason the bumper has to be removed is to gain access to the backside of the bumper itself. The backside of the cracked bumper is the first place in which you will apply repair material. It doesn’t do any good to repair the frontside only. The repair will not hold, and you’ll likely crack it again trying to reinstall it once the repair process is finished.
Step 2: Repairing the Back of the Bumper
Once the backside of your bumper is accessible than you’ll need to grab a ¼ in angle grinder and 3M mesh tape. The tape itself usually has an adhesive on it just like tape usually does. Scuff the damaged crack with your ¼ in angle grinder and clean it with wax and grease remover before applying the tape. Work the crack back together if possible, in an effort to have the bumper as close to pre-accident condition as possible. Once this step has been achieved, cut pieces of mesh tape and place it over the crack on the backside of the bumper. The mesh tape is used so that when you add repair material (the repair material that will inevitably hold the crack back together), it will give the repair strength. Applying 3M mesh tape to the backside of the damaged bumper is a very important step in the repair process.
Step 3: Covering the Mesh in Plastic Repair
3M TPO Plastic Repair can be found at your local auto body parts store. Repair material like 3Ms is what will be applied over the mesh you have cut and designated to “patch” the damage on the backside. There’s no need to overthink this step in the repair. You won’t sand this material once it’s dried. What is important is that you make sure the mesh is completely covered with repair material, holding the crack in place. You will see your plastic repair material ooze out through the cracked damage to the front of the bumper. That’s a good thing! You’re fixing the cracked damage from back to front, which is important. Why? Because doing so makes the repair stronger. I’ve never been a big fan of plastic welders, for the record. Plastic welders only fix one side of a cracked bumper at a time.
Step 4: Onto the Frontside
After the backside repair has dried, it’s time to move on to the crack that remains on the front of the bumper. This is where bodywork becomes a visible reality in the repair process. Naturally, the frontside repair is what will remain visible to you, and anyone else after refinishing. If the damage that remains on the front is nasty enough, don’t hesitate to the use step #3 again to fill the crack from the frontside (don’t use mesh on the front side). Make sure that you use your DA to feather back paint around the damaged area. This provides a scuff (from the sandpaper) for the repair material to stick. Nothing sticks without a scuff. Not paint, not primer, and certainly not repair material. Slightly, “V” out the crack on the frontside so the repair material can penetrate the damage. Once you feel the cracked bumper has regained its structural rigidity (after drying), then it’s time to use your choice of easy sand plastic repair material. This is the repair material that will be sanded and shaped to mimic the body work that was there before the accident.
It’s good to know that you can make a cracked bumper as strong as it was before by using sandpaper, mesh tape, and paint. My husband accidentally cracked his bumper in a parking lot about a week ago. I think it might be easiest if we found an auto body repair service to fix it for us.


![[Gallery] Okolona Street Rods Kentuckiana V Foundation Car Show](https://www.racingjunk.com/news/wp-content/uploads/2022/04/IMG_0774-e1650040587750-376x206.jpg)
![[Gallery] Road Rats Car Show](https://www.racingjunk.com/news/wp-content/uploads/2022/05/2A-e1651770667920-376x206.jpg)

It’s good to know that you can make a cracked bumper as strong as it was before by using sandpaper, mesh tape, and paint. My husband accidentally cracked his bumper in a parking lot about a week ago. I think it might be easiest if we found an auto body repair service to fix it for us.