


Mopar’s A-Body platform has been popular with collectors, speed freaks, and racers almost since their inception. These are the smaller cars from Chrysler, Dodge, and Plymouth that we can easily drop a slightly bigger and more powerful motor into and bump up the horsepower to weight ratio significantly and for not much money. The suspensions are also pretty easy to trick out. However, having a subframe, or being a unibody construction, they’re easy to bend into a pretzel if we put “too much” horsepower and torque under the hood. We can negate this by installing subframe connectors to make our beefed up suspensions work the way they should.
What Makes Up the Mopar A-Body Class?
The Mopar A-body sub-family of cars doesn’t include the Chargers, Roadrunners, Satellites, and Challengers. No. Those bad boys are the big B-, C-, and E-Body cars, many of which tore up the stock car racing tracks of the late Sixties and early Seventies. The A-Body cars are the smaller and somewhat lesser-known but still popular cars produced from 1960 through 1972 that had a following in NHRA drag racing:
- ’60-’76 Valiant
- ’63-’76 Dart
- ’61-’62 Laner
- ’64-’69 Barracuda
- ’70-’76 Duster
- ’71-’72 Demon
- ’61-’63 DeSoto Rebel
- ’68-’80 Plymouth Polara, Coronado, GTX, and R/T
- ’71-’76 Scamp
What Is a Subframe/Unibody and What Do Subframe Connectors Do?
Subframe or unibody construction is a method of automobile construction where the portion of the car supporting the engine and the portion supporting the rear-end/differential/leaf springs both have frame sections but there’s nothing between those two frame sections. This type of construction gets its (limited) chassis stiffness from the floorpan. Since we’re talking about cars that are, on average, 40-plus years old, we’re talking about cars that have their chassis stiffness seriously compromised over time.
The problem with this type of construction is that the body flexes, and the chassis you’ve spent dozens of hours and thousands of dollars upgrading isn’t allowed to work properly, causing things like wheel hop. Another problem comes into play when the car is older and you stick a massive fire-breathing engine producing gobs of power and torque into it. The end result of this can often resemble your favorite maple twist down at Dunkin’ Donuts.
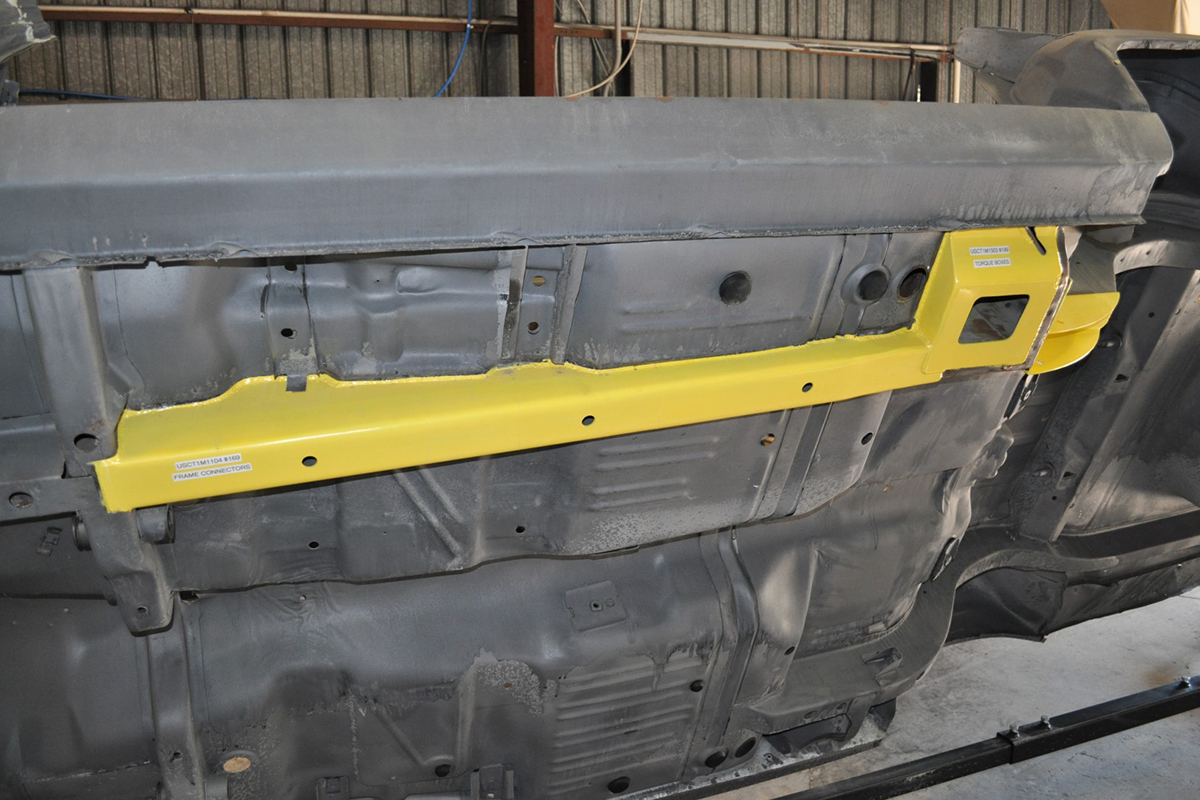
Chassis stiffness is a unibody vehicle can be compromised by simple metal fatigue, rust, age, and incorrect jacking. Installing subframe connectors corrects this by connecting the front and rear subframe members. In the Mopar A-body, these subframe connectors are welded and/or bolted at the front and rear of the car and welded to the floorpan in a number of places along the length of both sides of the connectors to greatly increase the chassis stiffness.
What You’ll Need to Complete This Project

In order to complete this project, you’ll need either a set of ramps, a jack, and two jack stands, or four jack stands. You’ll also need a MIG welder – ebay has several under $200. To prepare the car and the connectors for their installation, you’ll need a drill and either a wire wheel or a sanding wheel with 80-100 grit paper on it.
You’ll also need safety glasses. Finally, to complete the installation, you’ll need spray paint to protect the subframe connectors and the parts under the car that you have to weld from rust. Some subframe connectors for Mopar A-body vehicles can either be bolted-in or welded-in, while there are others that can only be welded. I’ll point out the differences as we go along. Because of this difference, you’ll also need a set of good high speed drill bits for your drill. Lastly, you’ll need at least two good-sized clamps.
Get the Car in the Air
If you’ve got access to a two-post lift, great. If not, I feel for you. With a lift, place the pads under the rear shock mounts and the lower control arms up front. If you’ve got ramps, drive up on them. Otherwise, after putting the transmission in gear/Park and firmly setting the parking brake, lift the front of the car by the K-member and place your jack stands under the ball joints and carefully lower the car onto them.

Next, lift the rear of the car by the differential housing and put the jack stands under the rear shock mounts or just inside the brake backing plates on the axle housing. The car’s suspension has to be loaded in order to do this project properly. To make sure you’ve got the car properly supported, check to make sure the doors open and close easily. If not, adjust where you have the jack stands until they do. You’ll see some videos online where the installers just lift the car on the frame. This is wrong. Besides, doing so will interfere with your work.
Test Fit and Do Your Weld Prep
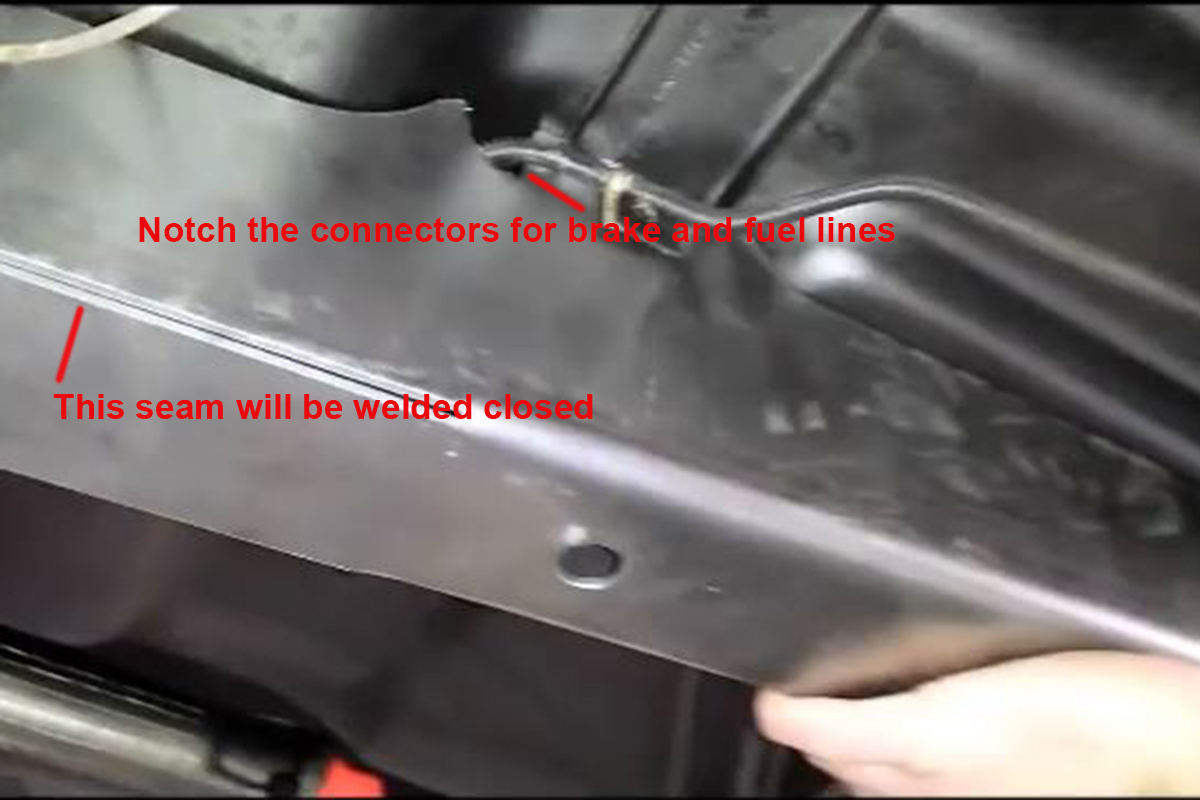
Slide under the car with the subframe connectors and lift them into position. Are any brake or fuel lines pinched between either of the connectors and the floorpan? If so, move them until you’re done. Another thing you can do is cut notches into the subframe connectors for the brake and fuel lines. There are also going to be small notches in the connectors that match up to the dimples stamped in the floorpans of some cars that you’ll need to finish cutting out. Be sure to use a rubber mallet or hammer with a block of wood to smack the connector towards the front once the rear pocket is seated.

Remember, the connectors have to sit perfectly flush against the floorpan from front to back if it’s the fully-welded type. You don’t have to worry so much with the bolt-in type as they don’t sit against the floorpan. No matter which kind you’re installing, you will need to disconnect the parking brake cable and move it out of your way.

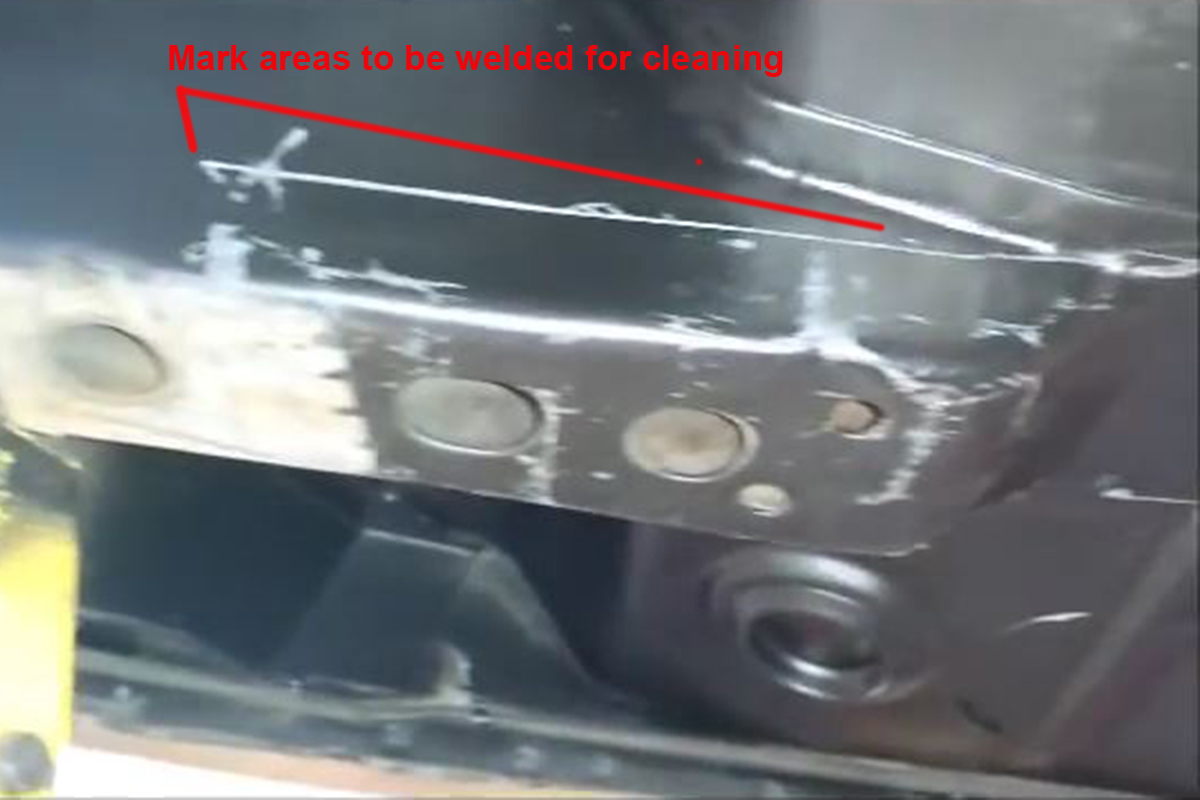
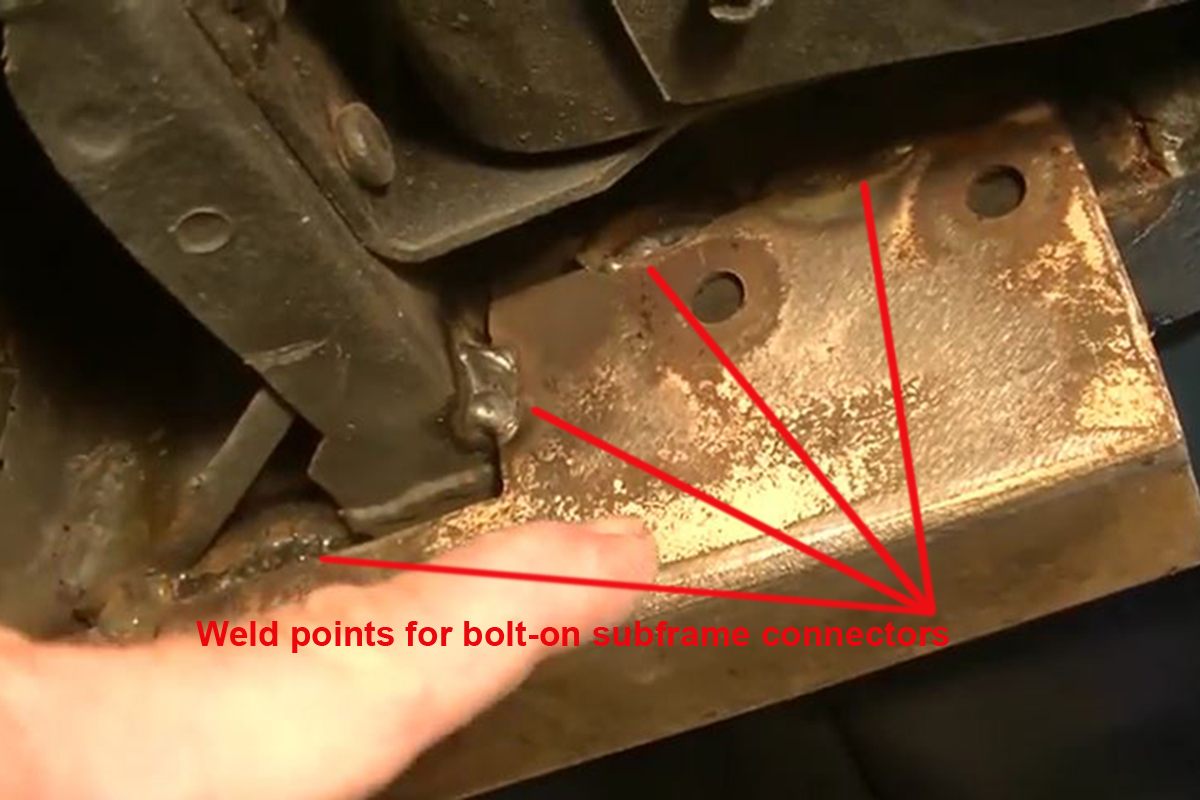
Now, use your jack with a block of wood to hold a connector up in place and mark where it contacts the front and rear frame/torque box (where the front leafspring mount is) and, if you have the fully-welded type, a few two- to three-inch sections of the floorpan on both sides of the connector. Drop the connector and start cleaning down to bare metal. Be sure you clean the frame/leafspring mount and floorpan on both sides of the subframe connectors. It should be noted here that if you’ve got the welded connectors, you should remove the front seat(s) and the carpet to keep it from burning. If your carpet is in good shape, you can get the carpet wet and then shampoo it after you’ve installed the connectors.
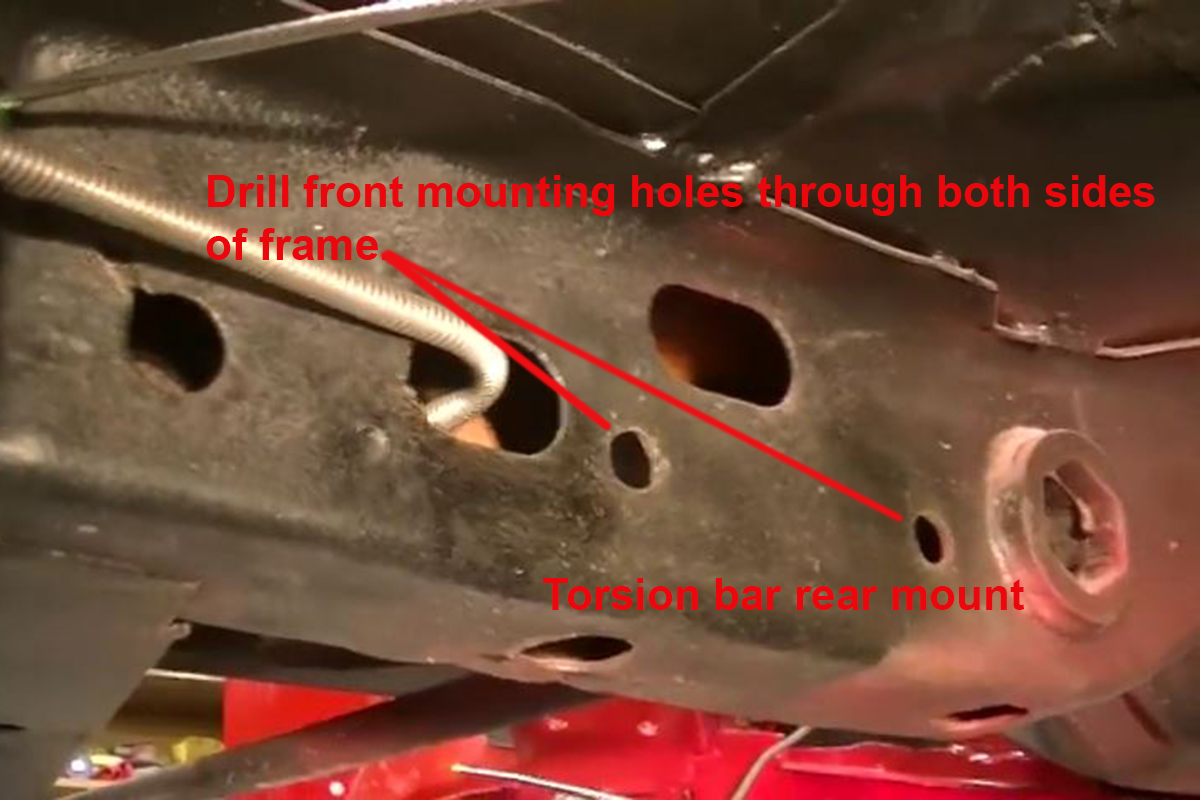
With the bolt-in type, use a marker or center punch to mark both the front frame pieces next to the torsion bars and the rear torque boxes/leafspring mount boxes where the connectors bolt to them. You’ll need to use the right size drill to drill holes through both sides of each to bolt the connectors in. I recommend at least strongly tack-welding the bolt-in connectors at both ends as this gives a stronger connection. Before doing any drilling, tightly clamp the front flange on the connector to the front frame rail, making sure you close the gap between the flange and the frame next to the torsion bar mount as much as possible. There’s going to be a small gap which torqueing the connector bolts down during final installation will eliminate.
Once you have the areas you’re going to be welding marked, remove the connector and start grinding, sanding, or wire wheel brushing until you get down to bare metal. You’ve got to have bare metal to allow the welds to penetrate properly. Now is also the time to drill your holes as needed. Finally, spray paint the inside of the connectors to protect them from rust. Once the paint dries, clean the places that you’ll be welding. You want to ensure good weld penetration and any contaminants on the metal will make that difficult.
Installing Bolt-In Subframe Connectors

Lift a connector up against the frame front and back and hold it loosely in place with your jack and a block of wood (Unless your jack goes high enough to not need the wood). Use a rubber mallet or a hammer and piece of wood at the back to smack it into place, making sure the front flange sits as close to flush against the front frame as possible.

Place one of the included plates on the front of the frame and run the two bolts through the connector, frame rail, and front plate. Slide a flat washer and then a lock washer on the bolt and then thread the nuts down. Tighten the nuts side to side to close the gap between the flange and frame without bending the flange. If you have a torque wrench, torque the nuts to about 80 pound-feet.
Next, raise the jack until the connector slides completely over the torque box. You want to see the car lift up fractionally. Run the bolts through from the center of the car. A flat and then a lock washer are next. Finally, thread the nuts down as much as you can by hand. If you can, torque these to about 80 lb-ft as well. Lastly, tack the front flange in place on the frame under the bolts, using a weld bead of about an inch in length and do the same in four places on both sides of the rear. Repeat the process on the other side and you’re done.
Installing Weld-In Subframe Connectors

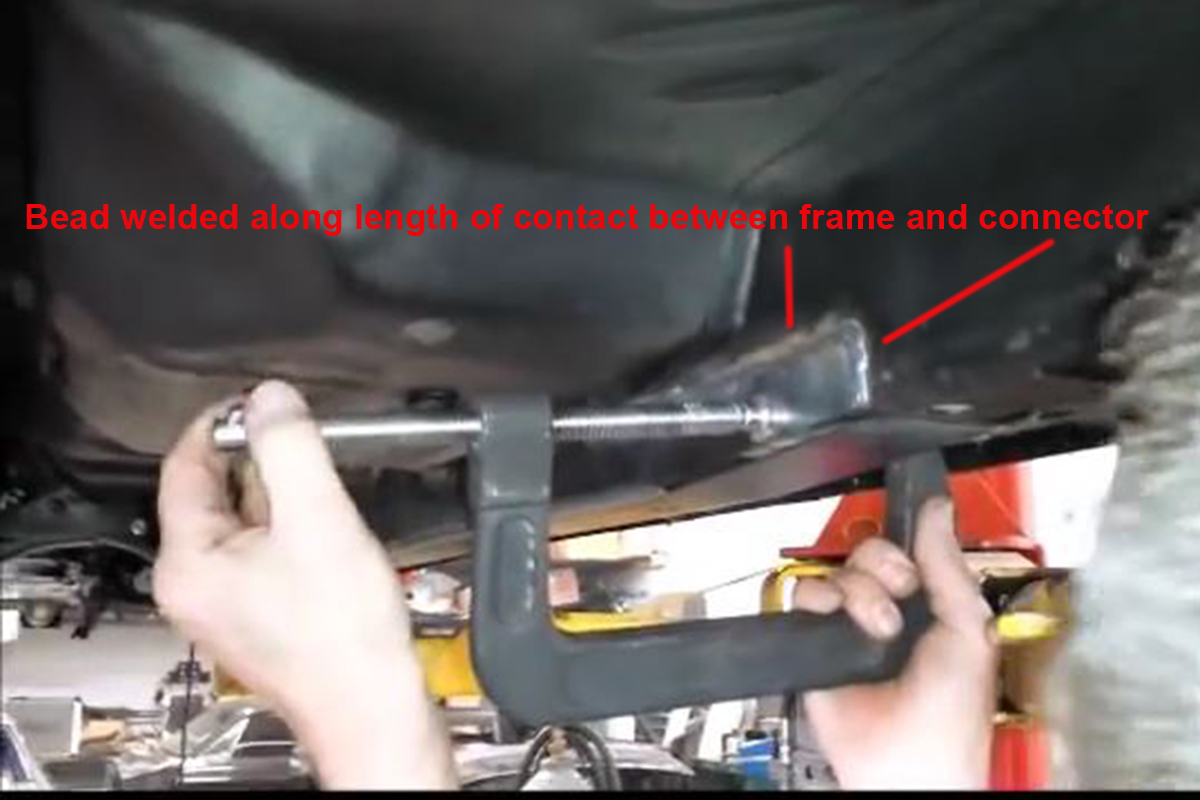
Lift a connector into place and smack it as far forward as it will go with a mallet or hammer and block of wood. Then use your jack to support it flush against the floorpan. Most welded subframe connectors are sliced in the back to make it easier to slide the completely over the torque box. You’ve got to use two clamps to squeeze these tabs/flanges against the torque box before you weld.

With the clamps installed, smack the bottom of the connector a couple of times to make sure it’s fully seated. Run a bead along the whole length of the connector where it meets the torque box, on both sides. Next, weld a full bead along the notch that was cut into the connector to make it easier for you to install.
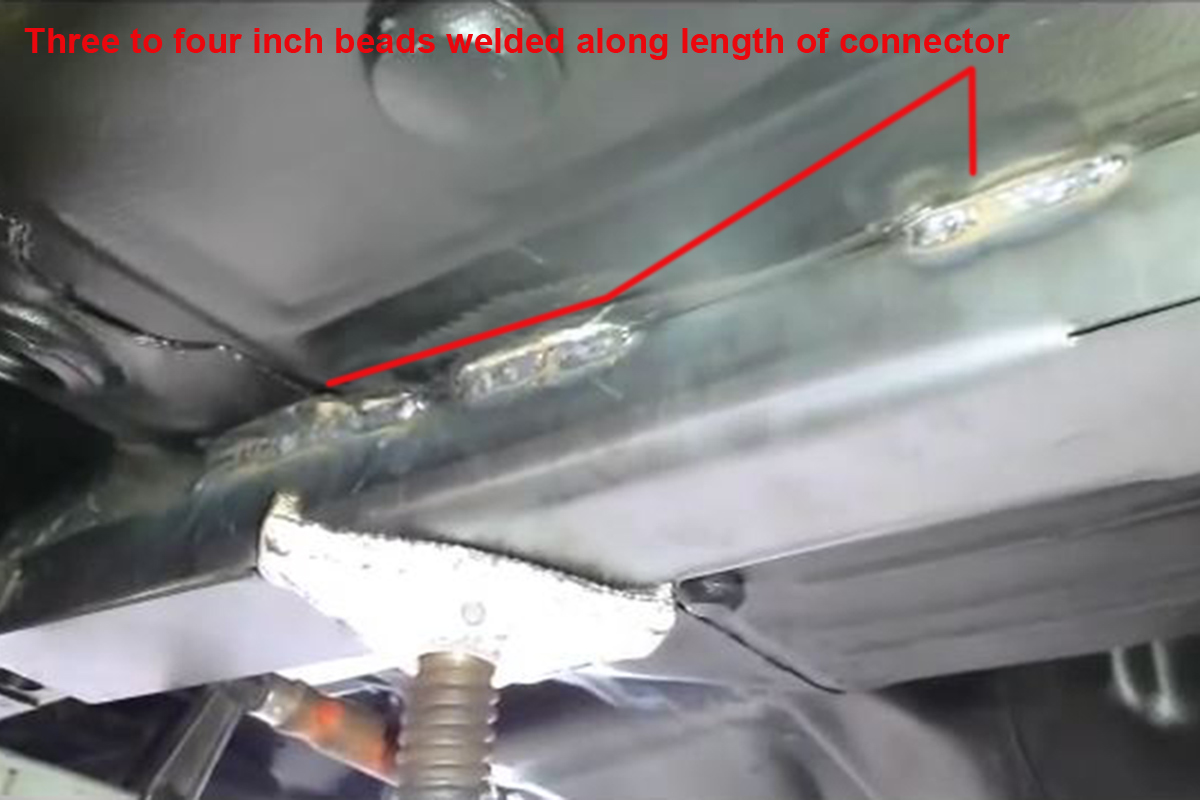
Move to the front and do the same thing: Weld along the full perimeter of the connector where it contacts the frame. If you haven’t cleaned enough of the frame rail, do so now. There may also be a couple of three- to four-inch notches cut into the angle at the bottom of the connectors that will need to be welded closed.
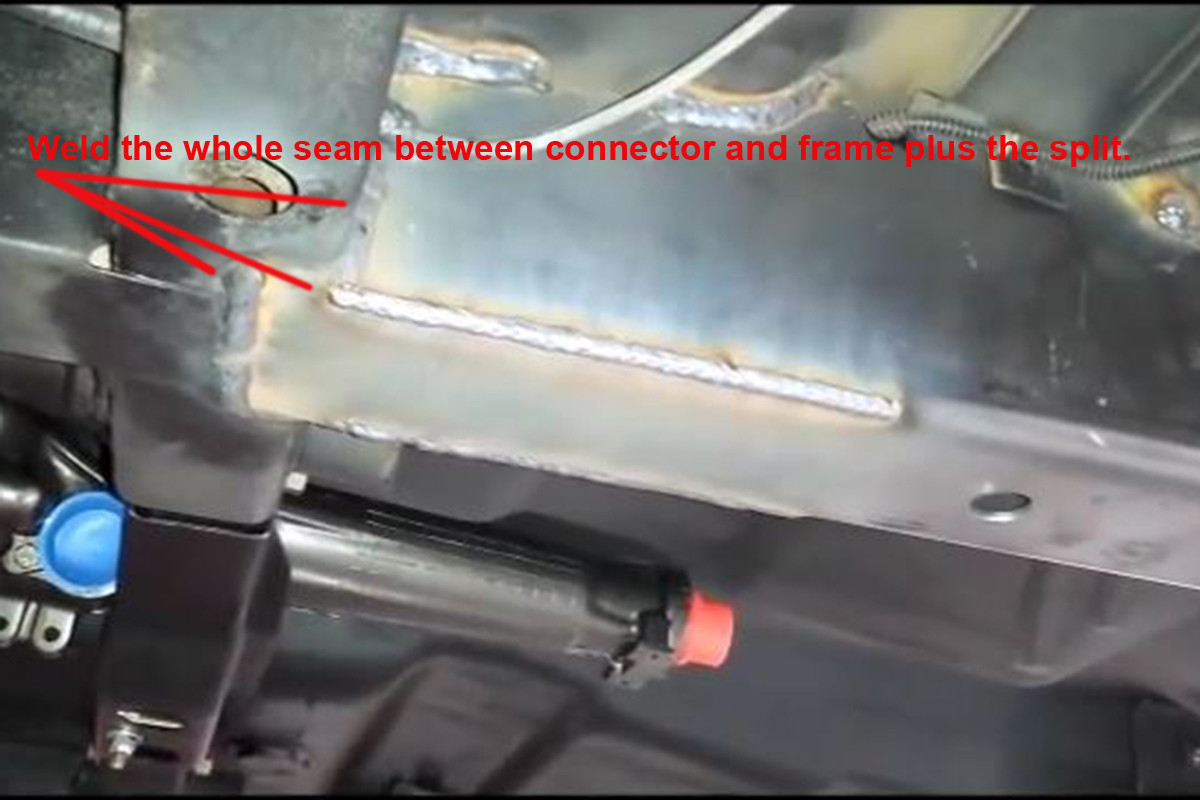
Now comes the fun part. Your subframe connectors are probably 1/8-inch steel, whereas the floorpan is probably half that. The trick to welding them together is to start your bead on the connector and then push it up into the floorpan. Don’t try to do any more than two or maybe three inches at a time, otherwise you’ll blow through the light gauge metal of the floorpan. That’s not good. Repeat the process on the other side and you’re done. DO NOT WELD NEAR THE FUEL LINE!
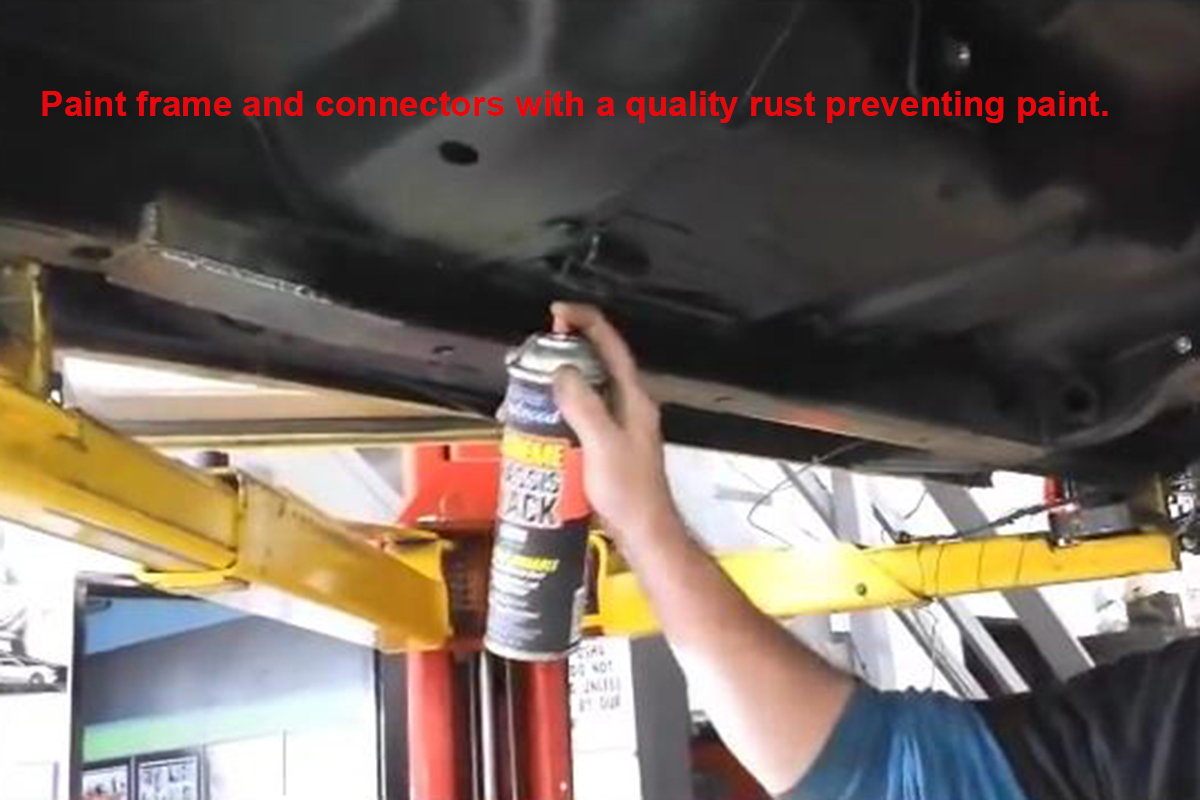
Finishing the Installation
Using a good quality paint that prevents rust, give the floorpan, frame rails, and the connectors two or three coats of paint. I like to start with a lighter coat that does a little more than just dusts the surface of the parts being painted as it allows the paint to dry quicker. Once that coat is setup and tacky, I blow another slightly heavier coat on and allow it to setup again. The third and final coat is the heaviest of all and provides the real protection from road grime and scratches from rocks and dust.
A Word About Welding
The connectors you buy will come with detailed instructions. In those instructions, you will be told that if you aren’t an excellent welder you should let a professional do the welding. I’m telling you that’s hogwash. No, you’re not going to be able to make a beautiful weld like a professional will.

However, if you pick up some scrap metal and do some practicing, you’ll be proficient enough within about 30 minutes to do a job that’s every bit as good as someone at a shop can do. Also, keep a Class ABC fire extinguisher close at hand while welding-just in case. Make sure your work area is clean and free of flammable materials.
Leave a Reply