

Photos: Mike Aguilar, Holley
Previously we discussed the benefits of the carburetor vs EFI. For those of you who have decided to proceed with the carb, the install is pretty easy. It’s actually just a four step process, when you include gathering your tools. Next, prepare the parts. Then install it, and finally, adjust it. However, I will admit that the last step, the adjustments, can be trying and take a little time. Everything else is pretty much bang, bang, it’s done. But in order to get the best performance out of your engine, and transmission, you have to take a little time to adjust things properly. Start with removing the carburetor. I’m assuming you’ve already done this, but if not, take that as step one.

Gather Your Tools
You shouldn’t need anything more than a wrench (usually half-inch) and a small screwdriver to install a carburetor, although you might need something to clean up mounting and mating surfaces if you’re replacing or rebuilding a carburetor. Under no circumstances should you use any sort of sealant when installing a carburetor.
You can adjust the carb by ear, but if you want to be exact and install it to spec, you’ll need some sort of tachometer during the adjustment process. I usually just adjust by ear, but I’ve had decades of experience.
Tools:
1/2 inch wrench
Small screwdriver
Brillo pads
Tachometer
Stud puller or nuts
Loc-tite
Prepare for the Installation
If you’re installing a new carburetor on a new engine, this step will consist of making sure no debris has fallen into the intake and that you have all the parts and pieces together where they can be gotten to easily.
If you’re replacing a carburetor, or re-installing a rebuilt one, you might need to use a Brill-o pad to clean the mounting plate on the intake manifold of any old gasket debris. If so, be sure to work from the inside out, brushing the debris onto the manifold and not into it. I usually use a low pressure air blower and position it over the intake opening where it will blow outward across the mounting plate so the debris won’t fall into the intake.
When cleaning the mounting plate on the manifold, I use a stud puller to remove the carburetor studs, but you can use two nuts and lock them together. This gives you an unobstructed access to the mounting plate to clean it. I use a little light (Blue or red-low strength) Loc-Tite on the threads to make sure they don’t pull out, but this isn’t really necessary.

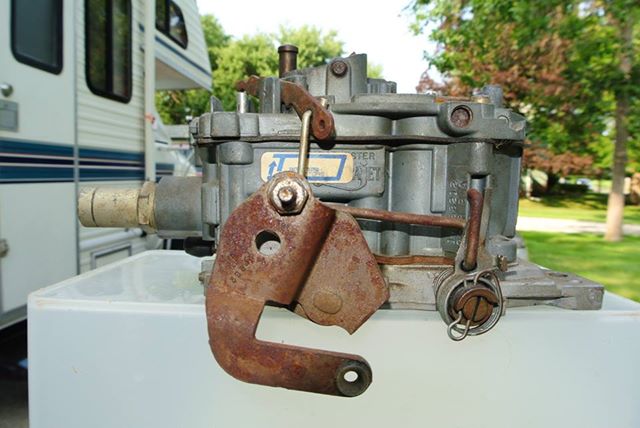
Mount the Carburetor
Place the carburetor spacer, if equipped with one, and the carburetor gasket over the carburetor studs. Align the carburetor so the throttle linkage is on the driver’s side of the engine and lower it over the studs. Each stud will get one lock washer, one flat washer, and a nut. If the fuel line from the pump to the carburetor is a ridged steel line, now is the best time to connect it, since a little wiggle room on the carb will help ensure you don’t strip the threads. Don’t use Teflon tape. The fuel can degrade it causing pieces of it to block orifices in the carburetor.
Tighten the nuts to approximately 15-20 foot-pounds or to where the lock washers have been flattened. Don’t over-tighten the nuts because the manifold and carburetor are made of aluminum and you don’t want the studs pulling out or the throttle body of the carb to be deformed. Once the carburetor is tightened down properly, you can tighten the fuel line.
Connect the Carburetor
During this step you will connect the throttle and kickdown (if you have an automatic transmission) linkages to the carburetor, vacuum lines, and the electric choke lead, if your car has one.
The electric choke is a plastic body on the passenger side of the carburetor and usually has a spade lug connector. However, if you’re like me, you’ve disabled this and installed a manual choke assembly. Insert the hardened wire on the choke cable into the brass fitting on the choke arm and tighten the retaining screw with the screwdriver.
Most carburetors have at least two vacuum lines. One of these is a larger (usually ¼ or 3/8 inch) line and attaches between the manifold and the throttle plate, usually at the back, although some carbs do have that nipple on the front.
The other vacuum line goes between ported vacuum on the carburetor (on the side of the carburetor in the metering plate) and the vacuum advance on the distributor. This will be a much smaller (usually 3/16 inch) vacuum line. If you have an older transmission, there might also be a vacuum modulator on the passenger side of the transmission that connects to ported vacuum on the carb. This controls transmission shift points.
You should now have two linkages and a spring to connect, throttle/accelerator and the transmission kickdown linkage and the throttle return spring. How these linkages connect to the carb will depend on what kind of carb and what kind of car you have. Some throttle cables simply have an eye opening that slips over a stud and is secured with a small cotter pin. Others are more like the manual choke cable where the ridged wire is fed through a hole in a brass fitting and then tightened down.
Kickdown cables are pretty standardized throughout the industry. At the end of the cable is a slide that allows the throttle to be opened without moving the cable until the throttle is opened a certain amount. This usually just slides over a nipple on the throttle arm on the side of the carb and secured with a cotter pin. The throttle return spring is slipped over the upper part of the throttle arm on the carb and attached to the spring post near the front of the engine.

Adjustments
If your carburetor has a manual choke, there are only two adjustments to be made: throttle position/engine speed, and air-fuel mixture. If you have an electric choke, you might also need to adjust it so that it works properly. Start with the idle mixture screws. These will either be on the side of the carb or at the front on or near the throttle plate. If you have a two barrel carb (but, really, who would?) there will only be one idle adjuster and four barrel carbs will have two. Easily and softly screw these all the way in and then back them out a quarter turn.
Prime the carb and start the engine. You may need to keep dribbling fuel into the carb until the float bowl is filled. With the engine running, adjust the throttle linkage, either to your liking or to spec. Either way, you’re shooting for an idle speed of about 700-800 RPM. If you’re going for spec, you may be looking for about 850 RPM in Park or Neutral.
Next, go back to the idle mixture screws and screw them in until the engine begins to stumble. Once the engine stumbles a bit (Cough, cough, splutter, rumble), back the screw off a quarter turn and leave it. Normally, the initial idle mixture setting given above is pretty darn close. If you want to be exact, you can use a three-gas analyzer or oxygen sensor to minutely adjust the idle mixture.
Adjusting the Transmission Kickdown

Adjusting the kickdown is a matter of preference. The kickdown cable shifts the transmission into overdrive, or passing gear when the throttle is hammered. I prefer for this to kick in a little sooner, while others want it to only happen at max wide open throttle (MWOT). You’ll need to get it out on the road in order to properly adjust it, however you prefer it. Just sitting in your garage or yard isn’t going to cut it.
Warm the engine up and get it out on the road and make like you’re passing people. Pay attention to how far you have to push the pedal to make it kick down into passing gear. If it takes too long to kick, adjust accordingly. If it kicks too early, ditto, adjust accordingly.
Unfortunately, I can’t tell you which way to adjust because I don’t know what you’re working on. One car may require you to move the kickdown forward, while another may require you to move it backward. Also, on some older cars, you may actually have to crawl under the car to make the adjustment on the side of the trans where the linkage connects to the kickdown arm. That’s what I had to do on my firstgen Charger with the 727 TorqueFlite.
Good luck and let us know how the install goes for you. Have tips on carb installs? Thoughts on carbs vs EFI? Leave them in the comments section!
——————————————————————————————————————————————————————–
So You Want to Be A Drag Racer: Buying, Building, Wrenching and Racing
The allure of the drag strip is easy to understand – a place where it takes less than 10 seconds to make a stand, prove your skill, speed, and nerve. But the road to the races can be intimidating. The Burnout wants to make that road a lot smoother for aspiring racers, whether it’s through building a new car, modding a used one, or taking that ride all the way up to the burnout box and beyond. This series is a work in progress, an ever expanding comprehensive guide to all the things that take drag racing from concept to reality.
Want to chat about this on social media? Use #RJDragRace on Facebook or Twitter
Leave a Reply